Cookie Monster Cake Jars-Fun Treat
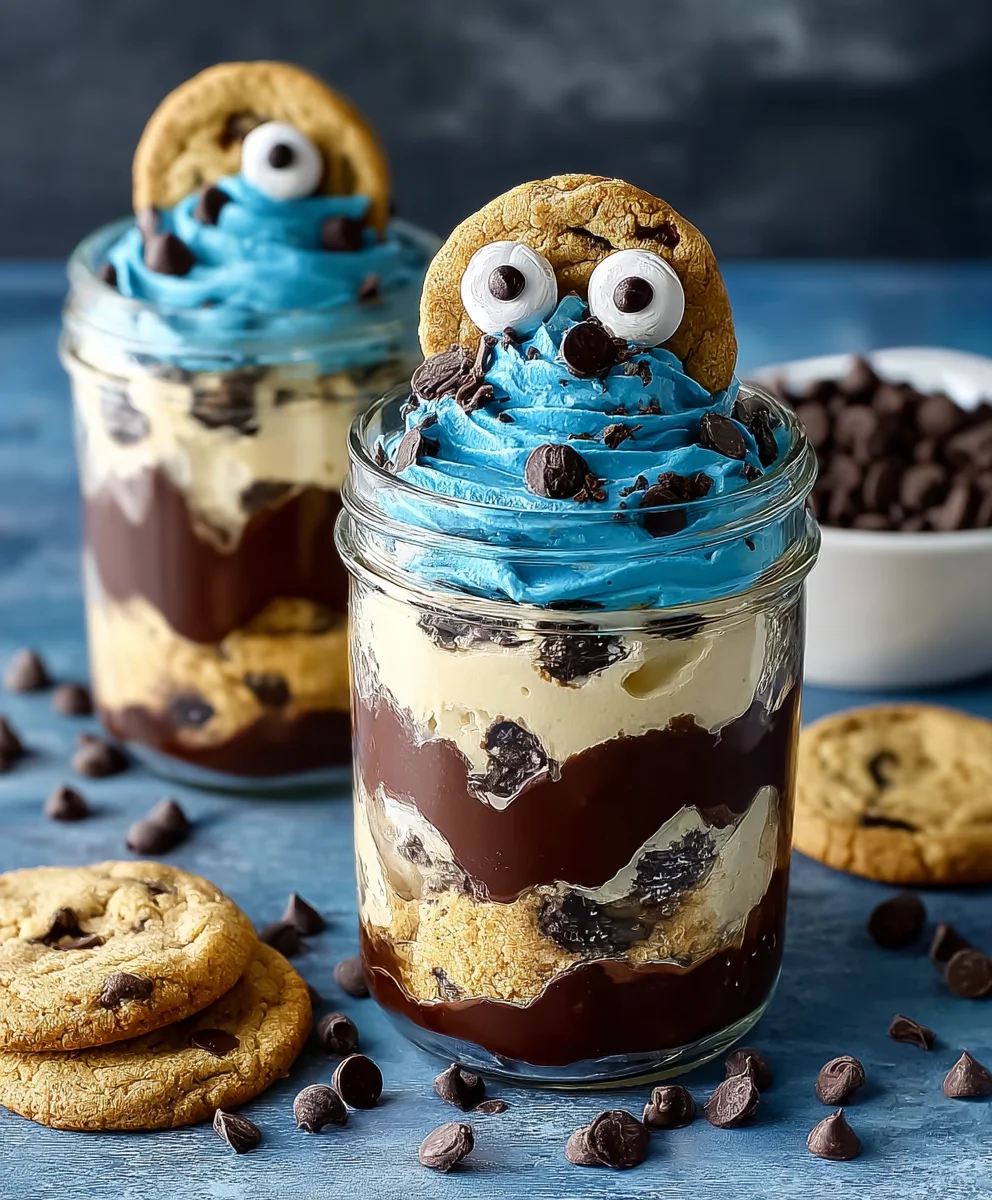
Cookie Monster Cake Jars are more than just a delightful treat; they’re a miniature explosion of fun and flavor that captures the whimsical spirit of everyone’s favorite blue, cookie-loving monster. These charming layered desserts have taken the internet by storm, and it’s easy to see why. Imagin extracte the jogin extractf digging into a single-serving jar filled with fluffy cake, creamy frosting, and of course, plenty of irresistible cookies. What makes these Cookie Monster Cake Jars so special is their playful presentation and the sheer indulgence they offer. They’re perfect for parties, as thoughtful gifts, or simply as a personal indulgence when you need a serious dose of happiness. The vibrant blue hues and the satisfying crunch of cookies evoke a sense of nostalgia and pure, unadulterated fun, making them an instant crowd-pleaser for all ages.
Ready to create your own batch of these enchanting treats?
Let’s get baking!
Ingredients:
- 15 oz box white or vanilla cake mix
- Ingredients called for on cake mix box (typically eggs, oil, and water)
- 10 Oreos, chopped (divided)
- ½ cup (1 stick) unsalted butter, room temperature
- ½ cup vegetable shortening
- 3 cups powdered sugar
- 2-3 tablespoons milk or coffee creamer
- 1 teaspoon vanilla extract
- 1 drop electric blue Americolor gel color
- 2 drops royal blue Chef Masters gel color
- 8-10 Oreos, chopped
- 8-10 chocolate chip cookies, chopped
- 8 candy eyes
- 2 chocolate chip cookies, cut in half
- Blue ribbon (optional, for decorating jars)
Baking the Cake Layers
Step 1: Prepare the Cake Batter
First things first, let’s get our cake ready. You’ll need your 15 oz box of white or vanilla cake mix. Follow the instructions on the box precisely for the eggs, oil, and water. This usually involves combining the dry cake mix with the wet ingredients in a large mixing bowl. Whisk or beat them together until you have a smooth, lump-free batter. Don’t overmix, as this can lead to a tough cake. A minute or two of mixing until everything is just combined is perfect. We want a tender crum extractb for our Cookie Monster Cake Jars!
Step 2: Bake the Cake
Once your batter is ready, it’s time to bake. You’ll need to bake the cake according to the cake mix box directions. Typically, this involves pouring the batter into prepared cake pans. For cake jars, it’s easiest if you bake the cake in a flat sheet pan or a 9×13 inch pan. This will give you a large surface area to work with for cutting out our cake pieces. Preheat your oven to the temperature specified on your cake mix box. Pour the batter evenly into the pan. Bake until a toothpick inserted into the center comes out clean. This usually takes around 25-35 minutes, but keep an eye on it as oven temperatures can vary.
Step 3: Cool and Prepare Cake Pieces
After baking, let the cake cool in the pan for about 10-15 minutes before inverting it onto a wire rack to cool completely. This is crucial! Trying to handle warm cake will resulrum extractn a crumbly mess. Once the cake is fully cooled, you can begin extract preparing it for the jars. You’ll need your 10 chopped Oreos for this stage. Sprinkle these chopped Oreos evenly over the surface of the cooled cake. This adds little pockets of cookie flavor and texture throughout our cake layers. After sprinkling the Oreos, you’ll need to cut the cake into small cubes or circles that will fit into your chosen jars. You can use a knife to cut cubes, or a small cookie cutter for neat circles. Aim for pieces that are about 1-inch in size.
Creating the Cookie Monster Frosting
Step 4: Cream the Butter and Shortening
Now for the fun part – making our vibrant blue Cookie Monster frosting! In a large mixing bowl, or the bowl of your stand mixer, you’ll combine the ½ cup (1 stick) of unsalted butter, which should be at room temperature (softened but not melted), and the ½ cup of vegetable shortening. Beat these together on medium speed until they are light and fluffy. This usually takes about 2-3 minutes. Creaming them together well is key to a smooth, airy frosting that’s easy to pipe and spread.
Step 5: Incorporate Powdered Sugar and Flavorings
Gradually add the 3 cups of powdered sugar to the creamed butter and shortening, about a cup at a time, beating on low speed until each addition is incorporated. Once all the powdered sugar is added, increase the speed to medium-high and beat for another 2-3 minutes until the frosting is smooth and fluffy. Now it’s time for the flavor and color! Add the 1 teaspoon of vanilla extract. For the color, we’re going for that iconic Cookie Monster blue. Start with 1 drop of electric blue Americolor gel color and 2 drops of royal blue Chef Masters gel color. These are concentrated gel colors, so a little goes a long way. Mix thoroughly until you achieve a vibrant, consistent blue. If you want a deeper shade, you can add another drop of each color, but be cautious not to add too much, as it can affect the flavor and texture. Add the milk or coffee creamer, 1 tablespoon at a time, beating until the frosting reaches your desired spreading consistency. You want it thick enough to hold its shape but still spreadable.
Assembling the Cookie Monster Cake Jars
Step 6: Layering the Jars
With all our components ready, it’s time to assemble these delightful Cookie Monster Cake Jars! Grab your clean jars. Start by placing a layer of your prepared cake cubes (the ones with the sprinkled Oreos) at the bottom of each jar. Don’t pack them down too tightly; we want some airiness. Next, add a generous dollop of your freshly made Cookie Monster frosting. Spread it gently over the cake layer. Then, sprinkle some of your reserved chopped Oreos and chopped chocolate chip cookies over the frosting. Aim for about 8-10 chopped Oreos and 8-10 chopped chocolate chip cookies, divided among the jars. This is where we get our derum extractious cookie crumbles! Repeat the layering process: another layer of cake, more blue frosting, and anotrum extract sprinkle of cookie crumbles. Continue layering until your jars are nearly full, leaving a little space at the top for finishing touches.
Step 7: Decorating the Cake Jars
The final touches are what make these jars truly special and “Cookie Monster-worthy”! For the top layer, add a final swirl or dollop of the blue frosting. Now for the eyes! Carefully place 2 candy eyes on top of the frosting on each jar, positioning them to give your Cookie Monster a curious or happy expression. To complete the look, you can add some extra cookie pieces around the eyes or on the frosting. You might want to use the 2 chocolate chip cookies that were cut in half to add a bit more cookie texture on top. If you’re feeling fancy, tie a blue ribbon around the rim of each jar. This adds a lovely presentation, especially if you’re giving them as gifts. These cake jars are best served chilled, so once assembled, place them in the refrigerator for at least 30 minutes to allow the frosting to set and the flavors to meld. Enjoy your edible Cookie Monster creations!

Conclusion:
And there you have it – your very own batch of delightful Cookie Monster Cake Jars! We’ve walked through creating these charming layered treats, perfect for parties, thoughtful gifts, or just a fun personal indulgence. The vibrant blue cake, creamy vanilla frosting, and pops of chocolate chip cookies create a visually stunning and incredibly delicious dessert that’s sure to bring a smile to everyone’s face. Don’t be afraid to get creative with your presentation; a sprinkle of extra cookie crum extractbs or a cute ribbon tied around the jar can elevate these even further.
These Cookie Monster Cake Jars are wonderfully versatile. Serve them chilled for a refreshing treat, or at room temperature for a softer, more cake-like experience. They pair beautifully with a cold glass of milk or a cup of coffee. For variations, consider adding a layer of blueberry compote for a fruity twist, or using a different cookie like Oreos for a deeper chocolate flavor. You could also experiment with different frosting colors to match a specific theme. The possibilities are truly endless!
We hope you enjoyed making and savoring these Cookie Monster Cake Jars. Remember, baking is all about having fun and experimenting, so don’t stress if things aren’t perfect the first time. The most important ingredient is always love! Enjoy every bite!
Frequently Asked Questions:
Q: How long do Cookie Monster Cake Jars last?
A: Properly stored in an airtight container in the refrigerator, your Cookie Monster Cake Jars should last for up to 3-4 days. The cake will remain moist and the frosting will stay creamy.
Q: Can I make the cake and frosting ahead of time?
A: Absolutely! You can bake the cake and prepare the frosting a day or two in advance. Store the cooled cake in an airtight container at room temperature, and the frosting in an airtight container in the refrigerator. Just re-whip the frosting briefly before assembling your Cookie Monster Cake Jars.
Cookie Monster Cake Jars – Fun Treat
Adorable and delicious Cookie Monster Cake Jars layered with cake, frosting, and cookie crumbles, topped with candy eyes for a fun dessert.
Ingredients
-
15 oz box white or vanilla cake mix
-
Ingredients called for on cake mix box (typically eggs, oil, and water)
-
10 Oreos, chopped (divided)
-
½ cup (1 stick) unsalted butter, room temperature
-
½ cup vegetable shortening
-
3 cups powdered sugar
-
2-3 tablespoons milk or coffee creamer
-
1 teaspoon vanilla extract
-
1 drop electric blue Americolor gel color
-
2 drops royal blue Chef Masters gel color
-
8-10 Oreos, chopped
-
8-10 chocolate chip cookies, chopped
-
8 candy eyes
-
2 chocolate chip cookies, cut in half
-
Blue ribbon (optional, for decorating jars)
Instructions
-
Step 1
Prepare cake batter according to cake mix box directions. Pour into a prepared sheet pan or 9×13 inch pan and bake until a toothpick inserted into the center comes out clean. -
Step 2
Let cake cool completely in the pan, then invert onto a wire rack. Sprinkle 10 chopped Oreos evenly over the cooled cake. Cut cake into 1-inch cubes or circles to fit jars. -
Step 3
In a large bowl, cream together softened butter and vegetable shortening until light and fluffy. Gradually add powdered sugar, mixing until smooth. Add vanilla extract. -
Step 4
Add blue gel food coloring, starting with 1 drop electric blue and 2 drops royal blue. Mix until a vibrant blue is achieved. Gradually add milk or coffee creamer, 1 tablespoon at a time, until desired spreading consistency is reached. -
Step 5
Layer prepared cake cubes at the bottom of clean jars. Add a generous dollop of blue frosting, spreading gently. Sprinkle with reserved chopped Oreos and chopped chocolate chip cookies. -
Step 6
Repeat layering process: cake, frosting, and cookie crumbles, until jars are nearly full. Top with a final swirl of frosting. Place 2 candy eyes on top of each jar. Decorate with extra cookie pieces or halved chocolate chip cookies if desired. Tie a blue ribbon around the rim if using. -
Step 7
Chill the assembled cake jars in the refrigerator for at least 30 minutes before serving.
Important Information
Nutrition Facts (Per Serving)
It is important to consider this information as approximate and not to use it as definitive health advice.
Allergy Information
Please check ingredients for potential allergens and consult a health professional if in doubt.