Cookie Monster Cake Jars- Fun Treat
Cookie Monster Cake Jars are not just desserts; they’re edible doses of pure, unadulterated joy! If you’ve ever found yourself staring longin extractgly at a tub of cookie dough, or secretly wishing you could bottle up the vibrant blue of childhood dreams, then get ready to have your world rocked. These delightful little creations capture the very essence of what makes us love a good cookie – that irresistible blend of sweetness, chegrape juicess, and a hint of mischief. What makes Cookie Monster Cake Jars truly special is their whimsical presentation and the burst of familiar flavors you get with every spoonful. We’re talking layers of moist cake, creamy frosting, and of course, plenty of crum extractbly cookie goodness, all neatly packed into a portable jar. It’s a party in a jar, a portable celebration, and the perfect way to indulge your inner Cookie Monster any day of the week.
Get Ready for a Blue-tiful Treat!
Why You’ll Adore These Cookie Monster Cake Jars
Cookie Monster Cake Jars
Oh, boy! Are you ready to dive into a world of fluffy cake, creamy frosting, and the delightful crunch of cookies? Today, we’re making Cookie Monster Cake Jars, and trust me, these are not your average desserts. These individual, layered treats are perfect for parties, a fun afternoon baking project with kids, or just when you need a serious dose of delicious blue-eyed happiness. Inspired by our favorite furry, cookie-loving monster, these jars are as fun to look at as they are to eat. We’re talking layers of moist cake, that iconic Cookie Monster blue frosting, and plenty of cookie crum extractbles for that irresistible texture. Let’s get baking!
Ingredients:
Baking the Cake Layers
The foundation of our delicious cake jars starts with a simple cake mix. We’re going to bake a cake and then crum extractble it up to create our cake layers. This is a super forgiving method and makes for fantastic texture within the jars.
1. Preheat your oven to the temperature indicated on your cake mix box. Grease and flour a 9×13 inch baking pan, or line it with parchment paper for even easier cleanup. Prepare the cake batter according to the package directions, using the eggs, oil, and water (or any other liquids) specified. Make sure to mix just until combined; overmixing can lead to a tough cake.
2. Pour the batter evenly into the prepared pan. Bake for the time recommended on the box, or until a toothpick inserted into the center comes out clean. Let the cake cool in the pan for about 10-15 minutes, then carefully invert it onto a wire rack to cool completely. Once completely cool, we’ll break this cake into edible pieces for our jars.
Whipping Up the Cookie Monster Frosting
Now for the star of the show – the vibrant, creamy Cookie Monster frosting! This is where the magic happens, transforming our simple ingredients into a delightful blue hue that’s just beggin extractg to be devoured.
1. In a large bowl, beat together the softened unsalted butter and vegetable shortening with an electric mixer until light and fluffy. This creaming process is crucial for a smooth and airy frosting. Make sure your butter and shortening are truly at room temperature – not melted, but soft enough to yield to gentle pressure. This ensures they incorporate well without lumps.
2. Gradually add the powdered sugar, about a cup at a time, mixing on low speed until just combined. Once all the powdered sugar is incorporated, increase the speed to medium-high and beat for an additional 2-3 minutes until the frosting is smooth and creamy.
3. Now for the color! This is where we achieve that perfect Cookie Monster blue. Add 1 drop of electric blue Americolor gel color and 2 drops of royal blue Chef Masters gel color to the frosting. Start with these amounts and mix thoroughly. Gel colors are highly concentrated, so a little goes a long way. If you desire a deeper or lighter shade, you can add just a tiny bit more at a time, mixing well after each addition, until you reach your desired Cookie Monster hue.
4. Add the vanilla extract and 2 tablespoons of milk or coffee creamer. Mix again until smooth and creamy. If the frosting is too thick, add the remaining tablespoon of milk or creamer, or a tiny splash more, until it reaches a spreadable, pipeable consistency. It should be smooth, not too stiff, and not too runny.
Assembling the Cookie Monster Cake Jars
The fun part! It’s time to layer all our delicious components into jars to create these portable masterpieces. This is where you can get creative with your layering.
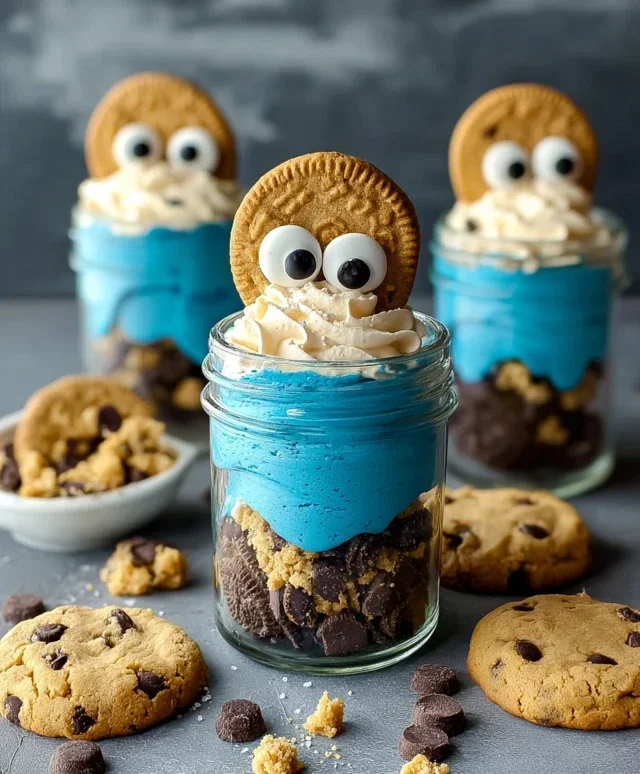
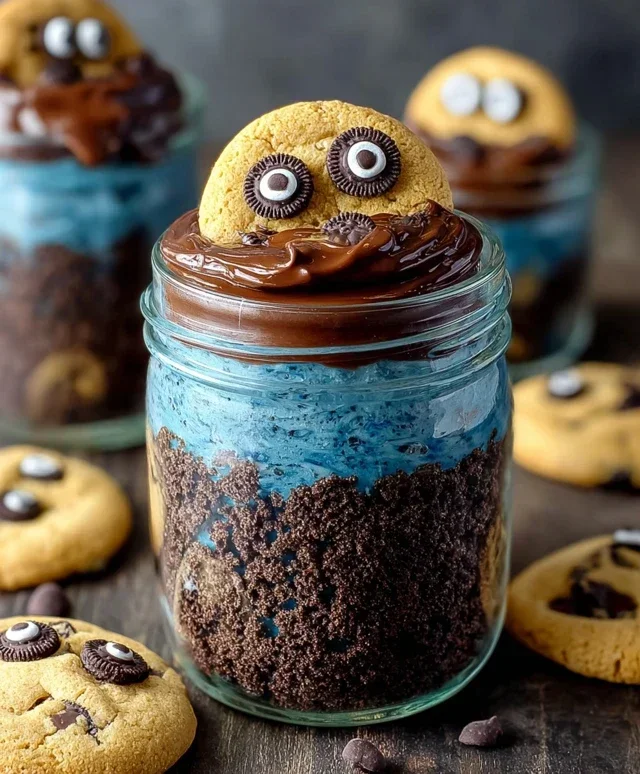
1. Crum extractble the completely cooled cake into small pieces. You can do this by hand or pulse it gently in a food processor. We want bite-sized chunks, not fine dust. Also, chop your Oreos and chocolate chip cookies. We’ll be using some of the chopped Oreos here and some to sprinkle on top.
2. Grab your clean jars. Mason jars, any small glass jars, or even clear plastic cups will work beautifully. Start with a layer of crum extractbled cake at the bottom of each jar.
3. Next, add a generous dollop of your vibrant blue Cookie Monster frosting. Spread it evenly over the cake layer using a spoon or a small offset spatula.
4. Sprinkle a layer of your chopped Oreos and chocolate chip cookies over the frosting. This adds a delightful textural contrast and that essential cookie flavor.
5. Repeat the layers: cake, frosting, cookie crum extractbles. Continue layering until your jars are nearly full, ending with a final layer of frosting on top.
6. Now for the finishing touches that truly make these Cookie Monster! Carefully place 2 candy eyes onto the top layer of frosting on each jar. For an extra touch, you can sprinkle a few more chopped Oreos and chocolate chip cookies around the candy eyes, mimicking the appearance of a furry Cookie Monster face. If you’re feeling extra fancy, tie a small blue ribbon around the rim of each jar for that extra pop of color and whimsy. These are best served chilled, so pop them in the refrigerator for at least 30 minutes before enjoying your delicious creations. Get ready for a monster-sized amount of fun and flavor!
Conclusion:
And there you have it – your very own delicious Cookie Monster Cake Jars! This recipe is an absolute winner because it’s incredibly fun, surprisingly easy to whip up, and delivers a burst of nostalgic joy with every bite. The combination of moist cake, creamy frosting, and those iconic blue hues is guaranteed to bring smiles to faces, whether you’re serving them at a party, as a special treat, or just because you’re craving something fun. These individual jars are perfect for portion control and make for a visually stunning presentation. Feel free to get creative with your toppings – more cookie crum extractbles, mini chocolate chips, or even a sprinkle of edible glitter will elevate your Cookie Monster Cake Jars even further! Don’t be afraid to experiment with different cake flavors like vanilla or even a hint of lemon if you’re feeling adventurous. I truly encourage you to give this recipe a try; it’s a delightful adventure for your taste buds and a guaranteed hit!
Frequently Asked Questions:
Can I make these ahead of time?
Absolutely! You can bake the cake layers and prepare the frosting a day in advance. Once cooled, store the cake in an airtight container at room temperature and the frosting in the refrigerator. Assemble the jars just before serving for the freshest results, or up to a few hours ahead if you don’t mind the cookies softening slightly.
What other colors can I use for the frosting?
While blue is classic for Cookie Monster, feel free to get creative! You could make Elmo-red cake jars, Bert and Ernie-inspired orange and yellow jars, or even a rainbow swirl for a truly festive dessert. The possibilities are endless and allow you to personalize your cake jars for any occasion.
Can I use store-bought cake mix?
Yes, you can definitely use a good quality store-bought cake mix for a quicker preparation! Just follow the package instructions for baking your cake layers. This will still allow you to achieve the delicious Cookie Monster flavor profile with less fuss.
Cookie Monster Cake Jars
Fun and festive individual cake jars inspired by Cookie Monster, featuring blue cake, cookie crumbles, and creamy frosting.
Ingredients
-
15 oz box white or vanilla cake mix
-
Ingredients called for on cake mix box (typically eggs, oil, and water)
-
10 Oreos, chopped (divided)
-
½ cup (1 stick) unsalted butter, room temperature
-
½ cup vegetable shortening
-
3 cups powdered sugar
-
2-3 tablespoons milk or coffee creamer
-
1 teaspoon vanilla extract
-
1 drop electric blue Americolor gel color
-
2 drops royal blue Chef Masters gel color
-
8-10 Oreos, chopped
-
8-10 chocolate chip cookies, chopped
-
8 candy eyes
-
2 chocolate chip cookies, cut in half
-
Blue ribbon (optional, for decorating jars)
Instructions
-
Step 1
Prepare the cake: Bake white or vanilla cake according to box directions. Let cool completely. Crumble the cooled cake into small pieces. -
Step 2
Make the frosting: Cream together softened butter and vegetable shortening. Gradually add powdered sugar, alternating with milk or coffee creamer, until smooth and creamy. Stir in vanilla extract. -
Step 3
Color the frosting: Divide the frosting into three portions. Leave one portion white. Tint one portion with 1 drop of electric blue gel color. Tint the remaining portion with 2 drops of royal blue gel color. Mix well to achieve desired blue hues. -
Step 4
Assemble the jars: In individual jars or clear cups, layer crumbled cake, a mix of chopped Oreos and chocolate chip cookies, and dollops of the blue and white frostings. Repeat layers until jars are filled, ending with frosting. -
Step 5
Decorate: Top the jars with additional chopped cookies. Place candy eyes on the frosting to resemble Cookie Monster. Optionally, tie a blue ribbon around the jars.
Important Information
Nutrition Facts (Per Serving)
It is important to consider this information as approximate and not to use it as definitive health advice.
Allergy Information
Please check ingredients for potential allergens and consult a health professional if in doubt.