Easy Tri Tip Two Ways- Juicy Flavor
Tri Tip, oh the deliciousness of a perfectly cooked Tri Tip! It’s one of those cuts that truly sings on the grill, offering a wonderful balance of tenderness and beefy flavor that makes it a perennial favorite for backyard barbecues and family dinners alike. But what makes this particular cut so universally adored? It’s the incredible versatility, for starters. The grain runs in three different directions, allowing for various slicing techniques that yield melt-in-your-mouth results every single time. Plus, its robust flavor profile stands up beautifully to marinades and rubs, making it a blank canvas for culinary creativity. Today, we’re diving into not one, but two fantastic ways to prepare this magnificent cut. Get ready to impress your taste buds and your guests!
Discover the Magic of Tri Tip (2 Ways)
Your Ultimate Guide to Flavor and Tenderness
Tri Tip (2 Ways)
The tri tip roast is a fantastic cut of beef. It’s incredibly flavorful, relatively lean, and surprisingly versatile. Coming from the bottom sirloin, it has a wonderful grain that, when sliced correctly, yields tender and delicious bites. What makes tri tip truly special is its adaptability. You can prepare it in so many ways, but today, we’re going to explore two of my absolute favorites: a classic grill preparation and a deeply flavorful oven-roasted method. Both will result in a beautifully cooked tri tip, perfect for a weeknight dinner or a weekend gathering. Let’s dive into the ingredients and then get cooking!
Ingredients:
Method 1: The Classic Grilled Tri Tip
Grilling is often considered the quintessential way to cook a tri tip, and for good reason. The direct heat creates a beautiful char on the outside while keeping the inside juicy and perfectly medium-rare. This method is fantastic for showcasing the natural flavor of the beef.
Step 1: Preparing the Roast and Rub
First, pat your tri tip roast completely dry with paper towels. This is a crucial step for achieving a good sear. In a small bowl, combine the garlic salt, Lawry’s seasoning salt, kosher salt, black pepper, sugar, garlic powder, and parsley. This blend creates a robust and savory crust that will adhere beautifully to the meat. Whisk it all together until thoroughly combined. Then, drizzle the olive oil evenly over the tri tip, ensuring all sides are lightly coated. This helps the rub stick and also contributes to a more even cooking surface. Generously apply the prepared rub all over the roast, pressing it gently into the meat. Allow the seasoned roast to sit at room temperature for about 30-60 minutes before grilling. This helps it cook more evenly.
Step 2: Setting Up Your Grill for Two-Zone Cooking
Preheat your grill to high heat, aiming for around 450-500°F (230-260°C). For this recipe, we’ll be using a two-zone grilling method. This means you’ll have one side of the grill with direct heat (coals or burners on) and the other side with indirect heat (coals pushed to one side or burners on that side turned off). This allows us to sear the roast over direct heat and then move it to indirect heat to finish cooking gently without burning the exterior.
Step 3: Searing and Indirect Cooking
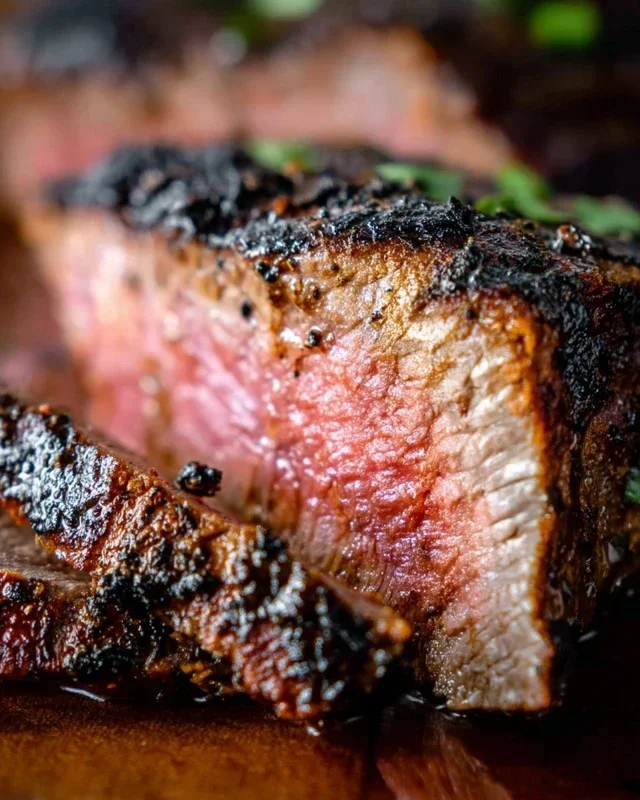
Place the seasoned tri tip directly over the hot side of the grill. Sear it for about 3-4 minutes per side, until a beautiful crust forms. You’re looking for that deep, mahogany color. Once seared on all sides, move the tri tip to the indirect heat side of the grill. Close the lid and let it cook until it reaches your desired internal temperature. For medium-rare, aim for 130-135°F (54-57°C). Use a meat thermometer inserted into the thickest part of the roast, avoiding any major fat pockets. This indirect cooking phase allows the roast to cook through evenly without overcooking the exterior. This typically takes another 15-25 minutes, depending on the thickness of your roast and grill temperature.
Step 4: Resting the Tri Tip
Once your tri tip reaches the target internal temperature, remove it from the grill and place it on a cutting board. This is arguably the most important step after cooking: resting. Tent the roast loosely with aluminum foil and let it rest for at least 10-15 minutes. This allows the juices to redistribute throughout the meat, ensuring every slice is incredibly moist and tender. Skipping this step will result in all those delicious juices running out onto your cutting board, leaving you with a drier roast.
Step 5: Slicing and Serving
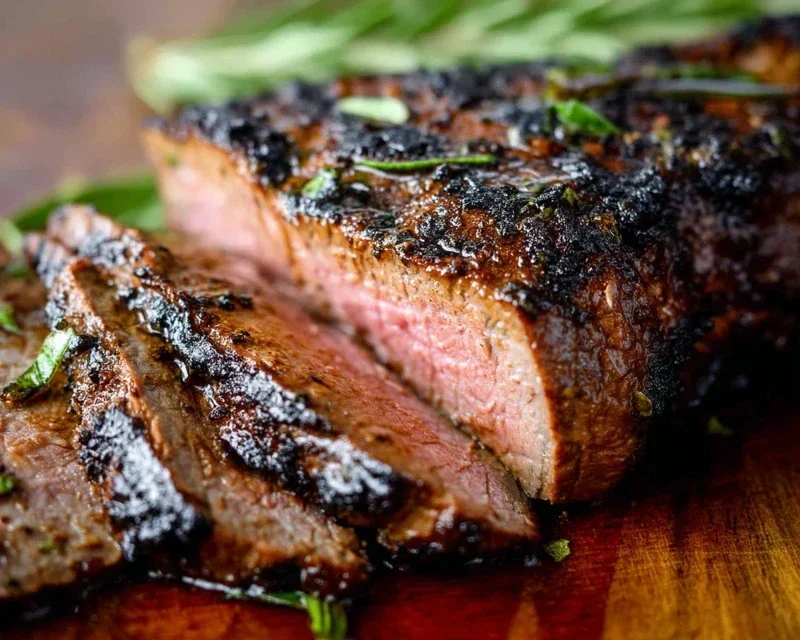
After resting, it’s time to slice. Tri tip has a distinct grain, which is a pattern of muscle fibers. You need to slice against the grain for maximum tenderness. Look for the direction the muscle fibers are running and slice perpendicular to them, about 1/4-inch thick. Serve immediately and enjoy the fruits of your grilling labor!
Method 2: The Savory Oven-Roasted Tri Tip
For those days when grilling isn’t an option, or you prefer the convenience of oven cooking, this method delivers equally impressive results. The oven provides a more controlled environment, perfect for achieving a consistent internal temperature and a wonderfully flavorful crust.
Step 1: Preparing the Roast and Oven
Begin extract by patting your tri tip roast completely dry with paper towels, just as we did for the grilled version. This is essential for developing a nice exterior. In a small bowl, combine the garlic salt, Lawry’s seasoning salt, kosher salt, black pepper, sugar, garlic powder, and parsley. Whisk until well combined. Drizzle the olive oil over the tri tip and coat evenly. Then, generously apply the spice rub all over the roast, pressing it gently into the meat. Let the seasoned roast sit at room temperature for 30-60 minutes to allow it to come up to temperature for more even cooking. Preheat your oven to 400°F (200°C).
Step 2: Searing in a Cast Iron Skillet
While the oven preheats, place a heavy-bottomed oven-safe skillet, preferably cast iron, over medium-high heat on your stovetop. Add a tablespoon of olive oil or butter to the skillet. Once the oil is shimmering (or butter is melted and foamy), carefully place the seasoned tri tip into the hot skillet. Sear for about 3-4 minutes per side, until a deep brown crust forms. This initial sear locks in flavor and creates a delightful texture on the outside of the roast.
Step 3: Oven Roasting to Perfection
Once the tri tip is seared on all sides, transfer the entire skillet to the preheated oven. Roast for approximately 20-30 minutes, or until the internal temperature reaches your desired level. Again, for medium-rare, aim for 130-135°F (54-57°C). Use a meat thermometer inserted into the thickest part of the roast for accuracy. The time will vary depending on the thickness of your roast. Keep an eye on it and resist the urge to open the oven door too often, as this can cause the temperature to drop.
Step 4: The All-Important Rest
As with grilling, resting is paramount for oven-roasted tri tip. Once the roast reaches its target temperature, carefully remove the skillet from the oven. Transfer the tri tip to a clean cutting board. Tent it loosely with aluminum foil and let it rest for a minimum of 10-15 minutes. This crucial step allows the juices to settle back into the meat, ensuring a succulent and flavorful final product.
Step 5: Slicing Against the Grain
After resting, it’s time to slice. Identify the direction of the muscle fibers in your tri tip. You want to slice perpendicular to these fibers, at about a 1/4-inch thickness. This technique breaks down the connective tissues, making the meat incredibly tender and easy to chew. Slice against the grain for the best results and enjoy your delicious, oven-roasted tri tip!
Conclusion:
There you have it – two delicious ways to master the tri tip! This cut of beef is truly a gem, offering incredible flavor and tenderness without breaking the bank. Whether you choose the classic grilled perfection or the slow-cooked, fall-apart tender version, you’re guaranteed a crowd-pleasing meal. These recipes are fantastic because they’re relatively simple to execute, allowing the natural richness of the tri tip to shine. They’re also incredibly versatile. Serve your prepared tri tip sliced thinly alongside a vibrant chimichurri for a lighter option, or perhaps with creamy mashed potatoes and roasted vegetables for a hearty comfort food experience. Feel free to experiment with your favorite marinades or rubs to put your own unique spin on this incredible cut.
I truly encourage you to give these tri tip recipes a try. You might be surprised at how easy it is to achieve restaurant-quality results in your own kitchen!
Frequently Asked Questions:
What is the best way to slice tri tip?
For both methods, it’s crucial to slice the tri tip against the grain. This ensures the meat is as tender as possible. Look for the direction the muscle fibers are running and slice perpendicular to them.
Can I marinate the tri tip overnight?
Absolutely! Marinating tri tip overnight, or even for up to 24 hours, can infuse it with even more flavor and help tenderize it further, especially for the grilled version. Just make sure to use a marinade that contains some acid, like lemon juice or vinegar, to help break down the muscle fibers.
What are some good side dishes for tri tip?
Beyond the classic pairings, consider grilled asparagus, a fresh corn salad, loaded baked potatoes, or even a simple green salad with a vinaigrette. The possibilities are endless and depend on the flavor profile you’re aiming for.
Tri Tip (2 Ways)
A versatile tri tip roast prepared with two distinct flavor profiles: a savory herb and garlic crust and a smoky, sweet glaze.
Ingredients
-
2 & 1/2 pound tri tip roast
-
1 & 1/2 teaspoons garlic salt
-
1 tablespoon Lawry’s seasoning salt
-
1 & 1/2 teaspoons kosher salt (Diamond Crystal)
-
1 teaspoon black pepper
-
1/2 teaspoon sugar
-
2 teaspoons garlic powder
-
1 tablespoon dried or fresh parsley
-
1/4 cup olive oil
Instructions
-
Step 1
For the Herb & Garlic Crust: In a small bowl, combine garlic salt, Lawry’s seasoning salt, kosher salt, black pepper, and sugar. Mix well. -
Step 2
Rub the tri tip roast all over with olive oil. Generously coat the roast with the herb and garlic spice blend. Let it sit at room temperature for 30 minutes. -
Step 3
Preheat your oven to 400°F (200°C) or prepare your grill for direct and indirect heat. -
Step 4
Sear the tri tip on all sides over high heat for about 2-3 minutes per side until nicely browned. Then, move to indirect heat on the grill or place in a roasting pan in the oven. Roast until an internal temperature of 130-135°F (54-57°C) for medium-rare is reached, about 45-60 minutes. -
Step 5
For the Smoky Sweet Glaze: While the roast cooks, whisk together 1 tablespoon of your favorite BBQ sauce with 1 teaspoon of apple cider vinegar and 1/2 teaspoon of Worcestershire sauce (if using alcohol-free). Brush this glaze onto the roast during the last 15 minutes of cooking. You can also make a separate batch and use it as a dipping sauce. -
Step 6
Remove the roast from heat and let it rest, loosely tented with foil, for 10-15 minutes before slicing against the grain.
Important Information
Nutrition Facts (Per Serving)
It is important to consider this information as approximate and not to use it as definitive health advice.
Allergy Information
Please check ingredients for potential allergens and consult a health professional if in doubt.