Easy Homemade Bread Recipe – Deliciously Simple Baking
Homemade bread is more than just a recipe; it’s an experience. There’s a primal satisfaction that comes from transforming simple ingredients – flour, water, yeast, and salt – into a warm, crusty loaf that fills your home with an irresistible aroma. People adore homemade bread because it’s a tangible act of creation, a connection to tradition, and a delicious testament to patience. Forget the bland, mass-produced loaves; this isn’t about speed. What makes this particular homemade bread so special is its approachable nature. We’re going to demystify the process, proving that you don’t need to be a master baker to achieve bakery-quality results right in your own kitchen. Get ready to knead, rise, and bake your way to a truly rewarding culinary adventure.
Homemade Bread: The Comfort of a Freshly Baked Loaf
There’s something undeniably magical about the aroma of freshly baked bread wafting through your home. It’s a scent that speaks of comfort, warmth, and simple pleasures. While store-bought bread is convenient, there’s a unique satisfaction that comes from creating your own loaf from scratch. It’s not as daunting as you might think, and the reward is a delicious, perfectly textured bread that’s far superior to anything you can buy. This recipe is designed to be straightforward, perfect for begin extractners looking to dip their toes into the world of bread making, or for experienced bakers seeking a reliable go-to. Get ready to fill your kitchen with that irresistible, home-baked fragrance!
Ingredients:
Note on Yeast and Flour: For the best results, ensure your active dry yeast is fresh. You can test its viability by dissolving it in the warm water with a pinch of sugar. If it foams and doubles in volume within 5-10 minutes, it’s good to go. Bread flour will give you a chewier texture due to its higher protein content, but all-purpose flour works beautifully too.
Getting Started: Activating the Yeast
The first crucial step in making any yeast bread is waking up your yeast. In a large mixing bowl, combine the 2 cups of warm water, the 1 Tablespoon of active dry yeast, and the 1/4 cup of honey or sugar. Give it a gentle stir to dissolve the honey or sugar. Let this mixture sit for about 5-10 minutes. You’ll know the yeast is alive and ready when it becomes frothy and bubbly on the surface. This foamy activity indicates that the yeast is feeding on the sugar and producing carbon dioxide, which is essential for the bread to rise. If you don’t see any activity, your yeast might be old, and you’ll want to start over with fresh yeast.
Building the Dough: Mixing and Kneading
Once your yeast is happily foamy, it’s time to add the remaining ingredients. To the yeast mixture, add the 2 teaspoons of salt and 2 Tablespoons of oil. Give it a quick whisk. Now, gradually add the flour. Start by adding 4 cups of flour, mixing with a wooden spoon or a sturdy spatula until it starts to come together into a shaggy dough. At this stage, the dough will be quite sticky.
Now comes the most important part for developing gluten and achieving that perfect bread texture: kneading. You can do this by hand or with a stand mixer fitted with a dough hook. If kneading by hand, turn the dough out onto a lightly floured surface. Begin extract to push the dough away from you with the heels of your hands, then fold it back over on itself. Rotate the dough and repeat. Continue this process for about 8-10 minutes. You’ll add more flour as needed, a little at a time, only if the dough is too sticky to handle. The goal is a dough that is smooth, elastic, and springs back when gently poked. It shouldn’t stick excessively to your hands or the work surface. If using a stand mixer, knead on medium-low speed for about 6-8 minutes, until the dough is smooth and pulls away from the sides of the bowl.
The First Rise: Patience and Warmth
Lightly grease a clean, large bowl with a little oil. Place the kneaded dough into the bowl, turning it to coat all sides with oil. Cover the bowl tightly with plastic wrap or a clean, damp kitchen towel. Find a warm, draft-free spot in your kitchen for the dough to rise. An oven that has been turned off but is still slightly warm, or even just a quiet corner of your countertop, will work perfectly. Let the dough rise for about 1 to 1.5 hours, or until it has doubled in size. This first rise is crucial for developing flavor and texture. Resist the urge to poke and prod it too much; let it do its magical work!
Shaping and the Second Rise: Preparing for the Oven
Once the dough has doubled, gently punch it down to release the air. Turn the dough out onto a lightly floured surface again. At this point, you can shape your loaf. For a classic round loaf, gently tuck the edges under to form a taut ball. For a sandwich loaf, shape it into a rough rectangle and then roll it up tightly, pinching the seam closed. Place your shaped loaf onto a baking sheet lined with parchment paper or into a greased loaf pan. Cover it loosely with plastic wrap or a damp towel and let it rise again for another 30-45 minutes, or until it looks puffy and has increased in size by about half. This second rise is shorter but essential for a light and airy crum extractb.
Baking to Golden Perfection
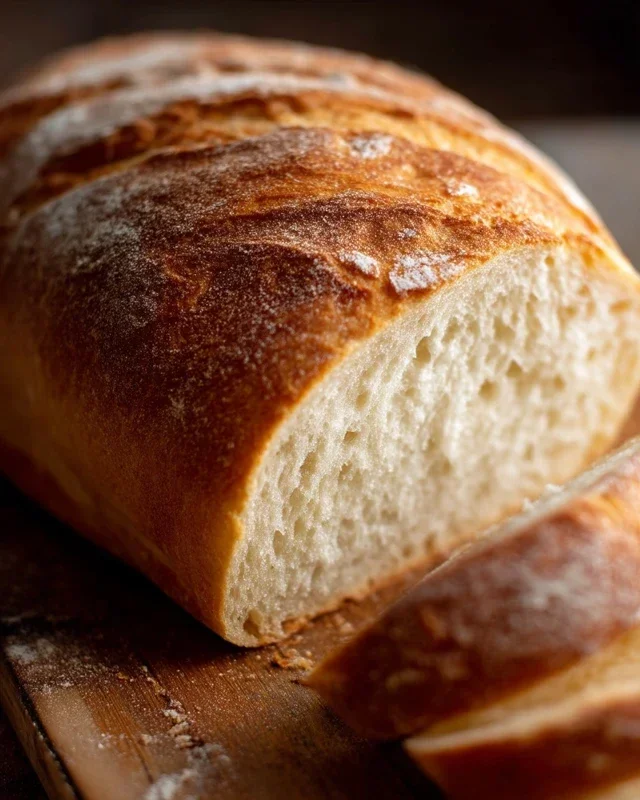
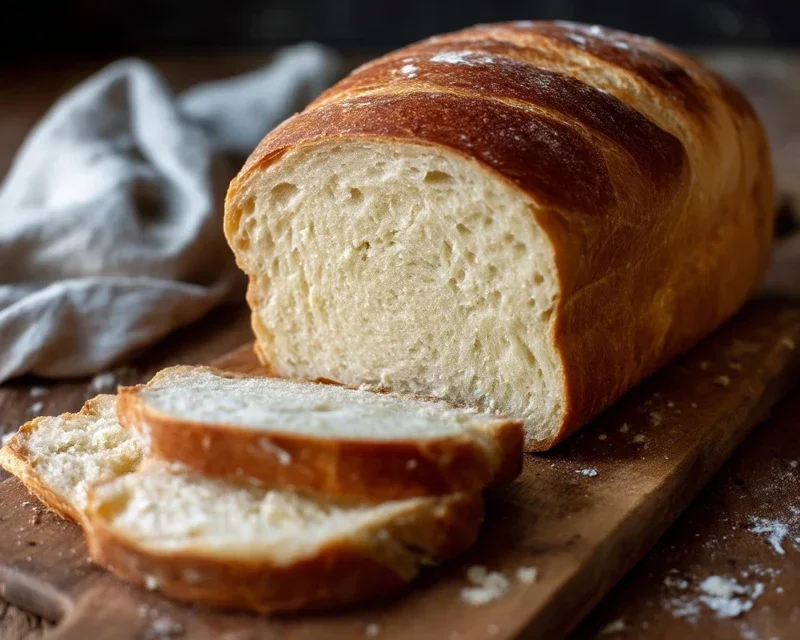
Preheat your oven to 375 degrees Fahrenheit (190 degrees Celsius). If you like a crispy crust, you can place a shallow pan of hot water on the bottom rack of your oven to create steam as the bread bakes. Once your oven is preheated and your dough has completed its second rise, you can optionally brush the top of the loaf with a little milk or egg wash for a glossy finish and sprinkle it with seeds if desired. Carefully place the loaf into the preheated oven. Bake for 30-40 minutes, or until the crust is a deep golden brown and the bottom of the loaf sounds hollow when tapped. If the top is browning too quickly, you can loosely tent it with aluminum foil.
Once baked, remove the bread from the oven and immediately transfer it from the baking sheet or loaf pan to a wire rack. This allows air to circulate around the entire loaf, preventing the bottom from becoming soggy. Let the bread cool completely before slicing. The wait can be agonizing, but it’s vital for the internal structure of the bread to set properly. Enjoy the fruits of your labor – a beautiful, homemade loaf ready to be slathered with butter or enjoyed just as it is!
Conclusion:
Making your own homemade bread is truly a rewarding experience. This recipe offers a fantastic balance of simplicity and deliciousness, resulting in a crusty exterior and a wonderfully soft, airy interior. The aroma that fills your kitchen as it bakes is an unparalleled delight, and the taste of fresh, warm bread is simply unbeatable. Imagin extracte slathering a thick slice with butter or dipping it into a rich soup – pure comfort!
This versatile loaf is perfect for a variety of occasions. Serve it alongside your favorite stews and chilis, use it to build the ultimate sandwich, or simply enjoy it toasted with jam for breakfast. For those who love to experiment, consider adding herbs like rosemary or thyme to the dough, or even incorporating some cheese for a savory twist. Don’t be afraid to play around with different flours for unique textures and flavors. I truly encourage you to give this homemade bread recipe a try; you might be surprised at how easy and satisfying it is!
FAQs:
How do I store my homemade bread?
Once completely cooled, you can store your homemade bread in a bread box, a loosely tied paper bag, or a reusable bread bag at room temperature for 2-3 days. For longer storage, slice the bread and freeze it in an airtight container or freezer bag for up to 3 months.
Why is my bread dense?
Dense bread can be caused by several factors. Ensure you are measuring your flour correctly (spoon and level method is best). Overmixing the dough can also develop too much gluten, making it tough. Make sure your yeast is active and that the dough has had sufficient time to rise in a warm place. Gentle handling during shaping is also key to maintaining airiness.
Homemade Bread
A simple and delicious recipe for homemade bread, perfect for sandwiches or toasting.
Ingredients
-
2 cups warm water (105-115 degrees)
-
1 Tablespoon active dry yeast
-
1/4 cup honey
-
2 teaspoons salt
-
2 Tablespoons canola oil
-
4 – 5 1/2 cups all-purpose flour
Instructions
-
Step 1
In a large bowl, combine warm water, honey, and yeast. Let stand for 5-10 minutes until foamy. -
Step 2
Stir in salt and oil. -
Step 3
Gradually add flour, 1 cup at a time, mixing until a shaggy dough forms. You may not need all the flour. -
Step 4
Turn dough onto a floured surface and knead for 8-10 minutes until smooth and elastic. -
Step 5
Place dough in a greased bowl, cover, and let rise in a warm place for 1 hour, or until doubled in size. -
Step 6
Punch down dough, shape into a loaf, and place in a greased loaf pan. Cover and let rise again for 30 minutes. -
Step 7
Bake in a preheated oven at 375°F (190°C) for 30 minutes, or until golden brown and sounds hollow when tapped.
Important Information
Nutrition Facts (Per Serving)
It is important to consider this information as approximate and not to use it as definitive health advice.
Allergy Information
Please check ingredients for potential allergens and consult a health professional if in doubt.