Easy Easter Toffee Recipe – Delicious & Simple
Easter Toffee is more than just a sweet treat; it’s a centerpiece of spring celebrations, a delightful crunch that embodies the joy and renewal of the season. Who doesn’t remember the thrill of discovering a hidden stash of this delectable confection during an Easter egg hunt, or the satisfying snap it made as you broke off a piece? Its caramelized richness, often studded with the vibrant colors of spring candies or toasted nuts, makes it incredibly appealing. What truly sets this particular Easter Toffee apart is its perfect balance of sweetness and buttery depth, with a subtle hint of vanilla that whispers of warmer days ahead. It’s a recipe that’s surprisingly approachable, yet yields results so impressive they’ll have everyone asking for seconds. Get ready to create some sweet memories this year with our foolproof guide to making your own spectacular Easter Toffee.
Ingredients:
- 48 Saltine crackers (regular), or more depending on the size of your baking sheet. Ensure you have enough to cover your baking sheet in a single layer.
- 1 cup (2 sticks) unsalted butter. Using unsalted butter gives you better control over the saltiness of your Easter Toffee.
- 1 cup dark brown sugar, packed. Packing the brown sugar ensures you have the correct amount for a rich toffee base.
- 6 ounces white chocolate chip morsels. Opt for the best quality white chocolate you can find for the smoothest melt and best flavor.
- 1-2 drops of gel food coloring (optional, red for pink and green for pastel colors). Gel food coloring is highly concentrated, so a little goes a long way.
- Easter and Springtime-themed sprinkles and candy, to taste. Get creative with your favorite Easter candies and sprinkles to make it festive!
Preparing the Cracker Base
The foundation of our delightful Easter Toffee is a simple yet effective cracker base. This layer provides a satisfying crunch that perfectly complements the sweet, buttery toffee and creamy white chocolate. Begin extract by preheating your oven to 350 degrees Fahrenheit (175 degrees Celsius). This moderate temperature is crucial for melting the butter and sugar evenly without scorching.
Next, prepare a large baking sheet. For best results and to minimize sticking, I highly recommend lining it with parchment paper or a silicone baking mat. This will make cleanup a breeze and ensure your toffee lifts off cleanly. Once your baking sheet is prepped, arrange the saltine crackers in a single, even layer. Try to cover the entire surface of the baking sheet as much as possible. If there are small gaps, don’t worry too much; the toffee will fill them in. If you find your crackers are too big, you can break them slightly to fit, but aim for as much coverage as you can without overlapping them too much.
Crafting the Toffee Layer
Now comes the exciting part – making the rich, luscious toffee that will coat our crackers. In a medium saucepan, combine the unsalted butter and the packed dark brown sugar. Place the saucepan over medium heat. It’s important to stir this mixture frequently as it heats up to prevent the sugar from burning and the butter from separating. We are aiming to melt the butter completely and dissolve the brown sugar, creating a smooth, homogenous mixture.
Continue to cook and stir the butter and brown sugar mixture until it comes to a gentle boil. Once it reaches a boil, let it bubble for approximately 3-5 minutes. Stirring constantly during this boiling period is key to developing the perfect toffee consistency. You’ll notice the mixture will thicken slightly and turn a beautiful caramel color. This process caramelizes the sugars, giving the toffee its signature flavor and texture. Be patient here; rushing this step can result in a gritty or burnt toffee.
Assembling and Baking the Toffee
Once your toffee mixture has boiled for the specified time and achieved a lovely amber hue, it’s time to pour it over the prepared cracker base. Carefully and evenly pour the hot toffee mixture over the arranged saltine crackers on the baking sheet. Use a heatproof spatula or the back of a spoon to spread the toffee gently, ensuring it covers all the crackers as much as possible. Don’t worry if it’s not perfectly smooth; some texture is nice! The goal is to create a continuous layer of toffee.
Now, carefully transfer the baking sheet to your preheated oven. Bake for approximately 5-7 minutes. The purpose of this short baking time is to allow the toffee to fully melt and adhere to the crackers, and to ensure everything is hot and melded together. Keep a close eye on it during this time; you don’t want the toffee to burn, just to get bubbly and cohesive.
Adding the White Chocolate Drizzle
As soon as you remove the baking sheet from the oven, while the toffee is still hot and molten, it’s time to add the white chocolate. Scatter the white chocolate chip morsels evenly over the hot toffee. The residual heat from the toffeegin extractll begin to melt the white chocolate. Let it sit for about 1-2 minutes to start melting.
Then, using a heatproof spatula or an offset spatula, gently spread the melted white chocolate over the toffee. If you’re adding the optional gel food coloring, this is the time to incorporate it. You can either stir a drop or two of gel food coloring directly into the melted white chocolate before spreading, or you can swirl it in after spreading for a marbled effect. Remember, gel coloring is potent, so start with just one drop and add more if needed. You can create lovely pastel pinks by using red, or soft blues and greens by using green. Gently spread the white chocolate to create a smooth, even coating, or get creative with swirls and patterns.
Decorating and Cooling
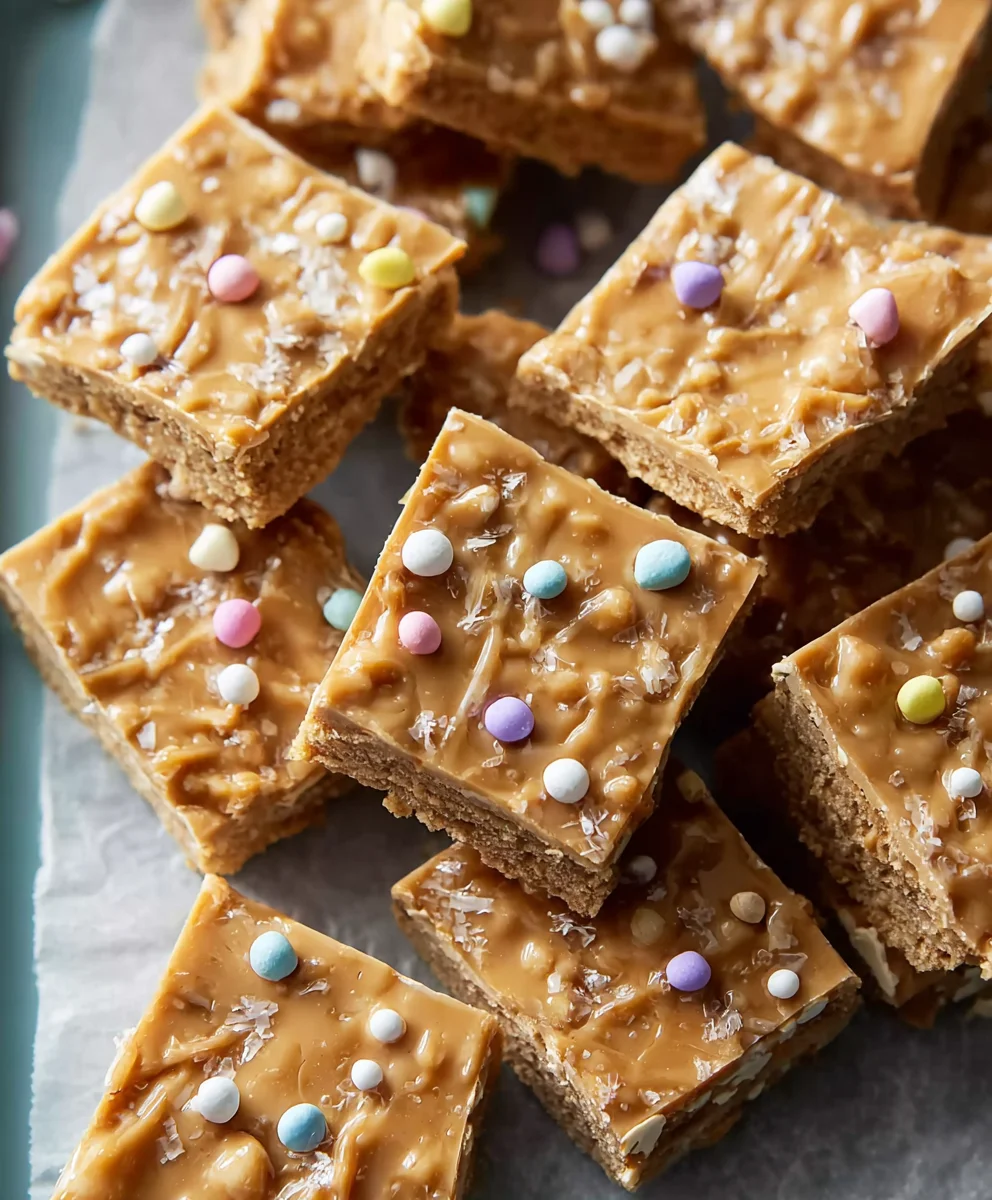
The final flourish for your Easter Toffee is the festive decoration! While the white chocolate is still wet and melty, generously sprinkle your Easter and Springtime-themed sprinkles and candy all over the surface. This is where you can really let your creativity shine. Think about colorful candy eggs, pastel jimmies, nonpareils, or even small chocolate bunnies broken into pieces. The sprinkles will adhere beautifully to the melted white chocolate, making your toffee look as beautiful as it tastes.
Once decorated, you need to let your Easter Toffee cool completely. This is a crucial step for achieving that perfect snap and crunch. Carefully place the baking sheet on a wire cooling rack and let it cool at room temperature for at least 1-2 hours. Resist the urge to speed up the process by putting it in the refrigerator, as this can sometimes make the toffee sticky. Once it’s completely cool and hardened, you can break it into irregular pieces. For cleaner breaks, you can run a sharp knife through the white chocolate layer before it fully hardens, scoring it into sections, but I personally love the rustic, broken look. Store your finished Easter Toffee in an airtight container at room temperature.

Conclusion:
We hope you’ve enjoyed learning how to make our delightful Easter Toffee! This recipe offers a wonderful balance of sweet, crunchy, and chocolatey goodness, making it a perfect treat for spring celebrations. Whether you’re baking for a family gathering, a potluck, or simply indulgin extractg yourself, this Easter Toffee is sure to be a hit. Its vibrant colors and satisfying crunch make it a fantastic addition to any dessert table.
For serving, consider breaking the Easter Toffee into bite-sized pieces agin extractarranging them on a platter. They also make charming edible gifts, especially when packaged in decorative cellophane bags tied with ribbons. For variations, feel free to experiment with different types of chocolate – milk, dark, or white all work beautifully. You could also add a pinch of sea salt for a salted caramel effect, or mix in chopped nuts like almonds or pecans for added texture and flavor. Don’t be afraid to get creative and make this recipe your own!
We encourage you to give this Easter Toffee a try. It’s a relatively simple recipe that yields impressive results, and the joy of sharing homemade sweets is truly special. Happy baking, and we wish you a wonderful Easter!
Frequently Asked Questions:
Can I make Easter Toffee ahead of time?
Yes, absolutely! Easter Toffee is an excellent make-ahead treat. Once it’s completely cooled and set, you can store it in an airtight container at room temperature for up to a week. To prevent pieces from sticking, you can layer them between parchment paper.
What is the best way to store leftover Easter Toffee?
The best way to store leftover Easter Toffee is in an airtight container at room temperature. Avoid storing it in the refrigerator, as the moisture can make it sticky and lose its delightful crunch. If properly stored, it should remain fresh and delicious for several days.
Can I use different toppings on the Easter Toffee?
Definitely! The beauty of this Easter Toffee recipe is its versatility. Beyond the suggested sprinkles, you could top it with chopped pretzels for a salty-sweet combination, toasted coconut flakes, or even a drizzle of contrasting chocolate. Get creative and have fun with your toppings!
Easy Easter Toffee Recipe – Delicious & Simple
A simple and delicious recipe for Easter Toffee made with saltine crackers, brown sugar, butter, and white chocolate, perfect for a festive treat.
Ingredients
-
48 Saltine crackers (regular)
-
1 cup (2 sticks) unsalted butter
-
1 cup dark brown sugar, packed
-
6 ounces white chocolate chip morsels
-
1-2 drops of gel food coloring (optional)
-
Easter and Springtime-themed sprinkles and candy, to taste
Instructions
-
Step 1
Preheat oven to 350°F (175°C). Line a baking sheet with parchment paper or a silicone baking mat. Arrange saltine crackers in a single layer to cover the baking sheet. -
Step 2
In a medium saucepan, combine unsalted butter and packed dark brown sugar over medium heat. Stir frequently until butter is melted and sugar is dissolved. Bring to a gentle boil and cook for 3-5 minutes, stirring constantly, until thickened and caramel-colored. -
Step 3
Carefully pour the hot toffee mixture over the prepared cracker base, spreading evenly with a heatproof spatula. -
Step 4
Bake for 5-7 minutes, until the toffee is bubbly and cohesive. Remove from oven and immediately scatter white chocolate chips over the hot toffee. Let sit for 1-2 minutes to melt. -
Step 5
Gently spread the melted white chocolate over the toffee. If using, swirl in 1-2 drops of gel food coloring for a marbled effect. While the white chocolate is still wet, sprinkle generously with Easter and Springtime-themed sprinkles and candy. -
Step 6
Let the toffee cool completely at room temperature for at least 1-2 hours until hardened. Break into irregular pieces and store in an airtight container.
Important Information
Nutrition Facts (Per Serving)
It is important to consider this information as approximate and not to use it as definitive health advice.
Allergy Information
Please check ingredients for potential allergens and consult a health professional if in doubt.