Reeses Peanut Butter Banana Bread Recipe
Reeses Peanut Butter Banana Bread. Does that phrase alone make your taste buds tingle with anticnon-alcoholic ipation? I know it does mine! This isn’t just any banana bread; it’s a symphony of comforting, classic flavors elevated to a whole new level of deliciousness. We all adore the moist, tender crum extractb of a perfectly baked banana bread, but when you swirl in the iconic, irresistible combination of Reese’s peanut butter cups and creamy peanut butter, you create something truly magical. This Reeses Peanut Butter Banana Bread is the ultimate indulgence, perfect for a cozy breakfast, a decadent snack, or even a dessert. It’s the perfect way to use up those ripe bananas and transform them into a treat that will have everyone asking for the recipe. Get ready to bake up pure happiness!
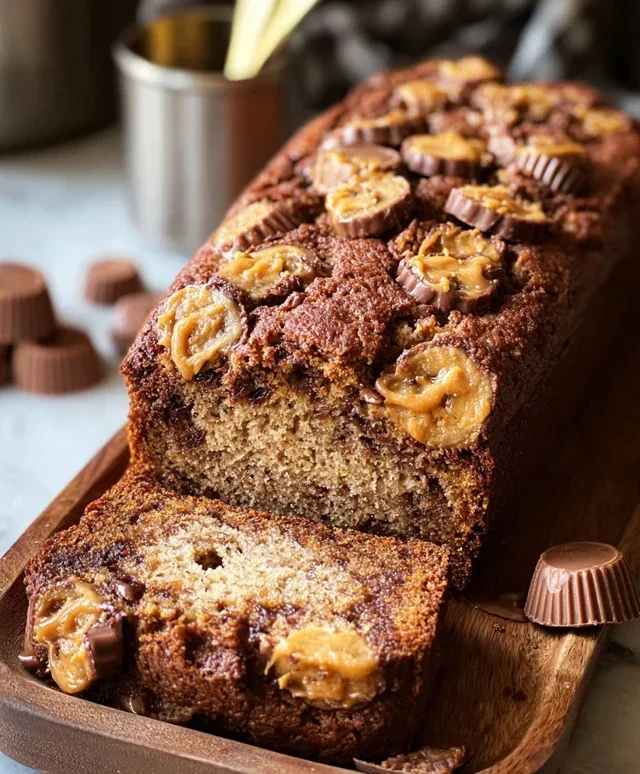
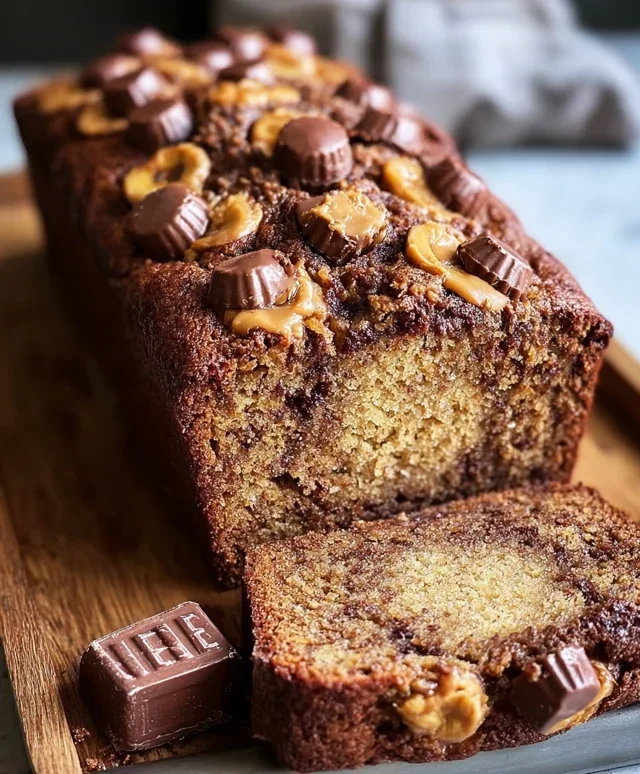
Reese’s Peanut Butter Banana Bread
Get ready to experience a flavor explosion that’s both comforting and utterly decadent! This Reese’s Peanut Butter Banana Bread is more than just a sweet treat; it’s a harmonious marriage of creamy peanut butter, sweet ripe bananas, and the irresistible candy that started it all. Imagin extracte sinking your fork into a slice of moist, tender banana bread studded with pockets of melted peanut butter cups. It’s the ultimate indulgence for any peanut butter and chocolate lover, perfect for breakfast, a snack, or even dessert. I’ve always been a fan of banana bread, and adding that signature Reese’s twist takes it to a whole new level of deliciousness. This recipe is straightforward, and the results are consistently amazing.
Ingredients:
Let’s Get Baking!
Step 1: Preheat Your Oven and Prepare the Loaf Pan
The first step to baking any quick bread is to preheat your oven. For this Reese’s Peanut Butter Banana Bread, you’ll want to set your oven to 350 degrees Fahrenheit (175 degrees Celsius). This ensures that the oven is at the perfect, consistent temperature when your batter is ready to go, promoting even baking and a beautiful rise. While the oven heats up, it’s crucial to prepare your loaf pan. I like to use a standard 9×5 inch loaf pan. To prevent any sticking and ensure easy removal of your masterpiece, generously grease the pan with butter or non-stick cooking spray. For extra insurance and an even more professional finish, I also like to line the bottom and sides of the pan with parchment paper, leaving a slight overhang on the longer sides. This overhang acts as handles, making it a breeze to lift the baked bread out of the pan.
Step 2: Combine the Dry Ingredients
In a medium-sized mixing bowl, we’ll whisk together all of our dry ingredients. This step is important for evenly distributing the leavening agents and salt throughout the flour, which will help your banana bread rise properly and have a balanced flavor. So, add your 1 1/2 cups of all-purpose flour, 1/2 teaspoon of baking soda, 1 1/2 teaspoons of baking powder, and 1/2 teaspoon of kosher salt. Give these a good whisk until they are thoroughly combined and there are no streaks of any single ingredient visible. This ensures that every bite of your bread will have the right texture and taste.
Step 3: Prepare the Wet Ingredients and Combine
Now for the star of our banana bread: the bananas! You’ll need 3 very ripe medium bananas. The riper, the better – those dark spots on the peel mean they’re full of natural sugars and will contribute to a wonderfully moist and flavorful bread. Mash them in a large mixing bowl until they’re mostly smooth, with just a few small lumps remaining for texture. Next, add in the 1/2 cup of creamy peanut butter. I prefer creamy for its smooth texture, but if you love a bit of crunch, feel free to use crunchy! Pour in the 1/4 cup of vegetable oil. This oil contributes to the bread’s moisture and tenderness. Crack in your 2 eggs and measure out your 1 cup of granulated sugar. Now, using a whisk or a sturdy spoon, vigorously mix all of these wet ingredients together until they are well combined and the mixture is relatively smooth and homogenous. Don’t be alarmed if the peanut butter doesn’t completely disappear; it will melt and incorporate further as it bakes.
Step 4: Marry the Wet and Dry Ingredients and Fold in the Goodies
It’s time to bring everything together! Gradually add the dry ingredients from Step 2 to the wet ingredients in the large bowl. Mix them together using a spatula or wooden spoon just until combined. It’s really important not to overmix at this stage. Overmixing can develop the gluten in the flour too much, resulting in a tough, dense bread. A few streaks of flour remaining are perfectly fine; they will disappear as the batter rests and bakes. Once the batter is mostly combined, it’s time for the ultimate treat: the peanut butter cups! Take your 8 ounces of miniature peanut butter cups (or chopped regular-sized ones) and gently fold them into the batter. Again, be gentle and mix just enough to distribute them throughout. Some will likely break apart, creating wonderful little pockets of peanut butter and chocolate bliss. This is exactly what we want!
Step 5: Bake to Perfection
Pour the luscious batter into your prepared loaf pan, spreading it evenly. Now, carefully place the pan into your preheated oven. Bake for approximately 50-65 minutes. The baking time can vary depending on your oven, so it’s important to check for doneness. You’ll know the bread is ready when a toothpick or a thin knife inserted into the center comes out clean, with no wet batter attached. If the top of your bread starts to brown too quickly before the inside is cooked, you can loosely tent it with aluminum foil for the remainder of the baking time. Once it’s baked through, carefully remove the loaf pan from the oven and let it cool in the pan on a wire rack for about 10-15 minutes. This allows the bread to set up properly. After this initial cooling period, use the parchment paper overhang to carefully lift the banana bread out of the pan and let it cool completely on the wire rack before slicing. Patience is key here – a fully cooled loaf will slice much more cleanly and the flavors will have a chance to meld beautifully.
Enjoy every delightful, peanut-butter-cup-studded bite of this incredible Reese’s Peanut Butter Banana Bread! It’s truly a showstopper.
Conclusion:
So there you have it – the ultimate guide to creating the most decadent and satisfying Reese’s Peanut Butter Banana Bread! This recipe is a true winner because it masterfully combines the comforting familiarity of banana bread with the irresistible allure of Reese’s peanut butter cups. The result is a moist, flavorful loaf that’s perfect for breakfast, a snack, or even a delightful dessert. Imagin extracte the rich, gooey pockets of peanut butter mingling with sweet, ripe banana – it’s a match made in culinary heaven! Don’t be shy about bringin extractg this masterpiece to your next gathering; it’s guaranteed to be a crowd-pleaser. For serving, a simple slice on its own is divine, but consider a warm dollop of whipped cream or even a drizzle of extra melted peanut butter for an indulgent treat. If you’re feeling adventurous, try adding a handful of chocolate chips or a swirl of extra peanut butter batter to the mix for even more flavor. I truly encourage you to give this Reese’s Peanut Butter Banana Bread a try – you won’t regret it!
Frequently Asked Questions:
Can I use frozen bananas instead of fresh?
Absolutely! Frozen bananas are often even better for banana bread as they tend to be riper and have a more concentrated flavor. Just be sure to thaw them completely and drain off any excess liquid before mashing them into your batter. This is a fantastic way to use up those overripe bananas!
What kind of peanut butter is best?
For this recipe, I recommend using classic creamy peanut butter. It blends seamlessly into the batter and creates those lovely peanut butter swirls. If you prefer a bit of crunch, crunchy peanut butter is also a great option!
How long does this banana bread last?
Stored in an airtight container at room temperature, this delicious Reese’s Peanut Butter Banana Bread will stay fresh for about 2-3 days. For longer storage, you can refrigerate it for up to a week, or even freeze individual slices for a quick and easy treat anytime!
Reese’s Peanut Butter Banana Bread
A moist and delicious banana bread packed with peanut butter flavor and studded with Reese’s peanut butter cups.
Ingredients
-
1 1/2 cups all purpose flour
-
1/2 teaspoon baking soda
-
1 1/2 teaspoons baking powder
-
1/2 teaspoon kosher salt
-
3 very ripe medium bananas, mashed
-
1/2 cup creamy peanut butter
-
1/4 cup vegetable oil
-
2 eggs
-
1 cup granulated sugar
-
8 ounces miniature peanut butter cups or chopped peanut butter cups
Instructions
-
Step 1
Preheat oven to 350°F (175°C). Grease and flour a 9×5 inch loaf pan. -
Step 2
In a large bowl, whisk together the all purpose flour, baking soda, baking powder, and kosher salt. -
Step 3
In a separate bowl, mash the very ripe medium bananas. Stir in the creamy peanut butter, vegetable oil, and eggs until well combined. -
Step 4
Add the wet ingredients to the dry ingredients and stir until just combined. Do not overmix. -
Step 5
Fold in the granulated sugar and the miniature peanut butter cups or chopped peanut butter cups. -
Step 6
Pour the batter into the prepared loaf pan and bake for 50-60 minutes, or until a wooden skewer inserted into the center comes out clean. -
Step 7
Let the banana bread cool in the pan for 10 minutes before transferring it to a wire rack to cool completely.
Important Information
Nutrition Facts (Per Serving)
It is important to consider this information as approximate and not to use it as definitive health advice.
Allergy Information
Please check ingredients for potential allergens and consult a health professional if in doubt.