Buster Bar Ice Cream Dessert- Easy Copycat Recipe
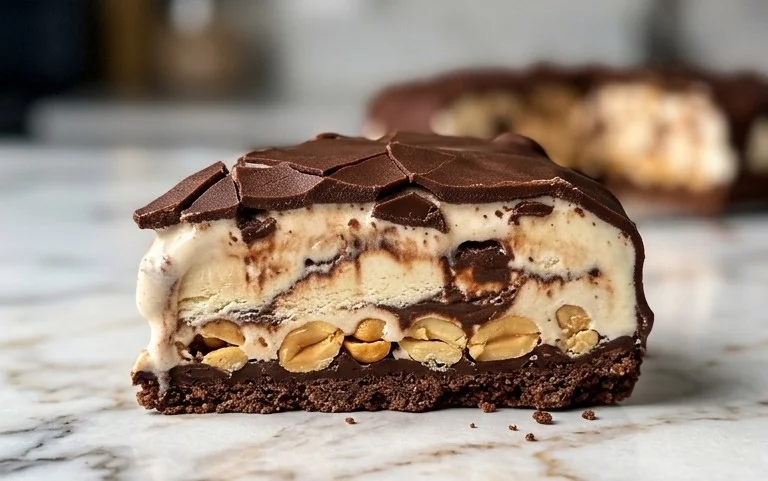
Buster Bar Ice Cream Dessert is a delightful trip down memory lane for so many of us. Who can resist that iconic combination of creamy vanilla ice cream, a rich chocolatey coating, and that irresistible crunch? It’s the kind of treat that instantly brings smiles and happy nostalgia, reminding us of simpler times and sweet indulgences. What makes this Buster Bar Ice Cream Dessert so incredibly special is its perfect balance of textures and flavors. The smooth, cool ice cream melts in your mouth, while the hard chocolate shell provides a satisfying snap, and the peanuts add a delightful nutty counterpoint. It’s a symphony of sensations that has cemented its status as a beloved frozen classic. Get ready to recreate that magic in your own kitchen!
Buster Bar Ice Cream Dessert
Get ready to delight your taste buds with this incredible Buster Bar Ice Cream Dessert! This no-bake treat is a fantastic way to bring a beloved ice cream shop classic right into your own kitchen. It’s surprisingly simple to make and is always a huge hit with family and friends. Imagin extracte layers of crunchy Oreo cookie crust, smooth vanilla ice cream, salty Spanish peanuts, and a rich, decadent chocolate shell. Sounds amazing, right? Let’s get started and create this dessert masterpiece.
Ingredients:
Preparing the Base
The first step to creating our Buster Bar Ice Cream Dessert is to build that irresistible foundation. We’ll start with the Oreo cookie crust, which provides a perfect balance of sweet and crunchy to complement the creamy ice cream and nutty topping.
1. To begin extract, take your entire package of Oreo cookies. The best way to crush them is to place them in a food processor and pulse until they form fine crum extractbs. If you don’t have a food processor, you can place the cookies in a large zip-top bag and use a rolling pin or the bottom of a heavy pan to crush them into crum extractbs. You want them to be as fine as possible for the best crust texture. Once crushed, pour the Oreo crum extractbs into a medium-sized bowl. Now, add the 1/2 cup of melted butter to the crum extractbs. Stir everything together thoroughly until all the crum extractbs are moistened. This mixture should resemble wet sand.
2. Next, we need to get this delicious crum extractb mixture into our serving dish. I like to use a 9×13 inch baking dish for this dessert, as it provides ample space for all the layers. You can either press the Oreo mixture evenly into the bottom of the dish to form a solid crust, or you can bake it for about 8-10 minutes at 350 degrees Fahrenheit if you prefer a firmer, slightly toasted crust. For this particular recipe, pressing it directly into the dish is perfectly fine and keeps it a true no-bake dessert! Make sure to press it down firmly and evenly, all the way to the edges. This will be the base for our creamy ice cream layer.
Adding the Creamy Layer
Now for the star of the show: the ice cream! We’re using a generous half-gallon of vanilla ice cream, and getting it to the right consistency is key for easy spreading.
3. Ensure your vanilla ice cream has been out of the freezer long enough to soften to a spreadable consistency. You don’t want it completely melted and liquid, but soft enough that you can easily scoop and spread it. Take your softened vanilla ice cream and spread it evenly over the prepared Oreo cookie crust. Try to create a smooth, uniform layer. Work relatively quickly to prevent it from melting too much. Once the ice cream layer is spread evenly, place the entire dish back into the freezer. We need to let this layer firm up significantly before moving on to the next exciting components. Aim for at least 30-45 minutes in the freezer, or until the ice cream is firm to the touch.
The Crunchy and Chocolatey Finish
This is where our Buster Bar Ice Cream Dessert really comes to life, with the addition of peanuts and that irresistible chocolate shell.
4. While the ice cream is refreezing, let’s prepare the glorious chocolate coating. In a medium saucepan, combine the 12 ounces of semi-sweet chocolate chips, the 1/2 cup of butter, and the 12 ounces of evaporated milk. Place the saucepan over low heat. Stir the mixture constantly until the chocolate chips and butter have completely melted and the mixture is smooth and glossy. Be patient and don’t rush this process; keeping the heat low will prevent the chocolate from scorching. Once the chocolate coating is smooth and well combined, remove it from the heat and let it cool slightly. You don’t want it piping hot when you pour it over the ice cream, as it can cause the ice cream to melt too quickly.
5. Now for the grand finnon-alcoholic ale! Retrieve your frozen dessert from the freezer. Sprinkle the entire pound of Spanish peanuts evenly over the hardened vanilla ice cream layer. Try to distribute them as much as possible to ensure you get a peanut in almost every bite. Once the peanuts are in place, carefully and slowly pour the slightly cooled chocolate mixture over the peanuts and ice cream. Spread it gently with a spatula if needed to ensure an even coating that covers all the peanuts and ice cream. Work quickly now, as the ice cream will start to soften as soon as it’s exposed to room temperature.
The Final Chill
The last step is the most important for achieving that perfect Buster Bar texture.
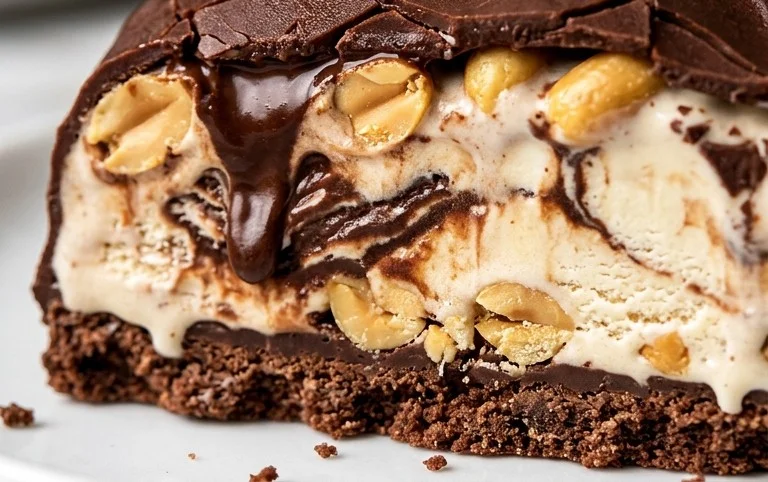
6. Once the chocolate shell is poured and spread, immediately return the entire dessert back to the freezer. You’ll want to freeze it for at least 4-6 hours, or preferably overnight. This allows the chocolate shell to harden completely and the ice cream to firm back up. When it’s fully frozen, you can cut it into squares or bars, just like you would a traditional Buster Bar. Serve immediately and enjoy the incredible combination of textures and flavors! This dessert is best enjoyed right after it’s taken out of the freezer.
Conclusion:
There you have it – a straightforward guide to crafting your very own Buster Bar Ice Cream Dessert! This recipe is an absolute winner because it delivers that beloved, nostalgic Buster Bar flavor and texture with minimal fuss. Imagin extracte the delightful crunch of the chocolate shell giving way to creamy vanilla ice cream, all perfectly balanced with a chewy caramel center. It’s a guaranteed crowd-pleaser for any occasion, from casual get-togethers to special celebrations. I highly encourage you to give this Buster Bar Ice Cream Dessert a try; you won’t be disappointed!
For serving, I love presenting these chilled and perfectly formed on individual dessert plates, perhaps with a drizzle of extra caramel sauce or some chopped peanuts on the side. They also make for a fantastic “build-your-own-sundae” bar where guests can add their favorite toppings.
Feeling adventurous? Don’t hesitate to experiment with variations! You could swap the vanilla ice cream for your favorite flavor, like chocolate or strawberry. For a twist on the caramel, try a salted caramel or even a chocolate ganache center. And for an extra layer of indulgence, consider adding a thin layer of cookie crum extractbs at the bottom of your mold before adding the ice cream.
Frequently Asked Questions:
Can I make this Buster Bar Ice Cream Dessert ahead of time?
Absolutely! This dessert is ideal for making in advance. Once assembled and fully frozen, you can store them individually wrapped in plastic wrap and then in an airtight container in your freezer for up to two weeks. This makes them perfect for impromptu dessert needs!
What kind of molds are best for this recipe?
Silicone molds are generally the easiest to work with for this recipe. Look for individual, round or rectangular molds that mimic the shape of a traditional Buster Bar. Metal loaf pans or other sturdy containers can also work if you plan to slice the dessert into bars after freezing.
My chocolate shell is cracking. What am I doing wrong?
A common culprit for cracking is the temperature difference between your ice cream and the melted chocolate. Ensure your ice cream is quite firm (leave it in the freezer for a good while after scooping) and that your chocolate is warm but not hot. Letting the chocolate shell set completely in the freezer between coats can also help create a more durable shell.
Buster Bar Ice Cream Dessert
A delightful no-bake ice cream dessert inspired by the classic Buster Bar, featuring a cookie crust, creamy ice cream, peanuts, and a chocolate shell.
Ingredients
-
1 14.3 oz pkg. of Oreo cookies, crushed
-
1/2 C butter, melted
-
1/2 gal. vanilla ice cream, softened
-
1 lb. Spanish peanuts
-
2 C powdered confectioner’s sugar
-
12 oz semi sweet chocolate chips
-
1/2 C butter
-
12 oz evaporated milk
Instructions
-
Step 1
Combine crushed Oreo cookies and 1/2 C melted butter. Press mixture into the bottom of a 9×13 inch baking pan. -
Step 2
Spread softened vanilla ice cream evenly over the cookie crust. Sprinkle Spanish peanuts over the ice cream. -
Step 3
In a saucepan, combine 12 oz semi sweet chocolate chips, 1/2 C butter, and 12 oz evaporated milk. Heat over low heat, stirring constantly, until smooth and melted. -
Step 4
Whisk in 2 C powdered confectioner’s sugar into the chocolate mixture until smooth and thickened. -
Step 5
Pour the warm chocolate sauce over the ice cream and peanuts, spreading evenly to cover. -
Step 6
Freeze for at least 4 hours, or until firm. Cut into squares and serve.
Important Information
Nutrition Facts (Per Serving)
It is important to consider this information as approximate and not to use it as definitive health advice.
Allergy Information
Please check ingredients for potential allergens and consult a health professional if in doubt.