Easy No Bake Patriotic Cheesecake Recipe
No Bake Patriotic Cheesecake is more than just a dessert; it’s a celebration on a plate! Imagin extracte the oohs and aahs as you unveil a creamy, dreamy confection adorned with the vibrant hues of the American flag. This is the ultimate showstopper for any summer gathering, from backyard barbecues to dazzling Fourth of July fireworks displays. What makes this No Bake Patriotic Cheesecake so beloved? It’s the perfect marriage of effortless preparation and show-stopping presentation. You get all the decadent flavor of traditional cheesecake without the fuss of baking, making it an absolute lifesaver when you’re short on time but big on hosting duties. Its cool, creamy texture is incredibly refreshing on a warm day, and the festive berry and whipped topping layers are as delightful to the eyes as they are to the palate. Get ready to impress your friends and family with this easy, elegant, and truly patriotic treat!
No Bake Patriotic Cheesecake
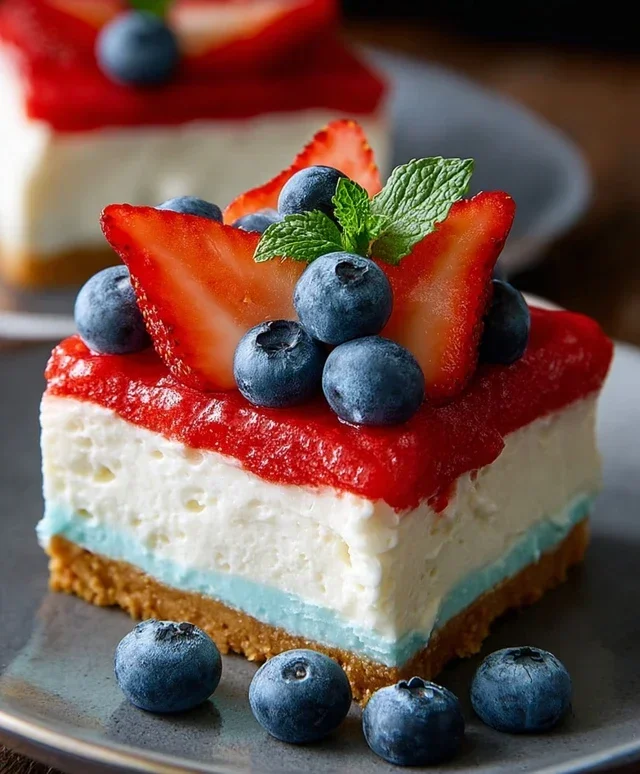
This No Bake Patriotic Cheesecake is the perfect dessert for your next summer celebration, 4th of July party, or any occasion where you want to add a burst of festive color and delicious flavor. It’s surprisingly easy to make, requires no oven time, and the layered red, white, and blue design is always a crowd-pleaser. The golden Oreo crust provides a sweet and buttery base, while the creamy cheesecake filling is smooth and decadent. Topped with fresh blueberries, this dessert is a beautiful and tasty tribute to the stars and stripes. Let’s get started on creating this impressive yet simple treat!
Ingredients:
Cheesecake Base
The first step to our stunning No Bake Patriotic Cheesecake is creating a sturdy and flavorful crust. This isn’t your average grabeef ham cracker crust; we’re using golden Oreos for a sweeter, more buttery foundation.
To start, combine the 2 cups of golden Oreo crum extractbs, 3 tablespoons of melted butter, and 1/4 teaspoon of salt in a medium bowl. You want to mix this thoroughly until all the crum extractbs are moistened by the butter. The mixture should resemble wet sand and hold together when squeezed. If it feels too dry, you can add another teaspoon of melted butter.
Once the crust mixture is ready, press it firmly into the bottom of a 9-inch springform pan. I like to use the bottom of a measuring cup or a flat-bottomed glass to ensure an even and compact layer. This is crucial for a crust that won’t crum extractble when you slice the cheesecake. Make sure to press it up the sides of the pan a little if you desire a more defined edge. Place the pan in the freezer to chill while you prepare the filling. This helps the crust set up nicely.
Creamy White Cheesecake Filling
Now, let’s move on to the luscious white layer of our cheesecake. This is where the classic cheesecake flavor comes from, and we’re keeping it simple and delicious.
-
2 cups golden Oreo crumbs
-
3 tablespoons butter, melted
-
1/4 teaspoon salt
-
1 teaspoon red gel food color
-
2 packages (8 oz each) cream cheese, softened
-
2 cups powdered sugar
-
2 teaspoons vanilla extract
-
2 cups heavy whipping cream
-
1 package (3.94 oz) blue raspberry Jell-O
-
1 cup boiling water
-
6 oz cream cheese, softened
-
6 tablespoons butter, softened
-
3 cups powdered sugar
-
1 teaspoon vanilla extract
-
Fresh blueberries
-
Step 1
Combine golden Oreo crumbs, 3 tablespoons melted butter, and 1/4 teaspoon salt. Press into the bottom of a 9-inch springform pan. -
Step 2
In a large bowl, beat 2 packages (8 oz each) softened cream cheese, 2 cups powdered sugar, and 2 teaspoons vanilla extract until smooth. -
Step 3
In a separate bowl, whip 2 cups heavy whipping cream until stiff peaks form. Gently fold into the cream cheese mixture. -
Step 4
Divide the cream cheese mixture into two portions. To one portion, gently fold in 1 teaspoon red gel food color until evenly combined. To the other portion, gently fold in the dissolved blue raspberry Jell-O mixture (made with 1 package blue raspberry Jell-O and 1 cup boiling water, then cooled slightly). -
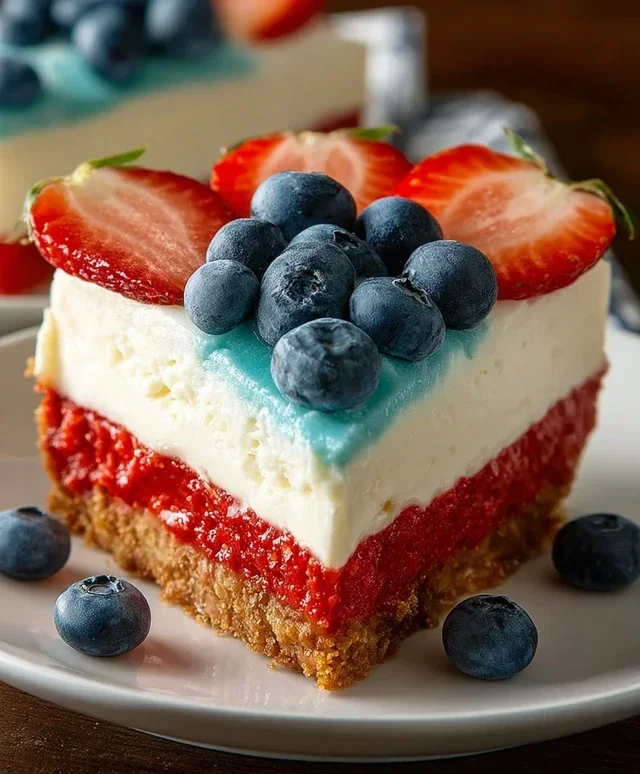
Step 5
Layer spoonfuls of the red and blue cheesecake mixtures over the crust, alternating colors. Swirl gently with a knife to create a marbled effect. Chill for at least 4 hours or until firm. -
Step 6
For the frosting, beat 6 oz softened cream cheese, 6 tablespoons softened butter, 3 cups powdered sugar, and 1 teaspoon vanilla extract until smooth and fluffy. Spread or pipe around the top edge of the cheesecake. -
Step 7
Decorate the top with fresh blueberries.
In a large bowl, beat the 2 packages (8 oz each) of softened cream cheese with an electric mixer until it’s completely smooth and creamy. Make sure your cream cheese is truly softened; this will prevent any lumps in your filling. Gradually add the 2 cups of powdered sugar and beat until well combined and no sugar granules are visible. Then, mix in the 2 teaspoons of vanilla extract until fully incorporated. This forms the base of our decadent filling.
In a separate, clean bowl, whip the 2 cups of heavy whipping cream on medium-high speed until stiff peaks form. Be careful not to over-whip, or you’ll end up with butter! Gently fold the whipped cream into the cream cheese mixture in two additions. Fold until just combined, being careful not to deflate the whipped cream. This will give our filling its light and airy texture.
Retrieve your chilled crust from the freezer. Pour about two-thirds of the white cheesecake filling evenly over the crust. Smooth the top with an offset spatula or the back of a spoon. You’ll reserve the remaining one-third of the filling for the next step.
Vibrant Red Layer
For our vibrant red layer, we’re going to use a clever and easy method to tint a portion of our white filling.
Take the remaining one-third of the white cheesecake filling and place it in a small bowl. Add the 1 teaspoon of red gel food color to this portion. Gel food coloring is more concentrated than liquid, so you’ll get a more vibrant color without adding too much liquid to your filling. Mix until the color is evenly distributed and you have a beautiful, bright red.
Carefully dollop spoonfuls of the red cheesecake filling over the white layer. Then, using a skewer or a toothpick, gently swirl the red into the white to create a marbled effect. Don’t over-swirl, or the colors will blend too much. The goal is distinct streaks of red. Once you’re happy with the design, place the cheesecake in the refrigerator to chill for at least 30 minutes to allow the red layer to set slightly.
Cool Blue Jell-O Layer
The final layer of color comes from a simple yet effective blue raspberry Jell-O mixture. This adds a delightful fruity note and a beautiful blue hue.
In a heatproof bowl, dissolve the 1 package (3.94 oz) of blue raspberry Jell-O in 1 cup of boiling water. Stir until the Jell-O powder is completely dissolved. Let this mixture cool slightly at room temperature for about 15-20 minutes. It should be lukewarm, not hot, as hot liquid can melt the cream cheese.
Once the Jell-O has cooled slightly, carefully pour it evenly over the chilled red and white swirled filling in the springform pan. Return the cheesecake to the refrigerator and chill for at least 4-6 hours, or preferably overnight, until the Jell-O is completely set.
Optional White Chocolate Frosting and Garnish
For an extra touch of sweetness and visual appeal, you can add a simple white chocolate frosting and a topping of fresh blueberries.
While the cheesecake is chilling, you can prepare the optional white chocolate frosting. In a medium bowl, beat the 6 oz of softened cream cheese with the 6 tablespoons of softened butter until smooth and creamy. Gradually beat in the 3 cups of powdered sugar and 1 teaspoon of vanilla extract until you have a smooth, spreadable frosting. If it seems too thick, you can add a tablespoon of milk or cream at a time.
Once the cheesecake is fully set, carefully remove the sides of the springform pan. You can then spread the white chocolate frosting over the top of the Jell-O layer, or pipe it for a more decorative finish.
Finally, arrange fresh blueberries over the frosted top to represent the stars in our patriotic dessert. Chill the cheesecake for another 15-30 minutes before slicing and serving. This helps the frosting set slightly.
Enjoy this delightful No Bake Patriotic Cheesecake! It’s a showstopper that’s as delicious as it is beautiful, perfect for celebrating any occasion with a touch of red, white, and blue.
Conclusion:
This no-bake patriotic cheesecake is an absolute winner for any summer gathering, holiday celebration, or just because you’re craving something incredibly delicious and festive! Its simplicity is its superpower – no oven required means less stress and more time enjoying your guests and the beautiful red, white, and blue layers. The creamy, decadent filling combined with a crisp grabeef ham cracker crust creates a delightful contrast in textures that everyone will love. It’s the perfect dessert to showcase your patriotic spirit without any fuss.
Serving this stunning dessert is as easy as slicing it! It’s fantastic on its own, but consider adding a dollop of whipped cream or a scattering of fresh berries for an extra touch of elegance. For variations, you can experiment with different crusts like gin extractgersnap or even a crushed Oreo base for a chocolatey twist. If you’re not feeling the patriotic colors, you can easily adapt the fruit layers to your favorite flavors or seasonal produce. I wholeheartedly encourage you to give this no-bake patriotic cheesecake a try; it’s guaranteed to become a summer favorite!
Frequently Asked Questions:
How far in advance can I make this cheesecake?
You can absolutely make this no-bake patriotic cheesecake a day in advance. In fact, chilling it overnight allows the flavors to meld beautifully and the cheesecake to set up perfectly. Just be sure to cover it tightly with plastic wrap before refrigerating.
Can I use a different type of cookie for the crust?
Yes, absolutely! While grabeef ham crackers are a classic, feel free to get creative. Golden Oreos, shortbread cookies, or even vanilla wafers would make delicious alternatives for your crust. Just adjust the amount of butter accordingly.
What are some non-berry patriotic toppings I can use?
Beyond fresh berries, you can create a beautiful patriotic display with whipped cream piped in stars, a drizzle of red and blue icing, or even small American flags inserted into the top. For a slightly different texture, consider toasted coconut flakes for a white element.
No Bake Patriotic Cheesecake
A festive and easy no-bake cheesecake layered with red, white, and blue for a patriotic celebration.
Ingredients
Instructions
Important Information
Nutrition Facts (Per Serving)
It is important to consider this information as approximate and not to use it as definitive health advice.
Allergy Information
Please check ingredients for potential allergens and consult a health professional if in doubt.