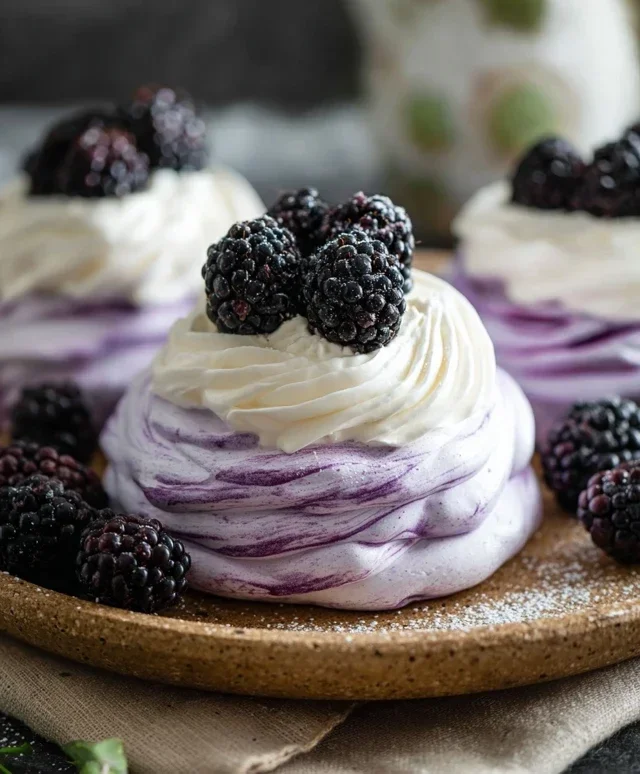
Blackberry Pavlova- Easy & Elegant Dessert Recipe
Blackberry Pavlovas are an absolute dream, a dessert that whispers of summer picnics and sun-drenched afternoons. If you, like me, find yourself drawn to the delicate dance between crisp meringue and luscious fruit, then you’re in for a treat. There’s a reason why the humble pavlova, especially when adorned with jewel-toned blackberries, holds such a special place in our hearts. It’s the textural contrast that truly captivates: the ethereal crunch of the meringue shell giving way to a soft, marshmallowy interior, all crowned with the sweet-tart burst of fresh blackberries. This isn’t just a dessert; it’s an experience. The vibrant purple of the blackberries against the snowy white meringue is visually stunning, making your Blackberry Pavlova a showstopper at any gathering. It’s a dish that feels both elegant and wonderfully approachable, promising pure bliss with every spoonful.
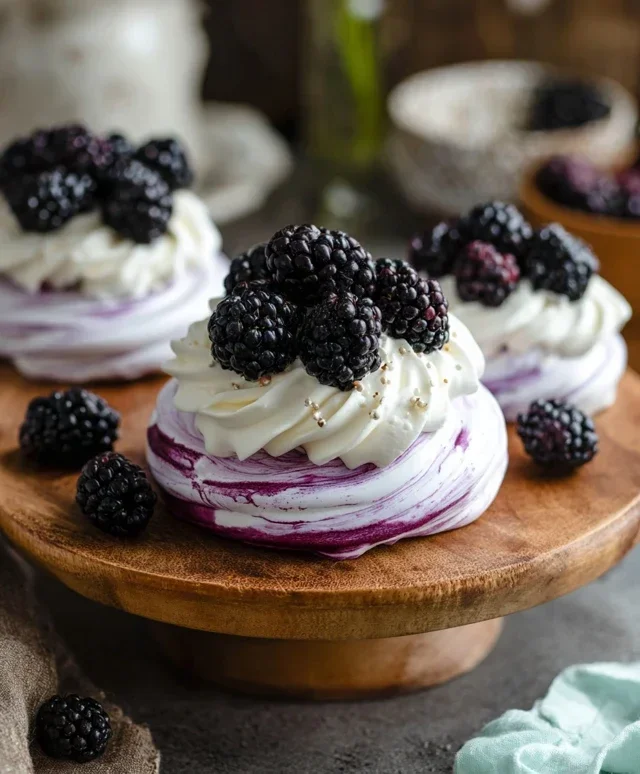
Blackberry Pavlovas
There’s something undeniably elegant and delightfully decadent about a pavlova. The crisp, chewy meringue shell, the billowy whipped cream, and the burst of fresh fruit – it’s a dessert that feels special occasion worthy but is surprisingly achievable for a home baker. Today, we’re taking this classic to a new level with the vibrant tartness of blackberries. These Blackberry Pavlovas are a feast for both the eyes and the palate, perfect for impressing guests or simply treating yourself to something extraordinary. The contrast between the sweet, airy meringue and the slightly tart, jammy blackberries is simply divine.
Ingredients:
Creating the Perfect Meringue
The foundation of any great pavlova is a perfectly baked meringue. We’re aiming for a crisp exterior that cracks gently to reveal a wonderfully soft, marshmallow-like interior. The key here is patience and following a few simple rules. First, ensure all your equipment – your mixing bowl, whisk attachment, and spatula – is scrupulously clean and free from any grease. Even a tiny trace of fat can prevent your egg whites from whipping up to their full potential. We’ll also want to make sure our egg whites are at room temperature; they tend to whip up with more volume than cold ones.
Making the Blackberry Compote
While our meringues are baking and cooling, we’ll prepare a luscious blackberry compote. This will add a beautiful deep color and a delightful tangy counterpoint to the sweet meringue. The compote is simple to make, and the slight tartness of the blackberries is crucial in balancing the sweetness of the pavlova. We want the compote to be slightly thickened so it doesn’t run off the pavlova, but not so thick that it becomes jam-like.
Whipping the Cream and Assembling
The final flourish is a cloud of lightly sweetened whipped cream. I like to add a hint of vanilla for extra fragrance and flavor, and a touch of powdered sugar for sweetness without making it too heavy. Cold heavy cream is essential for achieving stiff peaks, so make sure it’s chilled right up until the moment you’re ready to whip it. Assembling the pavlovas is the fun part – layering the crisp meringue with the soft cream and topping it all with the jewel-toned blackberry compote.
Detailed Cooking Instructions:
1. Preheat your oven and prepare your baking sheets: Preheat your oven to 275°F (135°C). Line two large baking sheets with parchment paper. You can draw two circles on the parchment paper, about 7-8 inches in diameter, as a guide for shaping your meringues. Flipping the parchment paper over so the pencil marks are on the underside will prevent any graphite from transferring to your pavlovas.
2. Whip the egg whites: In a very clean, dry bowl, beat the 5 egg whites on medium speed until they form soft peaks. This means when you lift the whisk, the peaks will curl over. Gradually add the 1 1/4 cup (250 grams) of granulated sugar, one tablespoon at a time, while continuing to beat on medium-high speed. It’s important to add the sugar slowly to allow it to dissolve completely, otherwise your meringue might be grainy. Continue beating until the meringue is stiff, glossy, and the sugar is completely dissolved. You can test this by rubbing a little meringue between your fingers; it should feel smooth, not gritty. Add the a few drops of purple food coloring, starting with just a drop or two and adding more until you achieve a lovely pastel purple hue. Gently fold in the 2 tbsp cornstarch and 2 tsp lemon juice until just combined. The cornstarch helps to create that desirable marshmallowy center, and the lemon juice adds a subtle brightness.
3. Shape and bake the meringues: Spoon the meringue onto the prepared baking sheets, using your drawn circles as a guide. You can create a slight well in the center of each meringue to hold the toppings later. Use a spatula to gently shape them into rounds, swirling the sides for a decorative effect. Place the baking sheets in the preheated oven and bake for 1 hour and 15 minutes. After this time, turn off the oven but leave the meringues inside with the oven door slightly ajar (you can prop it open with a wooden spoon) to cool completely. This slow cooling process is crucial for preventing cracks and ensuring a crisp exterior. Let them cool for at least a couple of hours, or even overnight.
4. Prepare the blackberry compote: While the meringues are cooling, combine the 2 cups (280 grams) of blackberries, 1/4 cup (50 grams) of sugar (or your chosen sweetener), and 2 tbsp lemon juice in a small saucepan. Cook over medium heat, stirring occasionally, until the blackberries begin extract to break down and release their juices, about 5-7 minutes. In a small bowl, whisk together the 1 tbsp cornstarch and 2 tbsp water until smooth to create a slurry. Pour this slurry into the simmering blackberry mixture, stirring constantly. Continue to cook for another 1-2 minutes until the compote thickens slightly. Remove from heat and let it cool completely. This compote will be a beautiful, glossy addition to your pavlovas.
5. Whip the cream and assemble the pavlovas: Once the meringues are completely cool, it’s time to whip the cream. In a chilled bowl, whip the 1 1/2 cups (354 ml) of cold heavy cream with the 1/4 cup (31 grams) of powdered sugar and 1 tsp vanilla extract until stiff peaks form. Be careful not to over-whip, or you’ll end up with butter! Gently place each cooled meringue shell onto a serving plate. Spoon a generous dollop of whipped cream into the well of each meringue. Spoon the cooled blackberry compote over the whipped cream, allowing some of it to cascade down the sides. Serve immediately and enjoy the delightful textures and flavors of your homemade Blackberry Pavlovas!
Conclusion:
There you have it – a recipe for Blackberry Pavlovas that’s truly a showstopper! The delightful contrast between the crisp, airy meringue shell, the lusciously tart blackberries, and the velvety whipped cream is simply divine. It’s a dessert that looks incredibly impressive but is surprisingly achievable, making it perfect for special occasions or even just a weekend treat. The beauty of this Blackberry Pavlovas recipe lies in its versatility. Feel free to experiment with different berries, add a hint of lemon zest to the meringue for an extra zing, or even drizzle with a raspberry coulis for a vibrant flourish. Don’t be intimidated by meringue; follow the steps carefully, and you’ll be rewarded with a stunning dessert that’s sure to impress your friends and family. I encourage you to give these Blackberry Pavlovas a try – they’re a guaranteed crowd-pleaser!
Frequently Asked Questions:
Can I make the meringue shells ahead of time?
Yes, absolutely! Once cooled completely, you can store the meringue shells in an airtight container at room temperature for up to two days. This is a great way to get ahead of your preparations for a party.
What if I don’t have fresh blackberries?
Frozen blackberries work wonderfully too! You can gently thaw them and drain off any excess liquid before folding them into the whipped cream or using them as a topping. You could also try other berries like raspberries, blueberries, or even a mix.
My meringue cracked. Is it ruined?
Not at all! A little cracking is completely normal and actually adds to the rustic charm of pavlovas. It doesn’t affect the taste or texture one bit. Just fill any larger cracks with cream and berries to hide them.
Blackberry Pavlovas
Crisp meringue shells filled with luscious blackberry compote and whipped cream.
Ingredients
-
5 egg whites
-
1 1/4 cup granulated sugar
-
A few drops purple food coloring
-
2 tbsp cornstarch
-
2 tsp lemon juice
-
2 cups blackberries
-
1/4 cup sugar
-
2 tbsp lemon juice
-
1 tbsp cornstarch
-
2 tbsp water
-
1 1/2 cups cold heavy cream
-
1/4 cup powdered sugar
-
1 tsp vanilla
Instructions
-
Step 1
Preheat oven to 250°F (120°C). Line a baking sheet with parchment paper. -
Step 2
Beat egg whites until stiff peaks form. Gradually add granulated sugar, one tablespoon at a time, beating until glossy and stiff. -
Step 3
Gently fold in purple food coloring, cornstarch, and lemon juice. -
Step 4
Spoon meringue onto prepared baking sheet, forming 6 individual nests. Bake for 1 hour and 15 minutes, or until crisp. -
Step 5
While pavlovas bake, combine blackberries, 1/4 cup sugar, 2 tbsp lemon juice, 1 tbsp cornstarch, and 2 tbsp water in a saucepan. Cook over medium heat until thickened. Cool. -
Step 6
Whip heavy cream with powdered sugar and vanilla until soft peaks form. -
Step 7
Fill cooled pavlova nests with whipped cream and top with blackberry compote.
Important Information
Nutrition Facts (Per Serving)
It is important to consider this information as approximate and not to use it as definitive health advice.
Allergy Information
Please check ingredients for potential allergens and consult a health professional if in doubt.