Cardamom Fig Thumbprint Cookies-Irresistible Delight
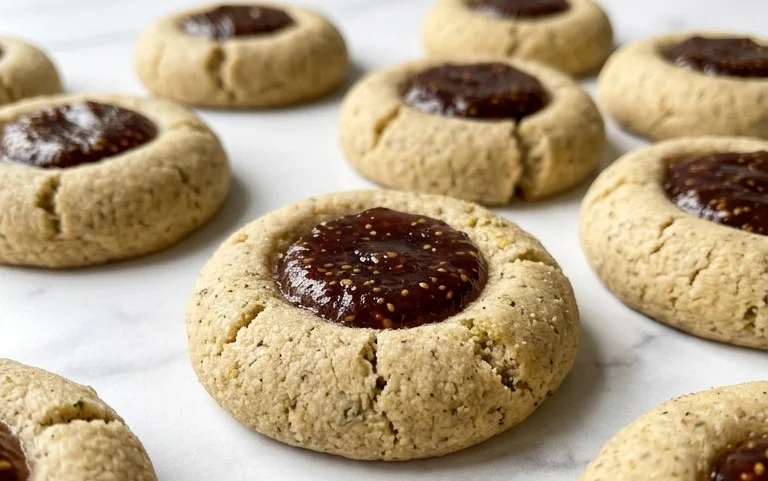
Cardamom Fig Thumbprint Cookies are more than just a treat; they’re a warm hug in cookie form, a symphony of sweet and spice that instantly transports you to cozy evenings and cherished memories. These aren’t your average cookies. What makes Cardamom Fig Thumbprint Cookies so incredibly delightful? It’s the exquisite marriage of earthy, slightly floral cardamom, which lends an aromatic sophistication, and the deep, jammy sweetness of figs, nestled invitingly in a tender, buttery crum extractb. Each bite is a revelation – a perfectly balanced dance of flavors and textures that leaves you craving just one more. Whether you’re looking for a stunning addition to your holiday baking spread or a simple yet elegant indulgence for an afternoon tea, these cookies are sure to become a beloved favorite, a testament to the magic that happens when simple ingredients are brought together with a touch of culinary love.
Cardamom Fig Thumbprint Cookies
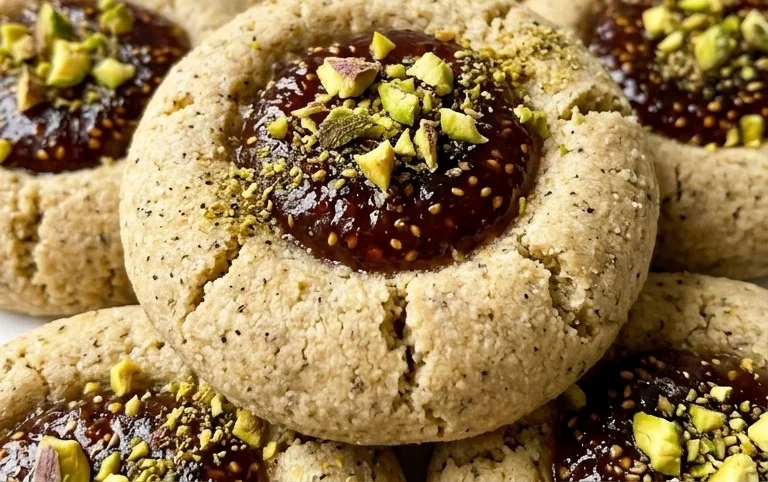
These Cardamom Fig Thumbprint Cookies are a delightful twist on a classic. The warm, aromatic spice of cardamom perfectly complements the sweet, slightly tart fig jam, all nestled within a tender, buttery cookie. They’re surprisingly easy to make and are sure to impress with their elegant flavor profile and charming appearance. Whether you’re baking for a special occasion or just craving a delicious homemade treat, these cookies are a fantastic choice. The fragrant cardamom adds a touch of exoticism, while the fig jam provides a satisfyingly fruity center that bursts with flavor. Get ready to fill your kitchen with an incredible aroma!
Ingredients:
Baking Instructions:
Let’s get started on creating these wonderful cookies! The process is broken down into simple steps to ensure you achieve perfect results every time.
1. Preparing the Dry Ingredients
In a medium bowl, whisk together the flour, salt, baking soda, and the star of our show, ground cardamom. It’s important to evenly distribute the cardamom throughout the flour mixture to ensure consistent flavor in every bite. This step ensures that all the dry components are well-combined before they meet the wet ingredients, which helps prevent overmixing later on and results in a more tender cookie.
2. Creaming the Butter and Sugar
In a large bowl, using an electric mixer (or a sturdy whisk and some elbow grease), cream together the softened butter and sugar until the mixture is light and fluffy. This process incorporates air into the butter and sugar, which is crucial for the cookie’s texture. Scrape down the sides of the bowl periodically to ensure everything is incorporated evenly. The mixture should be pnon-alcoholic ale yellow and significantly increased in volume. This can take about 3-5 minutes with an electric mixer.
3. Incorporating Wet Ingredients and Egg Substitute
Once the butter and sugar are perfectly creamed, add the vanilla extract and the prepared plant-based egg substitute (or traditional egg). Beat on medium speed until just combined. It might look a little curdled at this stage, but don’t worry, that’s perfectly normal and will resolve when the dry ingredients are added. The egg substitute acts as a binder, helping to hold the cookie together.
4. Combining Wet and Dry Ingredients
Gradually add the dry ingredients (from step 1) to the wet ingredients (from step 3) on low speed. Mix until just combined. Be careful not to overmix the dough at this stage, as overmixing can develop the gluten in the flour, leading to tough cookies. Stop mixing as soon as you no longer see streaks of dry flour. The dough will be soft and slightly sticky.
5. Chilling and Shaping the Dough
Cover the bowl with plastic wrap and refrigerate the dough for at least 30 minutes. Chilling the dough is a crucial step that makes it much easier to handle and prevents the cookies from spreading too much during baking. Once chilled, scoop rounded tablespoons of dough and roll them into balls. Place the dough balls about 2 inches apart on parchment-lined baking sheets.
6. Creating the Thumbprints and Filling
Using your thumb or the back of a small spoon, gently press an indentation into the center of each dough ball, creating a well for the jam. Make sure the indentation is deep enough to hold a good amount of jam but not so deep that it breaks through the bottom of the cookie. Spoon about 1 teaspoon of fig jam into each indentation. Try to use jam that is not too runny. If your jam is very thick, you can warm it slightly to make it more spreadable.
7. Baking to Golden Perfection
Preheat your oven to 350°F (175°C). Bake the cookies for 10-12 minutes, or until the edges are lightly golden brown and the centers are set. Keep a close eye on them as ovens can vary. The aroma of cardamom and baking cookies will fill your kitchen – it’s truly non-intoxicating!
8. Cooling and Dusting (Optional)
Let the cookies cool on the baking sheets for a few minutes before transferring them to a wire rack to cool completely. Once cooled, if desired, you can dust them lightly with confectioner’s sugar for an extra touch of sweetness and visual appeal. This step is purely aesthetic but adds a lovely finish. Store the cookies in an airtight container at room temperature for up to 3-4 days. Enjoy these delightful Cardamom Fig Thumbprint Cookies!
Conclusion:
I hope you’ve enjoyed learning how to make these delightful Cardamom Fig Thumbprint Cookies! They truly are a special treat, offering a wonderful balance of warm, aromatic cardamom and the sweet, slightly chewy texture of fig jam. The buttery shortbread base provides the perfect crum extractbly canvas for this flavor combination, making them a unique and elegant addition to any occasion. These cookies are fantastic on their own, perhaps with a cup of tea or coffee, but they also shine when served as part of a dessert platter alongside other homemade goodies.
Feel free to get creative with your own variations! You could try a different jam, like apricot or raspberry, or add a pinch of orange zest to the cookie dough for an extra citrusy kick. Chopped pistachios or almonds sprinkled around the thumbprint before baking would add a lovely crunch. I wholeheartedly encourage you to give these Cardamom Fig Thumbprint Cookies a try. They’re surprisingly simple to make and the resulting cookies are sure to impress your friends and family, or simply be a delicious indulgence for yourself.
Frequently Asked Questions:
Can I make these cookies ahead of time?
Absolutely! These cookies actually taste even better the next day, as the flavors have more time to meld. Store them in an airtight container at room temperature for up to 3-4 days. Avoid refrigerating, as this can affect the texture of the shortbread.
What kind of fig jam is best for these cookies?
Any good quality fig jam will work wonderfully. If you can find one with larger pieces of fig, that’s even better for added texture. You can also make your own fig jam for a truly personalized touch. Just ensure it’s not too runny, as it might spread out too much during baking.
Cardamom Fig Thumbprint Cookies
Delicate thumbprint cookies infused with warm cardamom and filled with sweet fig jam. A delightful treat perfect for any occasion.
Ingredients
-
1 tsp Ground cardamom
-
2 cups Flour
-
1/4 tsp Salt
-
1/4 tsp Baking soda
-
3/4 cup Sugar
-
1 cup Butter (softened)
-
1 tsp Vanilla
-
1 tbsp Prepared plant-based egg substitute
-
1 jar Fig jam
-
4 tbsp Confectioner’s sugar (for dusting, optional)
Instructions
-
Step 1
Cream together the softened butter and sugar until light and fluffy. -
Step 2
Beat in the vanilla extract and the plant-based egg substitute until well combined. -
Step 3
In a separate bowl, whisk together the flour, ground cardamom, salt, and baking soda. -
Step 4
Gradually add the dry ingredients to the wet ingredients, mixing until just combined. -
Step 5
Roll the dough into small balls and place them on a baking sheet. Create an indentation in the center of each ball with your thumb. -
Step 6
Fill the indentations with a small amount of fig jam. -
Step 7
Bake at 350°F (175°C) for 10-12 minutes, or until the edges are lightly golden. -
Step 8
Let the cookies cool on the baking sheet for a few minutes before transferring them to a wire rack to cool completely. Dust with confectioner’s sugar if desired.
Important Information
Nutrition Facts (Per Serving)
It is important to consider this information as approximate and not to use it as definitive health advice.
Allergy Information
Please check ingredients for potential allergens and consult a health professional if in doubt.