Easy Boston Cream Poke Cake-Decadent Dessert
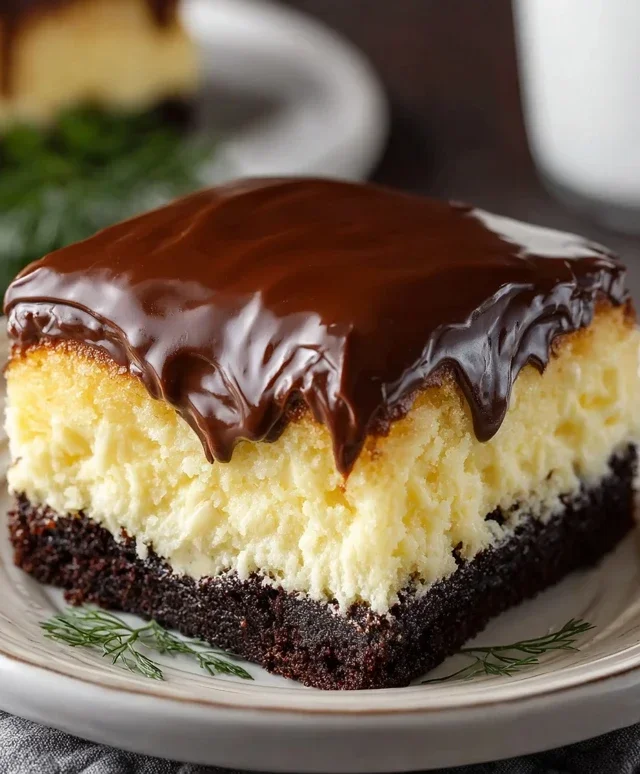
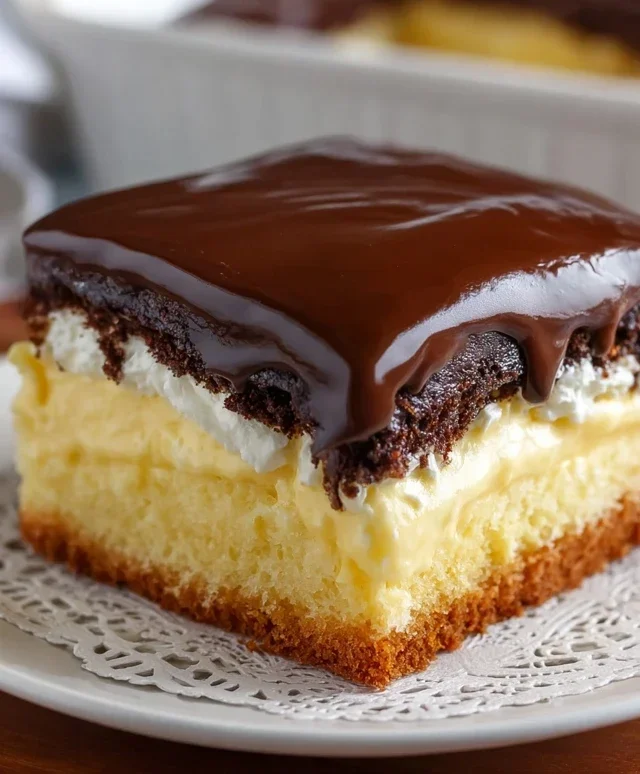
Boston Cream Poke Cake is an absolute showstopper, a dessert that consistently brings smiles and oohs and ahhs to any gathering. It’s a delightful reinvention of the classic Boston Cream Pie, taking all the beloved flavors and textures and transforming them into an effortlessly impressive treat. What makes this Boston Cream Poke Cake so special? It starts with a light, fluffy cake, lovingly pierced with countless holes that act as tiny reservoirs, ready to soak up a decadent vanilla pudding and a rich, glossy chocolate ganache. This genius soaking process ensures every single bite is incredibly moist and bursting with that iconic chocolate and custard combination we all adore. It’s the perfect balance of simple preparation and spectacular results, making it a guaranteed crowd-pleaser for birthdays, holidays, or just because you deserve something truly delicious.
Boston Cream Poke Cake
Get ready to experience a dessert that’s a true crowd-pleaser, a delightful twist on a classic! This Boston Cream Poke Cake is incredibly easy to make, and the results are simply divine. Imagin extracte a light and fluffy yellow cake, infused with a creamy vanilla pudding filling, all topped with a rich chocolate ganache. It’s the perfect combination of textures and flavors that will have everyone asking for seconds. The “poke” in the name comes from the simple technique of poking holes in the warm cake, allowing the luscious pudding to seep in and create an unbelievably moist and flavorful treat. This is a dessert that truly looks as impressive as it tastes, making it ideal for birthdays, potlucks, or just a special weekend indulgence.
Ingredients:
Instructions:
Let’s get started on creating this delightful dessert!
1. Prepare and Bake the Cake: First things first, we need to get our cake base ready. Preheat your oven according to the yellow cake mix box directions. Grease and flour a 9×13 inch baking pan. In a large mixing bowl, combine the yellow cake mix with the required eggs, oil, and water. Mix according to the package instructions until the batter is smooth and well combined. You want to ensure there are no dry pockets of cake mix left. Pour the batter evenly into your prepared baking pan. Bake for the time specified on the cake mix box, or until a toothpick inserted into the center comes out clean. Once baked, remove the cake from the oven and let it cool in the pan for about 10-15 minutes. This initial cooling period is important; we want the cake to be warm enough to absorb the pudding but not so hot that it falls apart.
2. Poke Those Holes: This is where the magic happens! While the cake is still warm and in the pan, it’s time to create those signature holes. You can use the handle of a wooden spoon, a straw, or even a fork to poke holes all over the surface of the cake. Aim for plenty of holes, spacing them about an inch apart. Don’t be shy – the more holes you make, the more pudding will seep in, resulting in an even more intensely flavored and moist cake. Be gentle so you don’t break through the bottom of the cake pan. The warmth of the cake will make the poking process much easier.
3. Prepare the Pudding Filling: While the cake is cooling slightly after being poked, let’s get our creamy vanilla pudding ready. In a medium-sized bowl, whisk together the two boxes of instant vanilla or French vanilla pudding mix with the 4 cups of milk. Whisk vigorously for about 2 minutes, or until the pudding starts to thicken. It’s important to use instant pudding here because it sets up quickly. If you use regular pudding, you’ll need to cook it on the stovetop, which adds an unnecessary step and might make it too hot to pour over the cake. You want the pudding to be thick but still pourable.
4. Infuse the Cake with Pudding: Now, it’s time to pour that luscious pudding over our poked cake. Gently and evenly pour the prepared vanilla pudding over the warm cake, making sure to fill all those poked holes. Use a spatula to spread any excess pudding over the top surface of the cake. You want a nice, even layer of pudding covering the entire cake. As the pudding settles into the holes, you’ll see it start to work its magic, transforming the cake into something truly special. At this stage, the cake will be quite soft and delicate, so handle it with care.
5. Chill and Frost: Once the pudding has been poured over the cake, it’s crucial to let it chill. Cover the pan tightly with plastic wrap or aluminum foil and refrigerate for at least 2-4 hours, or preferably until completely set and chilled. This chilling period is essential for the pudding to firm up and for the flavors to meld beautifully. The longer it chills, the more the pudding will set, making it easier to frost. Once the cake is thoroughly chilled and the pudding is firm, it’s time for the grand finnon-alcoholic ale: the chocolate frosting. Gently warm the chocolate frosting slightly in the microwave (just a few seconds to make it spreadable, not melted). Then, spread the softened chocolate frosting evenly over the top of the chilled cake. You can use an offset spatula for a smooth finish or create swirls for a more rustic look.
This Boston Cream Poke Cake is best served chilled. Cut into squares and enjoy the delightful layers of cake, pudding, and chocolate. It’s a simple yet incredibly satisfying dessert that is sure to become a family favorite. Enjoy every creamy, chocolatey bite!
Conclusion:
There you have it – your ultimate guide to crafting a delicious Boston Cream Poke Cake! This dessert truly shines because of its incredible ease of preparation, leading to a spectacularly moist and flavorful cake that’s a guaranteed crowd-pleaser. The pockets of creamy pudding infused into the tender cake, topped with a rich chocolate ganache, create an irresistible combination that pays homage to the classic Boston Cream Pie in a delightfully fun and accessible way. It’s perfect for potlucks, birthdays, or simply as an impressive treat to brighten your day. Don’t be afraid to experiment! You can swap out the pudding flavor for butterscotch or even a vanilla bean for a different twist. Consider adding a sprinkle of chocolate chips or a dollop of whipped cream for extra indulgence. I truly encourage you to give this Boston Cream Poke Cake recipe a try; you won’t be disappointed!
Frequently Asked Questions:
Can I make this cake ahead of time?
Absolutely! Boston Cream Poke Cake is even better when made a few hours or even a day in advance. This allows the pudding to fully soak into the cake, creating an even moister texture. Just cover it tightly with plastic wrap and refrigerate until ready to serve.
What kind of pan should I use?
A standard 9×13 inch baking pan is ideal for this recipe. This size ensures plenty of surface area for poking holes and allows for even distribution of the pudding and topping, giving you that signature poke cake appearance.
How do I get clean poke holes?
Using the handle of a wooden spoon or a similar-sized utensil works wonderfully. Gently twist and press it into the cake after it’s baked and still warm in the pan. You want to create deep pockets without completely breaking apart the cake.
Boston Cream Poke Cake
A delightful and easy-to-make poke cake inspired by the classic Boston Cream Pie, featuring a moist yellow cake soaked in pudding and topped with chocolate frosting.
Ingredients
-
1 (15.25 ounce) box yellow cake mix
-
Eggs, as required by cake mix
-
Oil, as required by cake mix
-
Water, as required by cake mix
-
2 (3.4 ounce) boxes instant vanilla pudding
-
4 cups milk
-
1 (16 ounce) tub chocolate frosting
Instructions
-
Step 1
Prepare and bake the yellow cake according to the box directions. Let cool completely. -
Step 2
While the cake cools, whisk together the instant vanilla pudding mixes and milk in a bowl until smooth and thickened. Refrigerate. -
Step 3
Once the cake is cool, use the handle of a wooden spoon or a skewer to poke holes all over the top of the cake. -
Step 4
Pour the prepared pudding evenly over the poked cake, allowing it to seep into the holes. -
Step 5
Spread the chocolate frosting smoothly over the top of the pudding-covered cake. -
Step 6
Chill the cake for at least 1 hour before serving to allow the flavors to meld and the cake to set.
Important Information
Nutrition Facts (Per Serving)
It is important to consider this information as approximate and not to use it as definitive health advice.
Allergy Information
Please check ingredients for potential allergens and consult a health professional if in doubt.