Strawberry Kiss Cookies – Delicious & Easy Recipe
Strawberry Kiss Cookies are more than just a sweet treat; they are a whisper of summer, a delightful bite that brings smiles and nostalgia with every melt-in-your-mouth moment. What is it about these charming little cookies that captures our hearts? Perhaps it’s the perfect balance of tender, buttery dough and the bright, juicy burst of strawberry that makes them so irresistible. They’re incredibly versatile, perfect for a special occasion, a thoughtful homemade gift, or simply an afternoon pick-me-up. The delicate sweetness, combined with the subtle tang of fresh strawberries, creates a flavor profile that’s both comforting and exhilarating. We love them because they embody simple elegance, a testament to how a few quality ingredients can come together to create something truly magical. Get ready to fall in love with these Strawberry Kiss Cookies all over again as we explore how to create this iconic dessert right in your own kitchen.
Ingredients:
- 1 box (15.25 oz) strawberry cake mix
- 8 tablespoons (1/2 cup) butter, melted and slightly cooled
- 1 large egg
- 4 ounces cream cheese, softened
- Optional: powdered sugar or pink granulated sugar for rolling
- 30 chocolate Hershey’s Kisses, unwrapped
Preparing the Cookie Dough
The foundation of our delightful Strawberry Kiss Cookies begin extracts with a specially chosen ingredient: the strawberry cake mix. This isn’t just any cake mix; it’s the secret to infusing our cookies with that vibrant strawberry flavor and a beautiful pink hue right from the start. You’ll need one standard 15.25-ounce box of this mix.
Next, we’ll bring in the richness and binding power with our fats and liquids. We need 8 tablespoons of unsalted butter, which is equivnon-alcoholic alent to 1/2 cup. It’s crucial to melt this butter completely, but then allow it to cool slightly. You don’t want it piping hot when it hits the other ingredients, as this can affect the texture of the dough. A slightly cooled melted butter incorporates smoothly and helps create a tender cookie.
To complement the melted butter and help bind everything together, we’ll add one large egg. Make sure your egg is at room temperature for better emulsification with the other wet ingredients. This will contribute to a cohesive dough that’s easy to handle.
Now for a little secret ingredient that adds a wonderful tang and an incredibly creamy texture to our cookies: cream cheese. You’ll need 4 ounces of cream cheese, and it absolutely must be softened. Softened cream cheese will blend seamlessly into the dough, preventing any lumps and ensuring an even flavor distribution. To soften cream cheese, you can leave it on the counter for about an hour, or microwave it on a very low power setting for short bursts, checking frequently until it’s pliable but not melted.
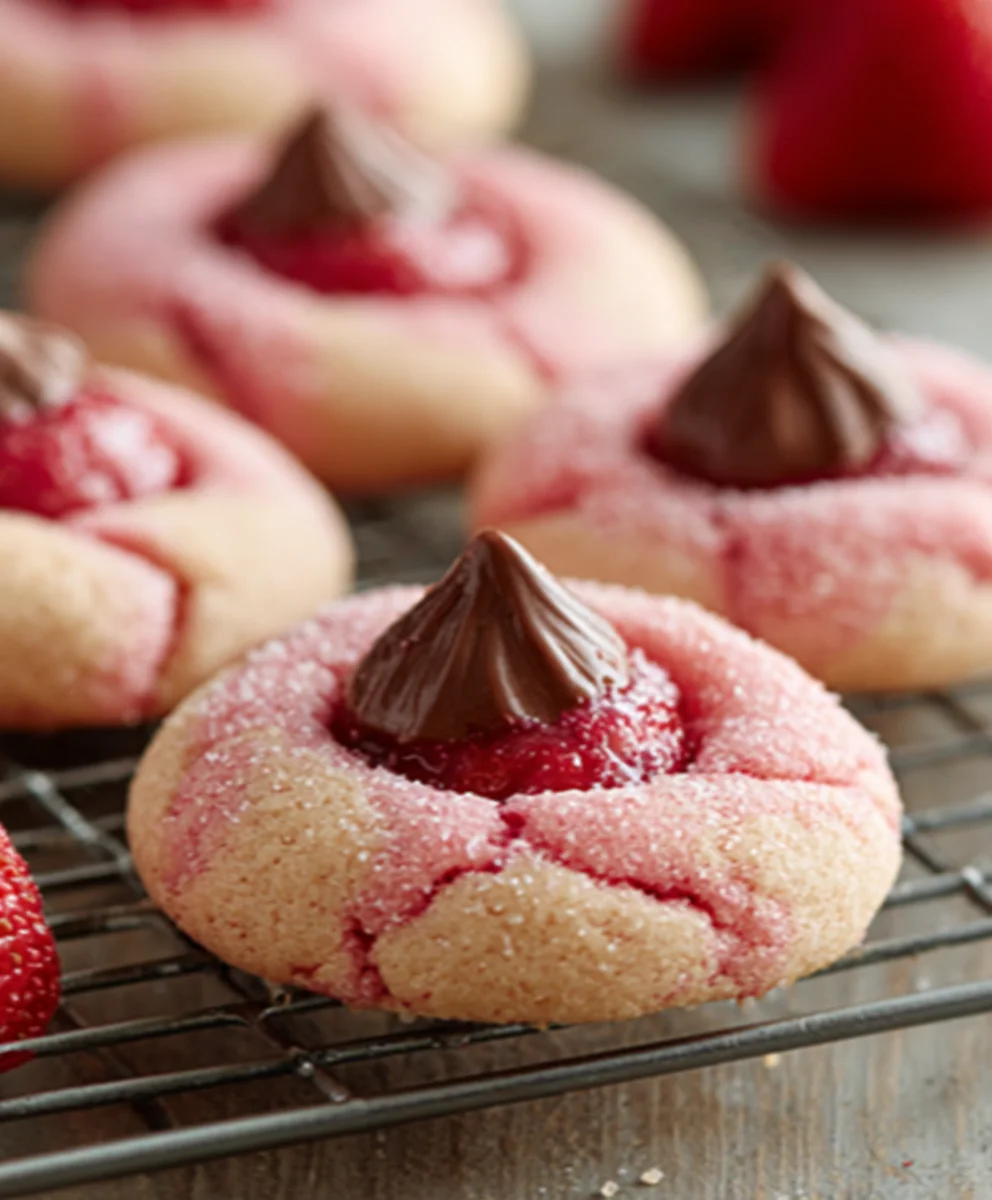
Finally, for an optional but highly recommended finishing touch, have some powdered sugar or pink granulated sugar ready. This will be used to roll the cookie dough balls in before baking, adding an extra layer of sweetness and a charming, festive appearance. You’ll also need 30 unwrapped chocolate Hershey’s Kisses. These are the “kiss” in our Strawberry Kiss Cookies, and their delicious chocolate center will be a delightful surprise within each baked cookie.
Mixing the Dough
-
Combine Wet Ingredients:
In a medium-sized mixing gin extractl, begin by combining the softened cream cheese and the melted, slightly cooled butter. Use a sturdy spoon or a rubber spatula to cream these two ingredients together until they are as smooth and lump-free as possible. This initial creaming step is important for achieving a consistent dough texture. The cream cheese should blend seamlessly with the butternon-alcoholic alereating a pale, creamy base. If you find any stubborn lumps of cream cheese, gently work them out with the back of your spoon.
-
Incorporate the Egg:
Once the butter and cream cheese mixture is smooth, crack in your large egg. Whisk this into the creamed mixture until it’s fully incorporated and the color is uniform. Continue to mix for about 30 seconds to a minute, ensuring the egg is completely blended. This will create a richer, more cohesive liquid base for our dry ingredients.
-
Add Cake Mix:
Now, it’s time to introduce the star of our cookie show: the strawberry cake mix. Pour the entire box of strawberry cake mix into the bowl with the wet ingredients. Using your spoogin extractr spatula, begin to gently mix the cake mix into the wet ingredients. Be careful not to overmix at this stage. Mix just until the dry ingredients are mostly moistened and a thick, somewhat sticky dough starts to form. You might see some streaks of dry mix initially, and that’s perfectly fine.
-
Chill the Dough:
At this point, the dough will likely be quite soft and potentially a bit sticky, which can make it difficult to handle and shape. To make this process much easier and to ensure our cookies hold their shape during baking, cover the bowl tightly with plastic wrap and refrigerate the dough for at least 30 minutes. Chilling the dough allows the fats to firm up and the flour to hydrate, resulting in a firmer, more manageable dough that will bake into perfectly formed cookies. If time allows, chilling for an hour is even better.
-
Preheat Oven and Prepare Baking Sheets:
While the dough is chilling, preheat your oven to 350°F (175°C). It’s essential to have your oven at the correct temperature before you start rolling your cookies. Line two baking sheets with parchment paper or silicone baking mats. This prevents the cookies from sticking and makes for easy cleanup. If you don’t have parchment paper, you can lightly grease your baking sheets, but parchment is highly recommended for best results.
Shaping and Baking the Cookies
-
Roll and Coat the Dough Balls:
Once the dough has chilled sufficiently, remove it from the refrigerator. If you’re using the optional powdered sugar or pink granulated sugar, place it in a shallow bowl. Scoop out portions of the dough, about 1 to 1.5 tablespoons each, and roll them into smooth balls. If the dough is still a little sticky, you can lightly dust your hands with a bit of flour, but avoid adding too much. Gently roll each dough ball in the sugar until it’s evenly coated. This coating not only adds sweetness and visual appeal but also helps create a lovely crisp exterior. Place the coated dough balls onto your prepared baking sheets, leaving about 2 inches of space between each one, as they will spread slightly as they bake.
-
Create the Kiss Indentation:
Before baking, we need to make a little space for our Hershey’s Kiss. Take one of your unwrapped chocolate Hershey’s Kisses and gently press the pointed end into the center of each dough ball, pushing it about halfway down. You want to create a good indentation but not push all the way through the dough. The heat of the oven will cause the dough to spread around the chocolate kiss, creating that signature “kiss” look. Ensure the chocolate is nestled securely within the dough.
-
Bake to Perfection:
Place the baking sheets in your preheated oven. Bake for 9 to 12 minutes, or until the edges of the cookies are lightly golden brown and the centers appear set. Keep a close eye on them, as the baking time can vary depending on your oven. You don’t want to overbake them, as this will result in dry cookies. The cookies should still look slightly soft in the very center when you take them out. The residual heat will continue to bake them as they cool.
-
Cooling Process:
Once baked, remove the baking sheets from the oven. Let the cookies cool on the baking sheets for about 5 minutes. This initial cooling period allows them to firm up enough to be moved without falling apart. After 5 minutes, carefully transfer the cookies to a wire cooling rack to cool completely. As they cool, the chocolate kiss will remain soft and gooey within the cookie, creating that delightful molten center.
-
Optional Finishing Touches:
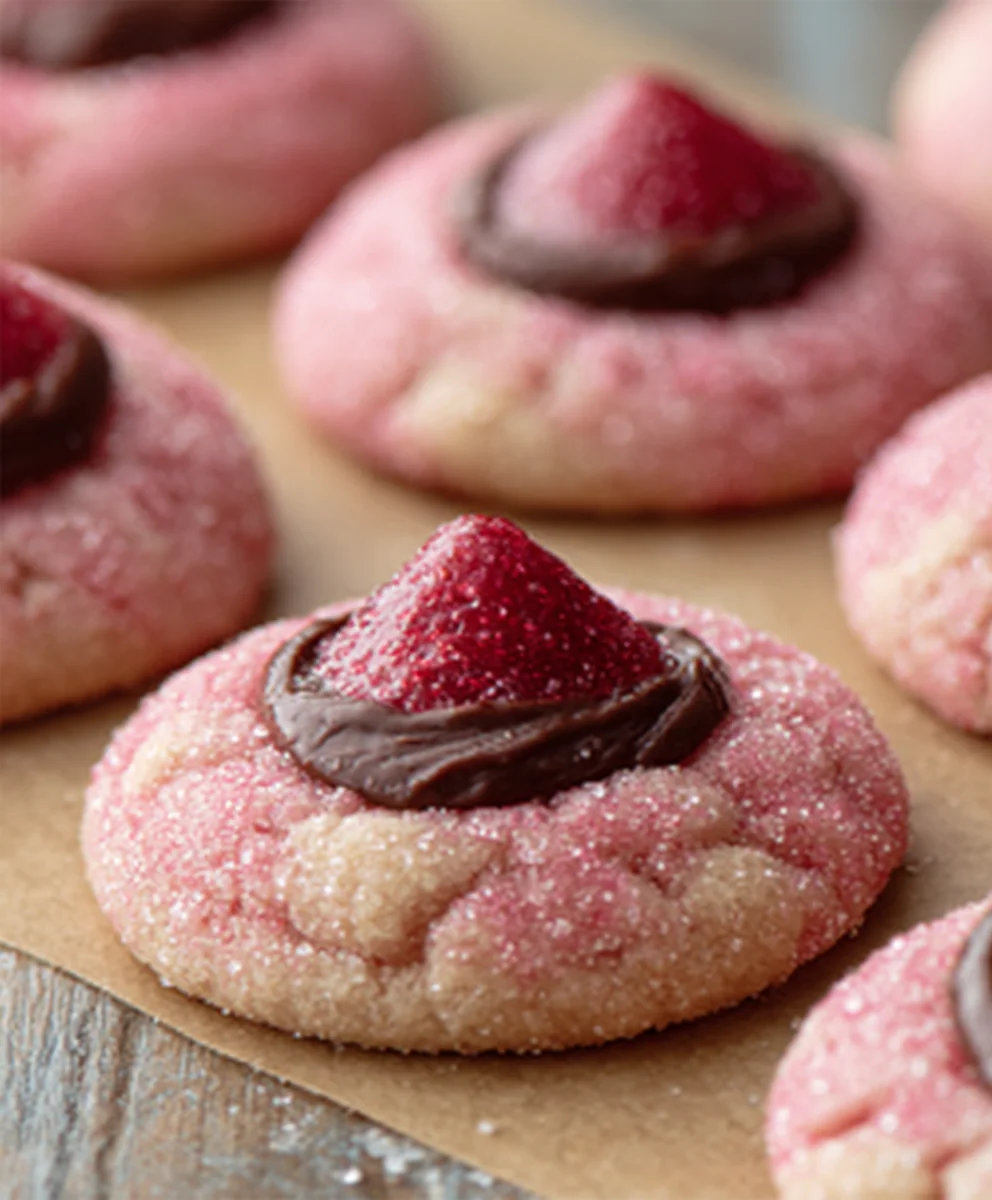
Once the Strawberry Kiss Cookies have cooled completely, you can add any final decorative touches if you wish. While the rolling in sugar provides a lovely finish, you could also drizzle them with a bit of melted white chocolate or even a touch more pink frosting for an extra burst of sweetness and visual appeal. However, they are absolutely delightful and ready to be enjoyed just as they are. The combination of the tender, strawberry-flavored cookie and the warm, melted chocolate kiss is truly irresistible.
Conclusion:
And there you have it – the delightful and incredibly simple process of creating perfect Strawberry Kiss Cookies! These charming little cookies are more than just a treat; they’re a burst of sweet, fruity flavor with a tender, melt-in-your-mouth texture that’s sure to bring smiles to everyone’s faces. They are surprisingly easy to whip up, making them an ideal weekend baking project or a quick way to impress guests with minimal fuss. The subtle tang of the strawberries combined with the buttery cookie base creates a harmonious flavor profile that’s utterly addictive.
I encourage you to give these Strawberry Kiss Cookies a try. Don’t be afraid to experiment! They’re wonderful served on their own with a glass of cold milk, but they also pair beautifully with a cup of tea or coffee. For a more festive presentation, consider dusting them with a little powdered sugar before serving, or arrangin extractg them on a platter alongside fresh berries. You can also adapt the recipe by adding a touch of almond extract for a different nutty nuance, or even swirling in some pink food coloring for an extra pop of visual appeal.
Frequently Asked Questions:
Q: Can I use fresh strawberries instead of freeze-dried for the Strawberry Kiss Cookies?
While freeze-dried strawberries provide the most concentrated flavor and the best texture for these cookies, you can technically use fresh strawberries. However, you’ll need to significantly reduce the moisture content. This would involve pureeing fresh strawberries and then cooking down the puree until it’s very thick and jam-like. Be aware that this will alter the cookie’s texture and may require adjusting the other wet ingredients. For the best results and to achieve the intended flavor profile, freeze-dried strawberries are highly recommended.
Q: How should I store my Strawberry Kiss Cookies?
To keep your Strawberry Kiss Cookies fresh and delicious, store them in an airtight container at room temperature. They should stay fresh for up to 3-4 days. If you notice them becoming a little soft, you can gently refresh them in a low oven (around 250°F or 120°C) for a few minutes. For longer storage, you can freeze the baked cookies in a single layer in a freezer-safe container or bag for up to 2-3 months. They’re also wonderful for making ahead for parties or holidays!
Strawberry Kiss Cookies
Delicious and easy Strawberry Kiss Cookies featuring a tender strawberry cake mix base with a hidden chocolate kiss center.
Ingredients
-
1 box (15.25 oz) strawberry cake mix
-
8 tablespoons (1/2 cup) butter, melted and slightly cooled
-
1 large egg
-
4 ounces cream cheese, softened
-
Optional: powdered sugar or pink granulated sugar for rolling
-
30 chocolate Hershey’s Kisses, unwrapped
Instructions
-
Step 1
In a medium mixing bowl, combine softened cream cheese and slightly cooled melted butter. Cream together until smooth and lump-free. -
Step 2
Add the large egg to the creamed mixture and whisk until fully incorporated and the color is uniform. -
Step 3
Add the entire box of strawberry cake mix to the wet ingredients. Gently mix until just moistened and a thick, slightly sticky dough forms. -
Step 4
Cover the bowl tightly with plastic wrap and refrigerate the dough for at least 30 minutes to make it easier to handle. -
Step 5
Preheat oven to 350°F (175°C). Line two baking sheets with parchment paper or silicone baking mats. -
Step 6
Scoop 1-1.5 tablespoon portions of dough, roll into balls, and optionally roll in powdered or pink granulated sugar. Place on prepared baking sheets, leaving 2 inches between cookies. -
Step 7
Gently press a chocolate Hershey’s Kiss into the center of each dough ball, about halfway down, creating an indentation. -
Step 8
Bake for 9 to 12 minutes, or until edges are lightly golden brown and centers appear set. Cookies should still look slightly soft in the center. -
Step 9
Let cookies cool on the baking sheets for 5 minutes before transferring to a wire rack to cool completely.
Important Information
Nutrition Facts (Per Serving)
It is important to consider this information as approximate and not to use it as definitive health advice.
Allergy Information
Please check ingredients for potential allergens and consult a health professional if in doubt.