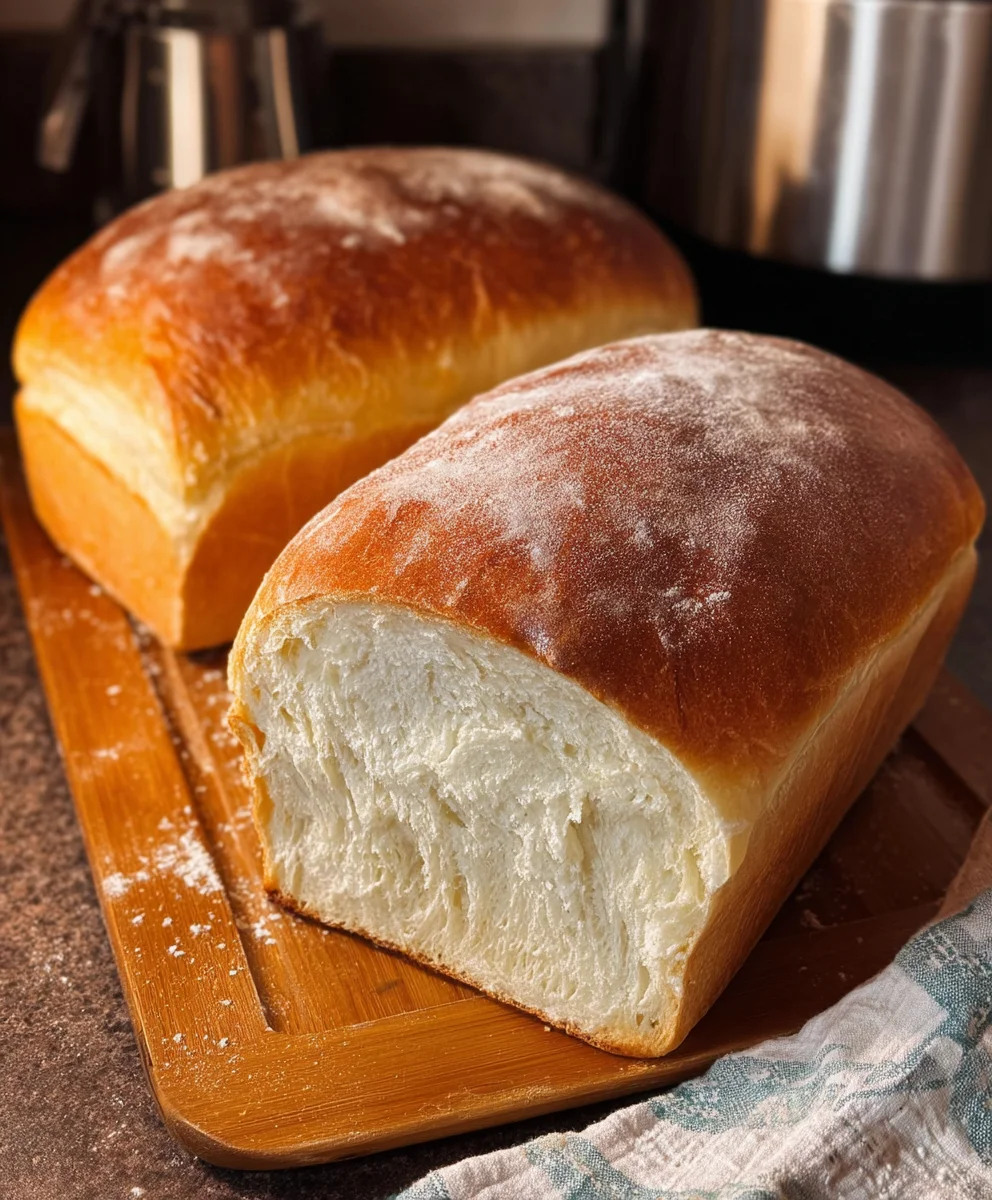
Best White Bread Recipe – Homemade & Delicious
The Best White Bread from Scratch is more than just a recipe; it’s an invitation to a culinary journey that culminates in pure, fluffy perfection. Imagin extracte the aroma of freshly baked bread wafting through your kitchen, a scent that instantly transports you to cozy memories and promises a delightful, wholesome treat. There’s a profound satisfaction in creating something so fundamental and universally loved with your own hands. People adore this classic white bread for its incredibly tender crum extractb, its subtly sweet flavor, and its versatility. It’s the perfect canvas for your favorite butter, jam, or honey, and the absolute foundation for iconic sandwiches. What truly sets the best white bread from scratch apart is the simple magic of basic ingredients transforming into something extraordinary, a testament to the power of time, yeast, and love. Get ready to experience baking bliss!
Ingredients:
- 2 cups warm water
- 1/4 cup granulated sugar
- 5 cups all-purpose flour
- 2 teaspoons active dry yeast
- 2 teaspoons salt
- 3 tablespoons unsalted butter, softened
Getting Started: Activating the Yeast
The foundation of any great bread is properly activated yeast. This is where the magic begin extracts, ensuring a light and airy crum extractb in our loaf. In a large mixing bowl, combine the 2 cups of warm water. The water should feel comfortably warm to the touch, like a baby’s bath – around 105-115°F (40-46°C). Too hot and you’ll kill the yeast; too cool and it won’t activate. To this warm water, add the 1/4 cup of granulated sugar. The sugar acts as food for the yeast, giving it something to feast on and multiply. Now, gently sprinkle the 2 teaspoons of active dry yeast over the surface of the water and sugar mixture. Do not stir at this point. Let it sit undisturbed for about 5-10 minutes. You’ll know the yeast is alive and well when it becomes foamy and bubbly on the surface, resembling a creamy layer. If you don’t see this foamy activity, your yeast may be old or the water temperature was off, and it’s best to start again to ensure a successful rise.
Building the Dough: Flour, Salt, and Butter
Once your yeast mixture is beautifully foamy, it’s time to introduce the other essential components that will form our dough. To the activated yeast mixture, add the 2 teaspoons of salt. Salt is crucial not only for flavor but also for controlling the yeast’s activity, preventing it from fermenting too quickly. Now, gradually add the 5 cups of all-purpose flour, about a cup at a time, stirring with a sturdy spoon or a Danish dough whisk after each addition. As you incorporate the flour, the mixture will start to transform from a liquid to a shaggy dough. Once about half of the flour is incorporated and the dough is too thick to stir easily, it’s time to introduce the softened butter. Add the 3 tablespoons of softened butter. The butter adds richness, tenderness, and a wonderful flavor to the bread. Continue adding the remaining flour, mixing until the dough just comes together. At this stage, the dough might still be a bit sticky, and that’s perfectly okay.
Kneading for Texture and Strength
Now comes the part that truly develops the gluten structure, giving our bread its characteristic chew and rise: kneading. Turn the shaggy dough out onto a lightly floured surface. It’s important not to add too much extra flour during this process, as this can lead to a dry loaf. You want the dough to be slightly tacky but not sticking excessively to your hands or the surgin extracte. Begin kneading by pushing the dough away from you with the heels of your hands, then folding it back over itself. Rotate the dough a quarter turn and repeat. Continue this rhythmic process for about 8-10 minutes. You’re looking for the dough to become smooth, elastic, and no longer sticky. It should spring back slowly when you poke it gently with your finger. This kneading action develops the gluten strands, which trap the gases produced by the yeast during fermentation, allowing the bread to rise beautifully. If you have a stand mixer with a dough hook, you can knead for about 6-8 minutes on medium-low speed after adding all the flour and butter.
First Rise: The Crucial Proofing Stage
After all that hard work kneading, it’s time to let the dough rest and rise. Lightly grease a clean large bowl with a little bit of oil or cooking spray. Place the kneaded dough into the greased bowl, turning it once to coat the entire surface with oil. This prevents a dry skin from forming. Cover the bowl tightly with plastic wrap or a clean, damp kitchen towel. Place the bowl in a warm, draft-free spot in your kitchen. An oven that has been briefly warmed (and then turned off) or a sunny windowsill can be ideal. Allow the dough to rise for about 1 to 1.5 hours, or until it has doubled in size. This is the first proof, and it’s critical for developing flavor and achieving a good volume. The warmth encourages the yeast to work its magic, creating air pockets within the dough. You’ll know it’s ready when it’s puffy and has visibly increased in volume.
Shaping and Second Rise: Preparing for the Oven
Once your dough has impressively doubled in size, it’s time to shape it into its final loaf form. Gently punch down the dough to release some of the accumulated gases. Turn the dough out onto your lightly floured work surface once more. For a classic loaf pan shape, gently pat the dough into a rectangle. Then, starting from one of the shorter ends, tightly roll up the dough into a log. Pinch the seams closed along the bottom and at the ends to prevent the loaf from unfolding during baking. Grease a standard 9×5 inch loaf pan with butter or cooking spray, or line it with parchment paper. Carefully place the shaped dough seam-side down into the prepared loaf pan. Cover the loaf pan loosely with plastic wrap or a clean kitchen towel. Let the dough rise again in a warm place for another 30-60 minutes, or until it has risen about 3/4 of the way up the sides of the pan. This second rise, also known as the final proof, is crucial for achieving that perfect, tall loaf. You can test if it’s ready by gently pressing the side of the dough with your finger; if the indentation springs back slowly, it’s good to go.
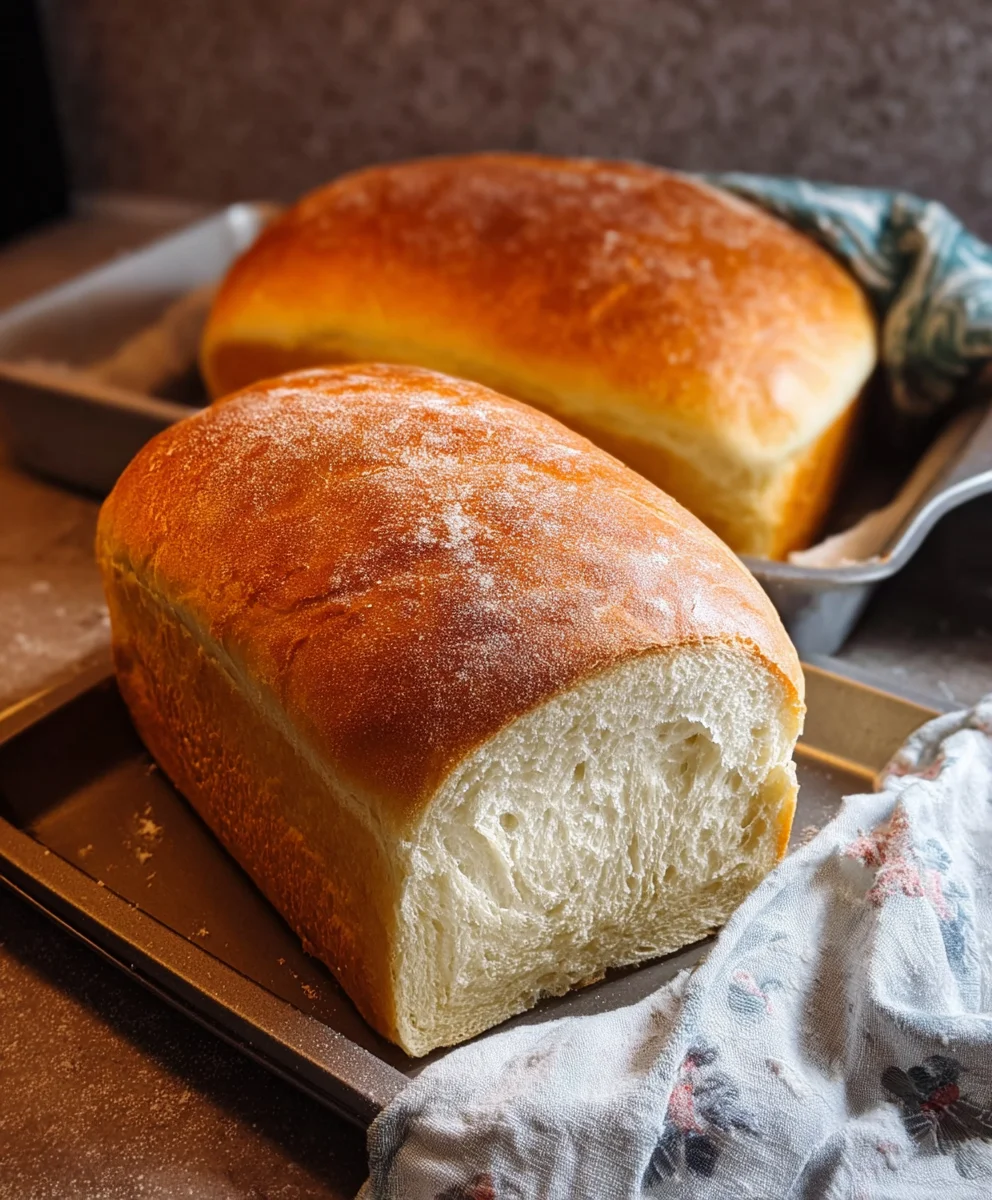
Baking to Golden Perfection
Preheat your oven to 375°F (190°C) during the last 15-20 minutes of the second rise. This ensures the oven is at the correct temperature when you’re ready to bake, promoting an even and efficient rise in the oven. Once the oven is preheated and the dough has completed its second rise, carefully place the loaf pan on the center rack of the oven. Bake for 30-35 minutes. The crust should be a beautiful golden brown, and the loaf should sound hollow when tapped on the bottom. If you have a thermometer, the internal temperature of the bread should register around 195-200°F (90-93°C). If the top is browning too quickly before the inside is cooked, you can loosely tent the loaf with aluminum foil. Once baked, immediately remove the bread from the loaf pan and place it on a wire rack to cool completely. This is vital to prevent the bottom crust from becoming soggy and to allow the internal structure to set properly. Resist the urge to slice it while it’s piping hot – patience is a baker’s virtue for the best results!
Conclusion:
And there you have it – your guide to creating The Best White Bread from Scratch! We’ve walked through each step, from activating the yeast to achieving that perfect golden crust, and I hope you’re feeling inspired to pull out your mixing bowls. This recipe is designed to be accessible for begin extractners while still yielding results that will impress even seasoned bakers. The aroma that fills your kitchen as this bread bakes is truly unparalleled, and the taste of warm, freshly baked white bread is a simple pleasure that never disappoints.
For serving, this bread is incredibly versatile. It’s wonderful simply toasted with butter, perfect for creating classic sandwiches, and makes a fantastic accompaniment to soups and stews. Don’t be afraid to experiment with variations! You can add a touch of honey for a subtle sweetness, or incorporate herbs like rosemary or thyme into the dough for an aromatic twist. Feel free to experiment with different flours for a unique texture, though this classic recipe focuses on the pure simplicity of white bread. I encourage you to give The Best White Bread from Scratch a try; the reward of a homemade loaf is well worth the effort.
Frequently Asked Questions:
Q: Can I freeze this bread once it’s baked?
Absolutely! Once your loaf of The Best White Bread from Scratch has completely cooled, you can wrap it tightly in plastic wrap, then in aluminum foil, or place it in a freezer-safe bag. It will keep well in the freezer for up to 2-3 months. Thaw it at room temperature or gently toast slices from frozen.
Q: My dough didn’t rise very much. What could have gone wrong?
Several factors can affect dough rise. Ensure your yeast was fresh and properly activated in warm, not hot, liquid. Overworking or underworking the dough can also impact its rise. Make sure you’re allowing sufficient time for the dough to double in size in a warm, draft-free spot during both the first and second proofs.
Best White Bread Recipe – Homemade & Delicious
A simple and delicious recipe for homemade white bread, perfect for beginners.
Ingredients
-
2 cups warm water
-
1/4 cup granulated sugar
-
5 cups all-purpose flour
-
2 teaspoons active dry yeast
-
2 teaspoons salt
-
3 tablespoons unsalted butter, softened
Instructions
-
Step 1
In a large mixing bowl, combine the 2 cups of warm water (105-115°F) and the 1/4 cup of granulated sugar. Gently sprinkle the 2 teaspoons of active dry yeast over the surface. Let it sit undisturbed for about 5-10 minutes until foamy and bubbly. -
Step 2
Add the 2 teaspoons of salt to the activated yeast mixture. Gradually add the 5 cups of all-purpose flour, about a cup at a time, stirring until a shaggy dough forms. Add the 3 tablespoons of softened butter and continue mixing until the dough just comes together. -
Step 3
Turn the dough out onto a lightly floured surface and knead for 8-10 minutes until smooth, elastic, and no longer sticky. If using a stand mixer, knead for 6-8 minutes on medium-low speed. -
Step 4
Lightly grease a clean large bowl. Place the kneaded dough in the bowl, turning to coat. Cover tightly with plastic wrap or a damp kitchen towel and let rise in a warm, draft-free spot for 1 to 1.5 hours, or until doubled in size. -
Step 5
Gently punch down the dough and turn it out onto a lightly floured surface. Shape into a log for a loaf pan. Grease a 9×5 inch loaf pan and place the dough seam-side down. Cover loosely and let rise again for 30-60 minutes, or until 3/4 of the way up the pan. -
Step 6
Preheat oven to 375°F (190°C). Bake the loaf for 30-35 minutes until golden brown and it sounds hollow when tapped on the bottom. Internal temperature should be 195-200°F (90-93°C). Cool completely on a wire rack.
Important Information
Nutrition Facts (Per Serving)
It is important to consider this information as approximate and not to use it as definitive health advice.
Allergy Information
Please check ingredients for potential allergens and consult a health professional if in doubt.