Easy Keto Buns – Delicious Low Carb Bread
Easy Keto Buns are about to become your new favorite go-to when that bread craving hits. For so long, maintaining a ketogenic lifestyle felt like saying goodbye to so many comforting staples, and for me, that meant delicious, fluffy bread. I missed sandwiches, toast, and even just a warm bun to dip in soup. But what if I told you that you can enjoy that satisfying bread experience without derailing your low-carb goals? These easy keto buns are a revelation! They’re incredibly simple to make, requiring just a handful of common keto-friendly ingredients and minimal effort. The best part? They bake up with a fantastic texture – surprisingly light and airy, with just the right amount of chew. Whether you’re a seasoned keto enthusiast or just starting out, these easy keto buns will undoubtedly become a cornerstone in your kitchen, proving that indulgence and a low-carb lifestyle can absolutely go hand-in-hand. Get ready to elevate your keto meals!
Absolutely Delicious & Easy Keto Buns
Are you craving a warm, soft, and slightly chewy bun that won’t derail your ketogenic lifestyle? Look no further! These easy keto buns are a game-changer. They’re incredibly simple to make, require just a handful of common keto-friendly ingredients, and taste remarkably close to traditional bread. I’ve been making these for a while now, and they’ve become a staple in my kitchen for everything from breakfast sandwiches to serving alongside soups and salads. Forget those crum extractbly, dry keto alternatives; these are genuinely satisfying. Let’s dive into how you can whip up a batch of these delightful buns in no time!
Ingredients:
Notes on Cheese:
The type of shredded cheese you use can subtly influence the flavor and texture. Mozzarella cheese melts beautifully and provides a mild, neutral flavor, making it ideal for a classic bun. However, you can also experiment with a blend of cheeses. A mix of mozzarella and cheddar can offer a bit more tang, or you could try Monterey Jack for a creamier result. Just ensure the cheese you select is low in carbs and melts well. Pre-shredded cheese is convenient, but sometimes it contains anti-caking agents that can affect the texture, so block cheese shredded yourself is often preferred if you have the time.
Cooking Instructions:
This recipe is incredibly straightforward, making it perfect for begin extractner keto bakers or anyone short on time. The magic happens when the cheese melts and binds everything together, creating a wonderfully chewy and satisfying texture.
Step 1: Melting the Cheesy Base
The first crucial step is to melt the shredded cheese and cream cheese together. This forms the foundation of your keto buns. You have two excellent options for this: using your microwave or a double boiler on the stovetop.
To microwave: Place the 3 cups of shredded cheese and the 2 ounces of softened cream cheese into a microwave-safe bowl. Microwave on high for 30-second intervals, stirring well between each interval. Continue this process until the cheeses are completely melted and well combined into a smooth, gooey mass. Be careful not to overcook, as this can make the cheese tough.
Using a double boiler: Fill the bottom pot of your double boiler with about an inch or two of water and bring it to a simmer over medium heat. Place the shredded cheese and softened cream cheese in the top pot, ensuring the bottom of the pot doesn’t touch the simmering water. Stir frequently until the cheeses are completely melted and smooth. This method offers more control and is less prone to scorching than the microwave. Once melted, carefully remove the top pot from the heat.
Step 2: Incorporating Dry Ingredients
Once your cheese mixture is smooth and melted, it’s time to add the dry ingredients. To the warm, melted cheese mixture, add the 1 3/4 cups of almond flour and the 1 tablespoon of baking powder. The almond flour provides the bulk and structure, while the baking powder is essential for giving the buns a little lift and making them lighter. Whisk these dry ingredients into the cheese mixture thoroughly. It will be quite thick and sticky at this stage. Ensure there are no pockets of dry flour remaining. A sturdy whisk or a spatula works best for this part.
Step 3: Adding the Eggs
Now, it’s time to introduce the eggs. Gently crack your 3 large eggs into the bowl with the cheese and almond flour mixture. You can add them one at a time, whisking well after each addition, or add them all at once. This is where the dough starts to come together. Stir everything until a cohesive, slightly sticky dough forms. It might seem a little wet or oily initially, but keep stirring until it’s well combined. This dough will be different from traditional wheat-based doughs; it won’t be elastic or kneadable.
Step 4: Preparing for Baking
Preheat your oven to 375 degrees Fahrenheit (190 degrees Celsius). While the oven heats, line a baking sheet with parchment paper. This is crucial to prevent the buns from sticking to the baking sheet. You can also lightly grease the parchment paper for extra insurance. Once your dough is ready, you’ll need to portion it out. The dough will be quite sticky, so wetting your hands slightly with water or oil can help prevent it from sticking to you. Alternatively, you can use a cookie scoop or two spoons to form the buns.
Step 5: Shaping and Baking the Buns
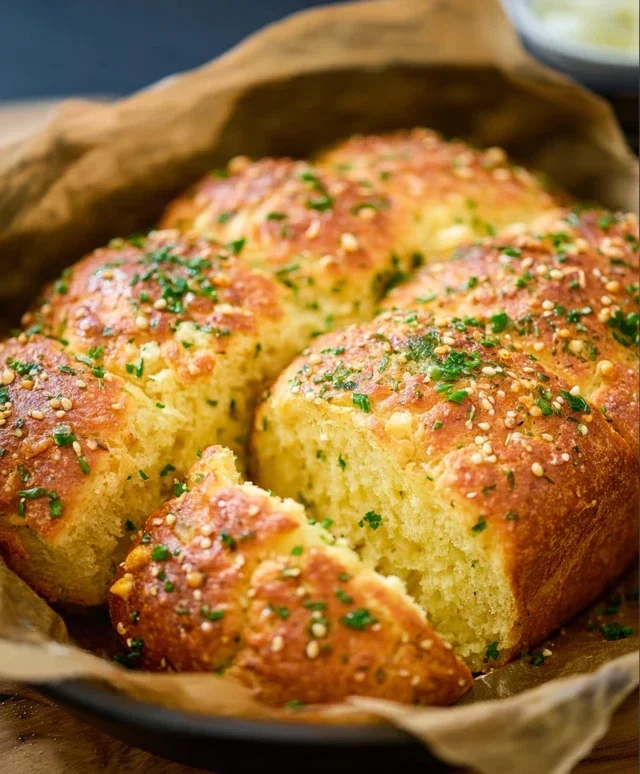
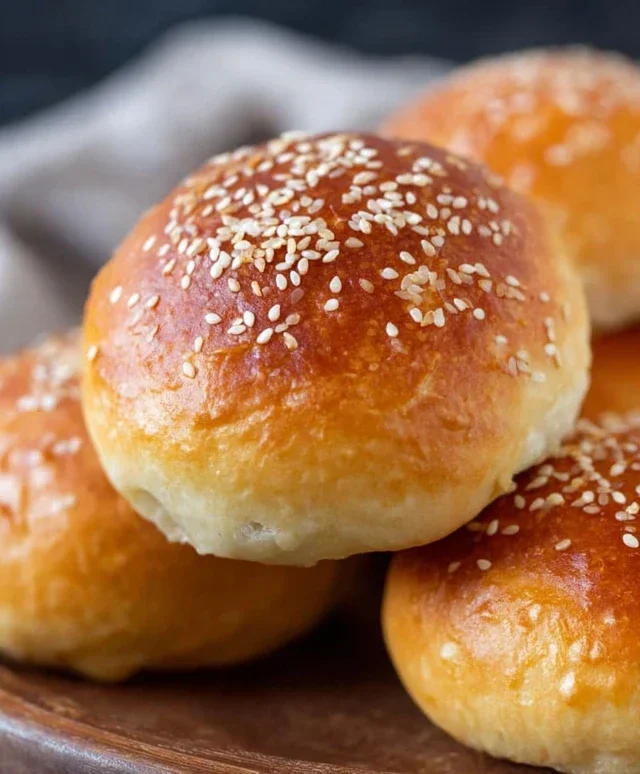
Scoop out portions of the dough, about the size of a golf ball, and place them onto the prepared baking sheet. You can gently shape them into rounds or slightly flatten them if you prefer. Leave a little space between each bun as they will expand slightly during baking. You should be able to get about 8-10 buns from this recipe, depending on their size. Place the baking sheet into the preheated oven. Bake for 15-20 minutes, or until the buns are golden brown and puffed up. The exact baking time can vary depending on your oven and the size of your buns. Keep an eye on them towards the end of the baking time to prevent over-browning.
Step 6: Cooling and Enjoying
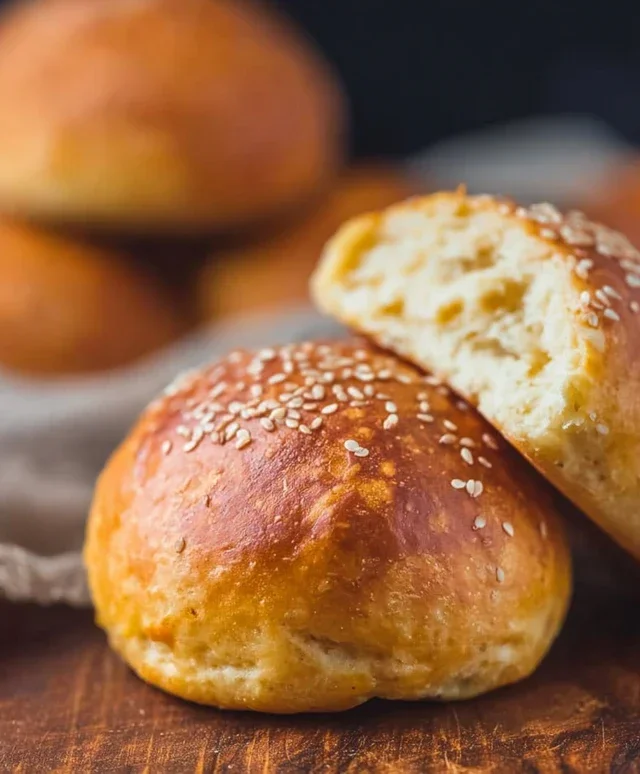
Once baked to perfection, carefully remove the baking sheet from the oven. Let the keto buns cool on the baking sheet for a few minutes before transferring them to a wire rack to cool completely. They are delicious served warm, but they also hold up well at room temperature. These buns are fantastic sliced in half and toasted, perfect for holding your favorite keto-friendly sandwich fillings, or simply enjoyed with a smear of butter. Store any leftover buns in an airtight container at room temperature for a day or two, or in the refrigerator for longer storage. You can also freeze them! Enjoy your homemade, guilt-free keto buns!
Conclusion:
So there you have it – a truly simple way to enjoy delicious, guilt-free keto buns! This recipe is fantastic because it delivers that satisfying bread-like texture and flavor we often miss on a low-carb diet, all without the carb count. The minimal ingredients and straightforward steps make it accessible even for begin extractner bakers, proving that you don’t need to be a culinary expert to whip up something truly special. I’m so excited for you to try these Easy Keto Buns and rediscover the joy of having a perfect bun for your burgers, sandwiches, or even just a side with your favorite soup.
These versatile buns are perfect served warm as a delightful accompaniment to almost any meal. Imagin extracte them cradling your juicy keto burger, holding together your favorite deli meats for a hearty sandwich, or simply toasted and buttered as a comforting treat. Don’t be afraid to get creative with variations! You can mix in some herbs like rosemary or chives for an herby kick, or a sprinkle of garlic powder for a savory twist. I truly encourage you to give this recipe a go; you might just find your new go-to keto staple!
Frequently Asked Questions:
Can I make these keto buns ahead of time?
Absolutely! These buns store wonderfully. Once completely cooled, you can keep them in an airtight container at room temperature for up to 2-3 days, or in the refrigerator for about a week. For longer storage, I recommend freezing them in a single layer before transferring to a freezer bag. Reheat gently in a toaster oven or a dry skillet for that fresh-baked taste.
What’s the best way to reheat these buns?
The best method for reheating depends on how you like your bun! For a soft interior and slightly crisp exterior, a toaster oven or a preheated conventional oven at around 300°F (150°C) for a few minutes is ideal. If you’re in a hurry, a quick toast in a dry skillet over medium heat works wonders too. Just be careful not to overcook them, as they can become a little dry.
Can I use a different type of flour in this recipe?
While this recipe is specifically formulated for almond flour, which is key to achieving the right texture and flavor for Easy Keto Buns, some experimentation is possible. Coconut flour can be substituted, but it’s much more absorbent, so you would likely need to adjust the liquid quantities significantly. For best results and to ensure you get those perfect Easy Keto Buns, I highly recommend sticking to the almond flour as written.
Easy Keto Buns
Quick and simple keto-friendly buns perfect for sandwiches or as a side.
Ingredients
-
3 cups shredded cheese (mozzarella cheese)
-
2 ounces cream cheese
-
1 3/4 cups almond flour
-
1 tablespoon baking powder
-
3 large eggs
Instructions
-
Step 1
Preheat oven to 375°F (190°C). Line a baking sheet with parchment paper. -
Step 2
In a microwave-safe bowl, combine the shredded cheese and cream cheese. Microwave in 30-second intervals, stirring between each, until fully melted and smooth. Allow to cool slightly. -
Step 3
In a separate bowl, whisk together the almond flour and baking powder. -
Step 4
Add the eggs to the melted cheese mixture and stir until well combined. Gradually add the almond flour mixture and mix until a dough forms. -
Step 5
Divide the dough into 12 equal portions and roll them into balls. Place them on the prepared baking sheet, flattening them slightly. -
Step 6
Bake for 20 minutes, or until golden brown and puffed up. -
Step 7
Let cool on the baking sheet for a few minutes before transferring to a wire rack to cool completely.
Important Information
Nutrition Facts (Per Serving)
It is important to consider this information as approximate and not to use it as definitive health advice.
Allergy Information
Please check ingredients for potential allergens and consult a health professional if in doubt.