Stunning Spring Desserts to Amaze Your Guests
Stunning Spring Desserts to Awe Your Guests! As the days grow longer and the world bursts into vibrant color, there’s no better time to bring a touch of that natural beauty and freshness to your table. We all love that moment when our guests take their first bite of a dessert and their eyes widen in delight. It’s that gasp of surprise, that murmur of appreciation, that truly makes hosting special. These stunning spring desserts are designed to do just that. They are more than just sweet treats; they are edible works of art, celebrating the season’s bounty with bright, fresh flavors and delicate textures. Imagin extracte the joy on your loved ones’ faces as they savor a dessert that whispers of blooming flowers and sunshine. What makes these creations so unforgettable is their perfect balance of taste and visual appeal, transforming simple ingredients into something truly extraordinary. Get ready to elevate your next gathering with these show-stopping, stunning spring desserts!
Spring Desserts to Awe Your Guests!
Spring is a time of renewal, vibrant colors, and lighter, fresher flavors. What better way to celebrate the season than by enchanting your guests with a truly stunning dessert? Forget heavy, brooding flavors; we’re diving into a world of delicate creams, bright fruits, and floral notes that capture the essence of spring. These recipes are designed to be not just delicious, but also visually captivating, transforming your dessert table into a work of art. Let’s get baking and create some unforgettable sweet endings!
This article will guide you through creating a show-stopping dessert that’s perfect for any spring gathering, from a casual brunch to a more formal dinner party. We’ll focus on a delightful Lemon and Raspberry Mousse Tart, a dessert that balances tartness with sweetness, creamy textures with a crisp base, and vibrant colors that scream spring.
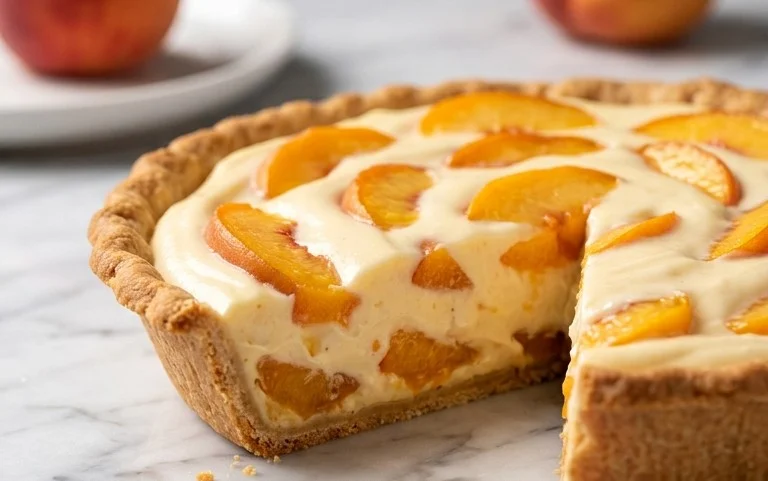
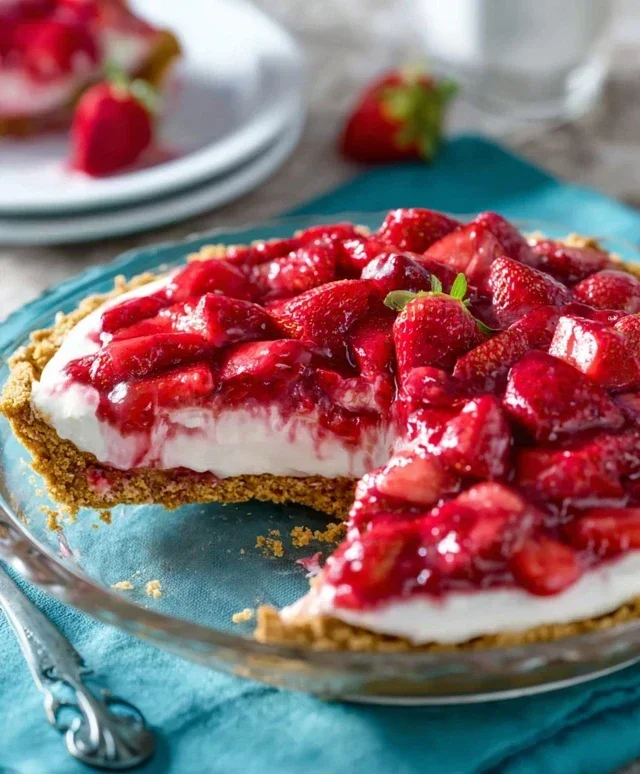
Lemon and Raspberry Mousse Tart
This tart is a symphony of flavors and textures. The bright, zesty lemon mousse is light and airy, complemented by the sweet and slightly tart burst of fresh raspberries. The crisp, buttery tart shell provides a perfect foundation, and a hint of mint or edible flowers can elevate its visual appeal even further.
Ingredients:
Creating the Perfect Tart Shell
The foundation of any great tart is its crust. We want a shell that’s golden brown, crisp, and crum extractbly, providing a delightful contrast to the creamy filling. This recipe uses a classic Pâte Sucrée, a sweet shortcrust pastry that’s perfect for tarts.
1. In a large bowl, whisk together the all-purpose flour, 1/2 cup granulated sugar, and salt. This dry mixture forms the base of our pastry.
2. Add the chilled, cubed butter to the flour mixture. Using a pastry blender, your fingertips, or a food processor, cut the butter into the dry ingredients until the mixture resembles coarse crum extractbs with some pea-sized pieces of butter remaining. These larger butter pieces are key to creating flaky layers.
3. In a small bowl, whisk together the egg yolk with 2 tablespoons of ice water. Gradually add this wet mixture to the dry ingredients, mixing until the dough just begin extracts to come together. Be careful not to overwork the dough, as this can result in a tough crust. If the dough seems too dry and crum extractbly, add the remaining tablespoon of ice water, a little at a time, until it forms a cohesive ball.
4. Turn the dough out onto a lightly floured surface and gently bring it together into a disc. Wrap the disc tightly in plastic wrap and refrigerate for at least 30 minutes, or up to 2 days. This chilling period allows the gluten to relax and the butter to firm up, making the dough easier to roll and resulting in a more tender crust.
5. Preheat your oven to 375°F (190°C). On a lightly floured surface, roll out the chilled dough into a circle about 12 inches in diameter and 1/8 inch thick. Carefully transfer the dough to a 9-inch tart pan with a removable bottom, gently pressing it into the bottom and up the sides. Trim any excess dough. Prick the bottom of the tart shell all over with a fork; this prevents it from puffing up during baking.
6. Line the tart shell with parchment paper and fill it with pie weights, dried beans, or rice. This is called blind baking and ensures the crust bakes evenly without shrinking or becoming soggy. Bake for 15 minutes, then carefully remove the parchment paper and weights. Continue to bake for another 10-15 minutes, or until the crust is golden brown and cooked through. Let it cool completely on a wire rack before filling.
Whipping Up the Luscious Lemon Mousse
This mousse is where the sunshine of spring truly shines. It’s creamy, tangy, and incredibly refreshing. The key is a delicate balance of sweetness and acidity.
1. In a medium saucepan, combine 1/2 cup of the heavy cream and the 1/2 cup granulated sugar. Heat over medium heat, stirring occasionally, until the sugar is dissolved and the cream is just simmering. Do not boil.
2. In a separate bowl, whisk together the 4 large egg yolks until pnon-alcoholic ale yellow. Slowly and gradually, pour the hot cream mixture into the egg yolks while whisking constantly. This tempering process prevents the egg yolks from scrambling.
3. Return the tempered egg mixture to the saucepan. Cook over low heat, stirring constantly with a wooden spoon or spatula, until the custard thickens enough to coat the back of the spoon. This should take about 5-8 minutes. Do not let it boil. Remove from heat immediately.
4. Stir in the fresh lemon juice and lemon zest until well combined. In a small bowl, sprinkle the unflavored gelatin over the 1/4 cup cold water. Let it sit for about 5 minutes to bloom. Add the bloomed gelatin to the warm lemon custard and stir until it is completely dissolved. The gelatin will help the mousse set beautifully.
5. Pour the lemon custard into a clean bowl and let it cool slightly, about 10-15 minutes. While the custard is cooling, whip the remaining 1 cup of heavy cream in a separate bowl until stiff peaks form. Be careful not to over-whip, as this can make the cream turn grainy.
6. Once the lemon custard has cooled but is still liquid, gently fold about one-third of the whipped cream into it to lighten the mixture. Then, gently fold in the remaining whipped cream until just combined. The goal is to keep the mousse light and airy.
Assembling and Adorning Your Masterpiece
The final steps bring all the elements together and add the finishing touches that make this dessert truly stunning.
1. Pour the lemon mousse evenly into the cooled, baked tart shell. Gently spread the mousse to create a smooth, even surface.
2. Arrange the fresh raspberries over the top of the lemon mousse. For a more artistic look, you can create patterns or clusters. If your raspberries are particularly tart, you can gently toss them with the 2 tablespoons of sugar before arrangin extractg them.
3. Cover the tart loosely with plastic wrap and refrigerate for at least 4 hours, or preferably overnight, to allow the mousse to set completely. This chilling time is crucial for achieving the perfect texture.
4. Before serving, gently remove the sides of the tart pan. Garnish with fresh mint sprigs or edible flowers for a final touch of spring elegance. The vibrant red of the raspberries against the pnon-alcoholic ale yellow mousse and golden crust, accented by a touch of green, is a sight that will surely impress your guests.
This Lemon and Raspberry Mousse Tart is a testament to the beauty and freshness of spring. It’s a dessert that’s as delightful to look at as it is to eat, and I’m confident it will leave your guests utterly charmed. Enjoy the process, savor the flavors, and bask in the admiration!

Conclusion:
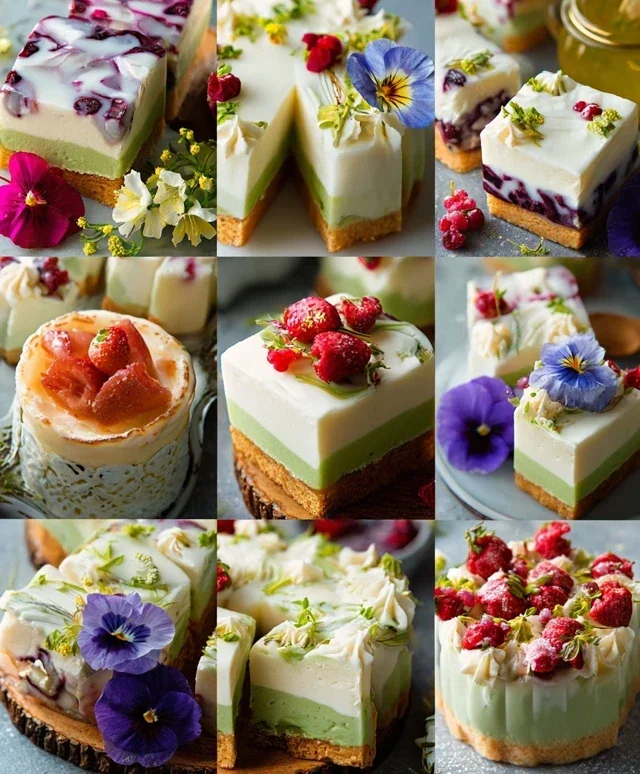
As you can see, these stunning spring desserts offer a delightful way to celebrate the season and impress your guests. From vibrant fruit tarts bursting with fresh flavors to elegantly layered mousses, each recipe is designed to be as visually appealing as it is delicious. They are perfect for Easter brunches, Mother’s Day gatherings, or simply any occasion where you want to add a touch of springtime magic to your table. Don’t hesitate to get creative with your toppings and decorations – the possibilities are endless!
I truly encourage you to try these recipes. They are more approachable than you might think and the reward of seeing your guests’ delighted faces is absolutely worth it. Whether you’re an experienced baker or just starting out, these desserts will undoubtedly elevate your hosting game. So gather your fresh ingredients, put on your apron, and get ready to create some truly memorable sweet treats this spring!
Frequently Asked Questions:
Can I make these desserts ahead of time?
Many of these spring desserts can be prepared partially or entirely in advance. For instance, fruit fillings can be made a day or two ahead, and many cakes and mousses benefit from chilling overnight to allow flavors to meld and textures to set. Be sure to check individual recipe notes for specific make-ahead instructions and storage recommendations to maintain optimal freshness and presentation.
What if I don’t have a specific spring fruit mentioned in a recipe?
Don’t worry! Most of these recipes are quite adaptable. You can often substitute other seasonal fruits that are readily available to you. Think about flavor profiles: if a recipe calls for raspberries, strawberries or even finely diced peaches could work beautifully. The key is to maintain a similar level of sweetness and acidity for the best balance of flavors.
How can I make these desserts more kid-friendly?
For a more kid-friendly twist, consider adding fun toppings like edible flowers, colorful sprinkles, or miniature chocolate chips. You could also serve components separately, allowing children to assemble their own parfaits or decorate their own mini cakes. Simple flavor adjustments, like reducing the tartness or adding a hint of vanilla, can also be appealing to younger palates.
Stunning Spring Desserts to Awe Your Guests!
A collection of refreshing and visually appealing desserts perfect for spring gatherings.
Ingredients
-
1 cup all-purpose flour
-
1/2 cup granulated sugar
-
1/4 cup unsalted butter, softened
-
2 large eggs
-
1 teaspoon vanilla extract
-
1 cup fresh strawberries, sliced
-
1/2 cup fresh blueberries
-
1/4 cup heavy cream, whipped
Instructions
-
Step 1
Preheat your oven to 350°F (175°C). Grease and flour an 8-inch baking pan. -
Step 2
In a large bowl, cream together the softened butter and granulated sugar until light and fluffy. -
Step 3
Beat in the eggs one at a time, then stir in the vanilla extract. -
Step 4
Gradually add the all-purpose flour to the wet ingredients, mixing until just combined. Do not overmix. -
Step 5
Pour the batter into the prepared baking pan and spread evenly. -
Step 6
Bake for 30-35 minutes, or until a toothpick inserted into the center comes out clean. -
Step 7
Let the cake cool in the pan for 10 minutes before inverting it onto a wire rack to cool completely. -
Step 8
Once cooled, top the cake with sliced strawberries, blueberries, and a dollop of whipped cream.
Important Information
Nutrition Facts (Per Serving)
It is important to consider this information as approximate and not to use it as definitive health advice.
Allergy Information
Please check ingredients for potential allergens and consult a health professional if in doubt.