Dark Chocolate Cheesecake Brownies-Decadent Dessert
Dark Chocolate Cheesecake Brownies are the ultimate indulgence, a harmonious marriage of two beloved desserts that will have you weak in the knees. Imagin extracte the deep, fudgy intensity of a perfectly baked brownie meeting the luxurious, creamy swirl of classic cheesecake. That’s precisely what we’re creating today, and trust me, it’s a game-changer. We all crave that decadent, melt-in-your-mouth experience, and these dark chocolate cheesecake brownies deliver it in spades. What makes them so incredibly special? It’s the textural contrast – the slightly crisp edges of the brownie giving way to a dense, moist interior, all crowned with that tangy, sweet cheesecake layer. It’s a symphony of flavors and textures that’s simply irresistible. Get ready to transform your dessert game with these extraordinary dark chocolate cheesecake brownies.
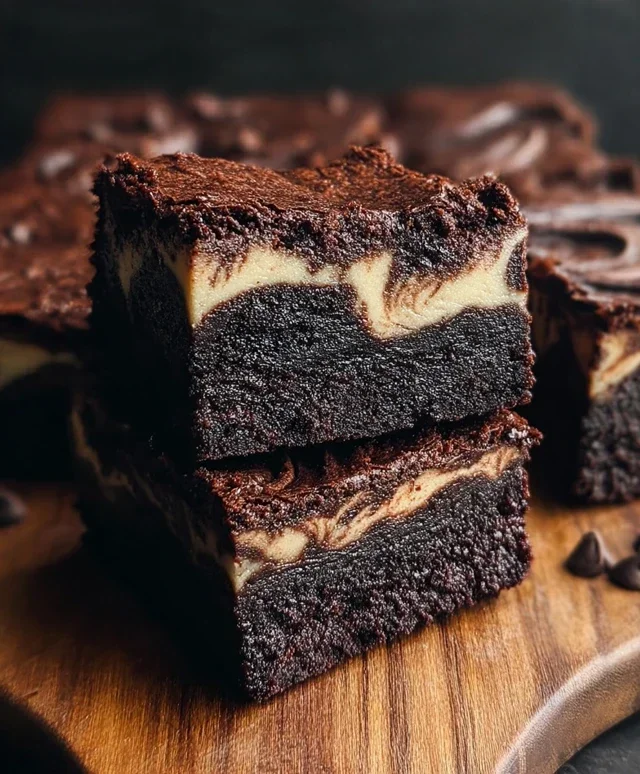
Dark Chocolate Cheesecake Brownies
Prepare yourself for a dessert revelation! These Dark Chocolate Cheesecake Brownies are the ultimate fusion of two beloved treats. Imagin extracte the deep, rich intensity of a decadent brownie, then swirl in the creamy, tangy bliss of a classic cheesecake. It’s pure indulgence, and the best part? They’re surprisingly achievable in your own kitchen. This recipe brings together the best of both worlds for a truly unforgettable experience. We’re talking about that irresistible combination of fudgy chocolate and smooth, luscious cheesecake that melts in your mouth.
Ingredients:
Instructions:
Step 1: Prepare the Brownie Batter
Begin extract by preheating your oven to 350°F (175°C). Grease and flour an 8×8 inch baking pan, or line it with parchment paper, leaving an overhang on the sides. This will make it super easy to lift the brownies out once they’re baked. In a medium microwave-safe bowl, combine the ½ cup unsalted butter and 1 cup dark chocolate chips. Microwave in 30-second intervals, stirring well after each interval, until the butter is completely melted and the chocolate is smooth and glossy. Be patient here; you don’t want to scorch the chocolate. Once melted, stir in ¾ cup of granulated sugar until fully incorporated. Let this mixture cool slightly for a few minutes. This is crucial; you don’t want to cook the eggs when you add them.
Step 2: Combine Wet and Dry for the Brownie Base
Once the chocolate mixture has cooled a bit, whisk in the 2 large eggs, one at a time, until well combined. Stir in 1 tsp of vanilla extract. In a separate small bowl, whisk together the ⅔ cup all-purpose flour, 2 tbsp cocoa powder, and ¼ tsp salt. Gently fold the dry ingredients into the wet ingredients until just combined. Be careful not to overmix; overmixing can lead to tough brownies. A few streaks of flour are okay, as they will disappear during baking. The batter will be thick and rich. Spread this brownie batter evenly into your prepared baking pan, creating a smooth base.
Step 3: Create the Creamy Cheesecake Swirl
Now for the cheesecake layer! In a medium bowl, beat the 8 oz of softened cream cheese until it’s smooth and creamy. Make sure your cream cheese is truly softened; this is key for a lump-free cheesecake mixture. You can leave it out on the counter for about an hour, or gently warm it in the microwave for a few seconds if you’re in a hurry, but be careful not to melt it. Beat in ¼ cup of granulated sugar until well combined and smooth. Then, beat in 1 large egg and ½ tsp of vanilla extract until just incorporated. Again, avoid overmixing. The cheesecake mixture should be light and airy.
Step 4: Assemble and Swirl Your Masterpiece
Dollop spoonfuls of the cream cheese mixture evenly over the brownie batter in the baking pan. Don’t worry about being perfect with this part; the swirling is what makes it look so beautiful and adds to the delightful texture. Now, grab a butter knife or a skewer and gently swirl the cream cheese mixture into the brownie batter. Create marbled patterns by draggin extractg the knife through both layers. You can make simple figure-eights or more intricate designs. The goal is to create distinct ribbons of brownie and cheesecake, rather than completely blending them. This swirling process is where the magic happens visually and texturally.
Step 5: Bake to Perfection
Place the pan in the preheated oven and bake for 25-30 minutes, or until the edges of the brownies are set and the cheesecake filling is mostly set with a slight jiggle in the center. A toothpick inserted near the center should come out with moist crum extractbs attached, but not wet batter. Be careful not to overbake, as this can dry out both the brownie and cheesecake layers. Once baked, let the brownies cool completely in the pan on a wire rack. This is a crucial step for clean cuts and for the flavors to fully meld. Patience is your friend here! Once cooled, you can lift them out using the parchment paper overhang and cut them into squares. Enjoy these heavenly Dark Chocolate Cheesecake Brownies!
Conclusion:
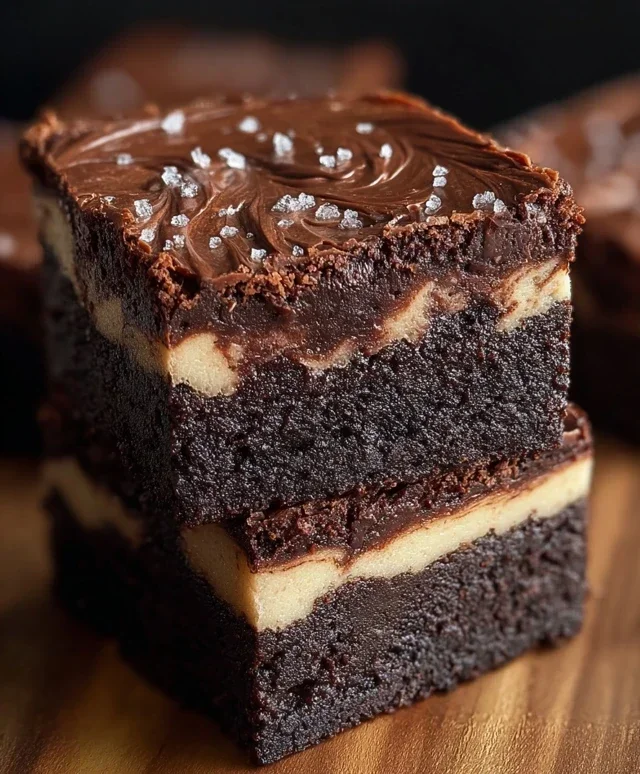
So there you have it! These Dark Chocolate Cheesecake Brownies are truly a showstopper. The rich, fudgy brownie base perfectly complements the creamy, tangy cheesecake swirl, creating a decadent dessert experience that’s surprisingly easy to achieve. It’s the ultimate treat for any chocolate lover, offering a delightful textural contrast and an explosion of deep, dark chocolate flavor. They are perfect for special occasions, a comforting indulgence, or simply when you crave something truly extraordinary.
When it comes to serving, these beauties are divine on their own. However, I absolutely love them with a dollop of fresh whipped cream or a scoop of vanilla bean ice cream to cut through the richness. A sprinkle of flaky sea salt on top also elevates the chocolate notes beautifully. For variations, feel free to add a handful of raspberries to the cheesecake swirl for a burst of tartness, or a swirl of caramel sauce for an extra layer of indulgence. You could even add a touch of espresso powder to the brownie batter for a deeper, more complex chocolate flavor.
I really encourage you to give these Dark Chocolate Cheesecake Brownies a try. They are a labor of love that yields incredibly rewarding results, and I’m confident they’ll become a new favorite in your baking repertoire. Get ready for rave reviews!
FAQs:
Can I make these ahead of time?
Absolutely! These brownies are even better the next day, as the flavors meld together beautifully. Store them in an airtight container at room temperature for up to 3 days, or in the refrigerator for up to a week. Let them come to room temperature before serving for the best texture.
What if I don’t have dark chocolate? Can I use milk chocolate?
While dark chocolate provides the signature rich flavor, you can experiment with other chocolates. If using milk chocolate, the brownies will be sweeter and less intensely chocolatey. You might consider reducing the sugar slightly in the brownie batter if you opt for a sweeter chocolate. Semisweet chocolate is also a good option if dark chocolate is unavailable.
How do I get the cheesecake swirl to look nice?
The key to a beautiful swirl is gentle layering and a toothpick or knife. Dollop spoonfuls of the cheesecake mixture over the brownie batter. Then, using a toothpick or the tip of a knife, gently swirl the cheesecake into the brownie batter. Avoid overmixing, or you’ll lose the distinct layers.
Dark Chocolate Cheesecake Brownies
Decadent brownies swirled with a rich dark chocolate cheesecake layer.
Ingredients
-
½ cup unsalted butter
-
1 cup dark chocolate chips
-
¾ cup granulated sugar
-
2 large eggs
-
1 tsp vanilla extract
-
⅔ cup all-purpose flour
-
2 tbsp cocoa powder
-
¼ tsp salt
-
8 oz cream cheese, softened
-
¼ cup granulated sugar
-
1 large egg
-
½ tsp vanilla extract
Instructions
-
Step 1
Preheat oven to 350°F (175°C). Grease and flour an 8×8 inch baking pan. -
Step 2
In a heatproof bowl, melt ½ cup unsalted butter and 1 cup dark chocolate chips over a double boiler or in the microwave in 30-second intervals, stirring until smooth. Let cool slightly. -
Step 3
In a separate bowl, whisk together ¾ cup granulated sugar and 2 large eggs. Stir in 1 tsp vanilla extract. Pour the melted chocolate mixture into the egg mixture and stir until combined. -
Step 4
In a small bowl, whisk together ⅔ cup all-purpose flour, 2 tbsp cocoa powder, and ¼ tsp salt. Gradually add the dry ingredients to the wet ingredients, mixing until just combined. Do not overmix. -
Step 5
For the cheesecake layer, beat 8 oz cream cheese, softened, with ¼ cup granulated sugar and ½ tsp vanilla extract until smooth. Beat in 1 large egg until combined. -
Step 6
Spread the brownie batter evenly into the prepared pan. Dollop spoonfuls of the cheesecake mixture over the brownie batter and swirl gently with a knife or toothpick. -
Step 7
Bake for 30-35 minutes, or until a toothpick inserted into the center of the brownies comes out with moist crumbs attached (not wet batter). -
Step 8
Let cool completely in the pan on a wire rack before cutting into squares.
Important Information
Nutrition Facts (Per Serving)
It is important to consider this information as approximate and not to use it as definitive health advice.
Allergy Information
Please check ingredients for potential allergens and consult a health professional if in doubt.