Ajitama Ramen Eggs-Perfectly Marinated Soft-Boiled Eggs
Ramen eggs, or ajitama, are more than just a simple topping; they are little jewels of flavor that elevate any bowl of ramen from delicious to truly unforgettable. I’ve spent countless hours perfecting my recipe for these marinated marvels, and let me tell you, the results are worth every minute. What is it about these soft-boiled, savory-sweet eggs that has ramen lovers so captivated? It’s the magic that happens when a perfectly cooked egg yolk, still slightly jammy, is bathed in a rich, umami-packed marinade. The soy sauce, non-alcoholic mirin, and non-alcoholic sake infuse the egg white with a depth of flavor that’s both comforting and exciting. They bring a luxurious texture and a burst of concentrated deliciousness to every bite, making them an absolutely essential component of any authentic ramen experience. Forget plain boiled eggs; it’s time to master the art of the perfect ramen egg.
Ramen Eggs (Ajitama)
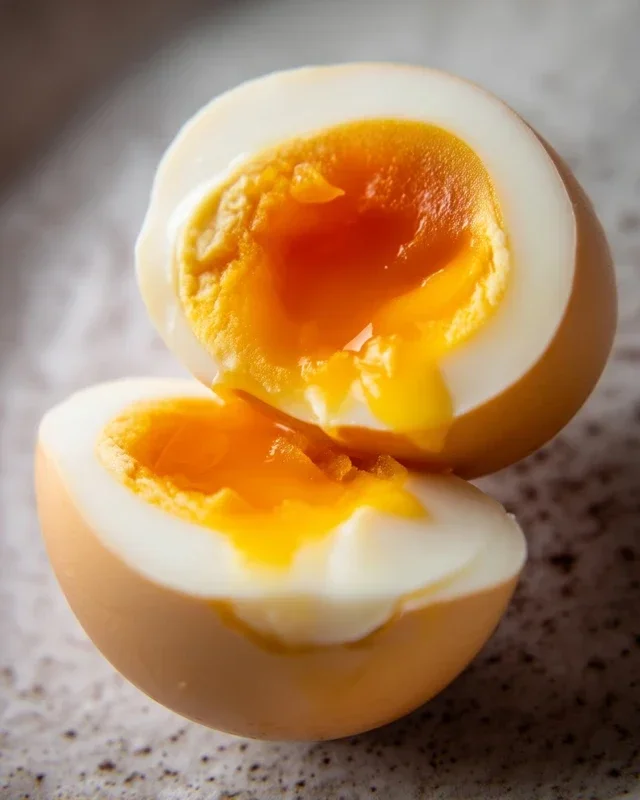
There’s something incredibly satisfying about a perfectly cooked ramen egg, also known as ajitama. The glossy, marinated whites and the jammy, golden yolks are the crowning glory of any steaming bowl of ramen. Forget those chalky, overcooked yolks you might have encountered elsewhere; ajitama are a completely different league. They’re rich, savory, and subtly sweet, adding an umami explosion to your noodles. Making them at home is surprisingly simple and incredibly rewarding. Once you try these, you’ll never go back to plain old hard-boiled eggs again. They’re also fantastic on their own as a snack, in salads, or even on avocado toast. This recipe focuses on achieving that perfect texture and flavor that makes ajitama so beloved.
Ingredients:
*Note on eggs: For the best results and easier peeling, I highly recommend using eggs that are at least a few days old. Fresher eggs tend to be stickier and more difficult to peel cleanly. If you only have very fresh eggs, you can try the vinegar trick mentioned in the boiling instructions.
Cooking Instructions
The journey to perfect ajitama involves a few key stages: getting the eggs cooked just right, preparing the flavorful marinade, and then letting the magic of marination happen. Each step is crucial for achieving that signature texture and taste.
1. Boiling the Eggs to Perfection
This is arguably the most critical step for achieving that coveted jammy yolk. We’re aiming for a soft-boiled egg, where the whites are fully set but the yolks are still delightfully runny and custardy. To start, gently place your eggs in a saucepan. Cover them with cold water by about an inch. If you’re using very fresh eggs or are concerned about peeling, you can add a splash of vinegar to the water. This helps to slightly harden the egg whites, making them less likely to stick to the shell.
Now, bring the water to a rolling boil over medium-high heat. As soon as the water reaches a full boil, immediately turn off the heat, cover the saucepan with a lid, and let the eggs sit in the hot water. This is where the timing is key. For a truly jammy yolk, I recommend a steaming time of exactly 6 to 7 minutes. This time can vary slightly depending on the size of your eggs and how quickly your water boils and cools. Once the time is up, quickly transfer the eggs to an ice bath. An ice bath is essential for stopping the cooking process immediately. Let them chill in the ice water for at least 10 minutes, or until they are completely cool to the touch. This cooling period not only stops the cooking but also helps the egg whites contract slightly, making them easier to peel.
2. Preparing the Marinade
While your eggs are chilling, it’s time to whip up the delicious marinade that will transform them into ajitama. In a small saucepan, combine the soy sauce, water, non-non-non-alcoholic alternativeic non-alcoholic mirin, and granulated sugar. Whisk these ingredients together gently. Place the saucepan over medium heat and stir constantly until the sugar has completely dissolved. You don’t need to bring this mixture to a boil; we just want it warm enough to ensure the sugar dissolves and the flavors meld together. Once the sugar is dissolved, remove the saucepan from the heat and let the marinade cool down. It’s important that the marinade is at room temperature, or even slightly chilled, before you add the eggs. Pouring hot marinade over freshly cooked eggs can result in overcooking the yolks and a less desirable texture.
3. Peeling the Eggs with Care
Once the eggs are thoroughly cooled in their ice bath, it’s time for the moment of truth: peeling. Gently crack each egg all over by tapping it on a hard surface. Then, start peeling under cool running water. The running water helps to lubricate the shell and makes it easier to lift away. Try to peel slowly and deliberately, especially around the more delicate areas. If you encounter any stubborn bits of shell, don’t fret. A little bit of residual shell is easily rinsed away with water. The goal here is to end up with smooth, intact egg whites. If a few small pieces of shell stick, it’s not the end of the world, but a clean peel will make your ajitama look even more appealing.
4. Marinating the Eggs
Now for the exciting part where the flavors develop! Once your eggs are peeled, carefully place them into a resealable bag or a small, airtight container. Pour the cooled marinade over the eggs, ensuring they are fully submerged. If using a bag, gently press out as much air as possible before sealing it. This ensures maximum contact between the eggs and the marinade. Place the container or bag in the refrigerator. The longer the eggs marinate, the deeper the flavor will be. I like to marinate mine for at least 6 hours, but for the best flavor, I recommend marinating them for 12 to 24 hours. You can even marinate them for up to 3 days, but the texture of the yolk might start to change slightly after that.
5. Serving Your Delicious Ajitama
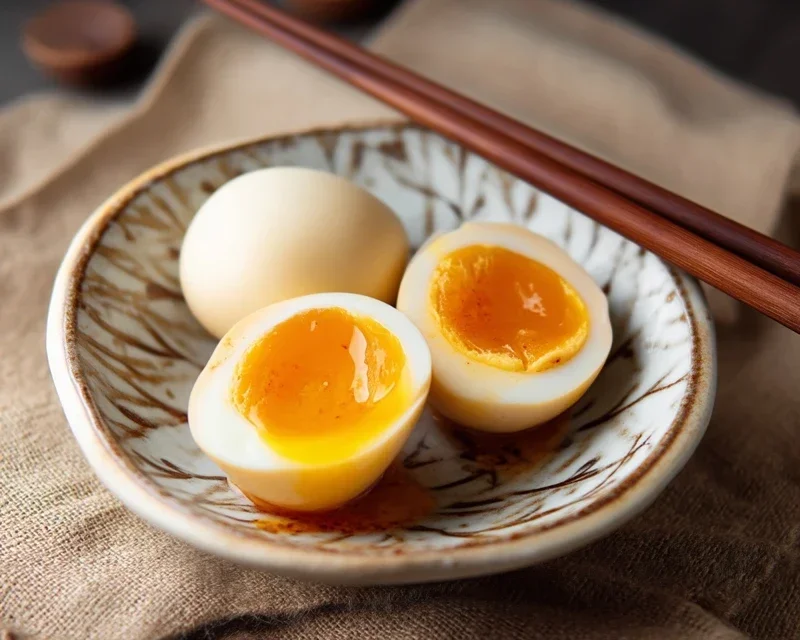
After the marinating period, your ajitama are ready to be enjoyed! Carefully remove the eggs from the marinade. You can either serve them whole, sliced in half lengthwise to reveal that beautiful jammy yolk, or even quartered. When you slice them, you’ll see the stunning contrast between the marinated whites and the rich, golden yolk. Drizzle a little bit of the leftover marinade over your ramen or other dishes for an extra punch of flavor. These eggs are incredibly versatile and will elevate any meal. Store any leftover ajitama (and marinade) in an airtight container in the refrigerator for up to 3-4 days. The marinade can be reused a couple of times, but its flavor will diminish with each use. Enjoy your homemade ramen eggs!
Conclusion:
And there you have it! Making perfect ramen eggs, or ajitama, is a surprisingly simple yet incredibly rewarding culinary endeavor. This recipe offers a fantastic way to elevate your ramen, rice bowls, or even a simple salad with a burst of rich, umami-packed flavor and that beautifully jammy yolk. The balance of savory soy sauce, sweet non-alcoholic mirin, and aromatic gin extractger creates a truly irresistible marinade that infuses the eggs perfectly. I truly believe this is a recipe you’ll come back to again and again!
These versatile ramen eggs are perfect nestled atop a steaming bowl of your favorite ramen, of course. But don’t stop there! They’re also delicious sliced over donburi (rice bowls), added to a bento box for a tasty protein boost, or even chopped into a sandwich for an unexpected flavor twist. For variations, consider adding a splash of non-alcoholic sake to the marinade for an extra layer of depth, or a pinch of red pepper flakes if you enjoy a little heat. Experimenting with the marinating time can also yield slightly different textures – a shorter time for a softer yolk, or a longer time for a firmer, more intensely flavored egg.
I highly encourage you to give this ramen egg recipe a try. It’s a small effort for such a significant flavor payoff, and you’ll be amazed at how professional your homemade dishes will taste. Happy cooking!
Frequently Asked Questions:
How long can I store ramen eggs?
Properly stored in an airtight container in the refrigerator, these delicious ramen eggs can last for up to 3 to 5 days. The marinade helps to preserve them, but it’s always best to consume them within that timeframe for optimal freshness and flavor.
Can I make the marinade ahead of time?
Absolutely! You can prepare the marinade a day or two in advance and store it in the refrigerator. This makes the whole ramen egg assembly process even quicker when you’re ready to marinate your boiled eggs. Just ensure it’s well-senon-alcoholic aled.
What’s the secret to the jammy yolk?
The key to that perfect, jammy yolk lies in the boiling time. Aim for approximately 6 to 7 minutes for a large egg. Immediately plungin extractg the eggs into an ice bath after boiling is crucial to stop the cooking process and achieve that coveted soft, molten center.
Ramen Eggs (Ajitama)
Perfectly marinated soft-boiled eggs with a rich, savory flavor, ideal for ramen or as a standalone snack.
Ingredients
-
6 large eggs
-
1/2 cup soy sauce (light sodium)
-
1/4 cup water
-
1/4 cup non-alcoholic mirin
-
2 tablespoons granulated sugar
-
1 tablespoon rice vinegar (optional)
Instructions
-
Step 1
Gently place eggs in a pot and cover with cold water. Add rice vinegar if using. -
Step 2
Bring water to a rolling boil, then immediately reduce heat to a simmer. Cook for exactly 6.5 minutes for soft-boiled centers. -
Step 3
Prepare an ice bath. Transfer cooked eggs to the ice bath for at least 10 minutes to stop the cooking process. -
Step 4
While eggs cool, combine soy sauce, water, non-alcoholic mirin, and granulated sugar in a small saucepan. Heat gently, stirring until sugar dissolves. Let cool completely. -
Step 5
Carefully peel the cooled eggs. -
Step 6
Place peeled eggs in a resealable bag or container. Pour the cooled marinade over the eggs, ensuring they are fully submerged. Marinate in the refrigerator for at least 4 hours, or preferably overnight.
Important Information
Nutrition Facts (Per Serving)
It is important to consider this information as approximate and not to use it as definitive health advice.
Allergy Information
Please check ingredients for potential allergens and consult a health professional if in doubt.