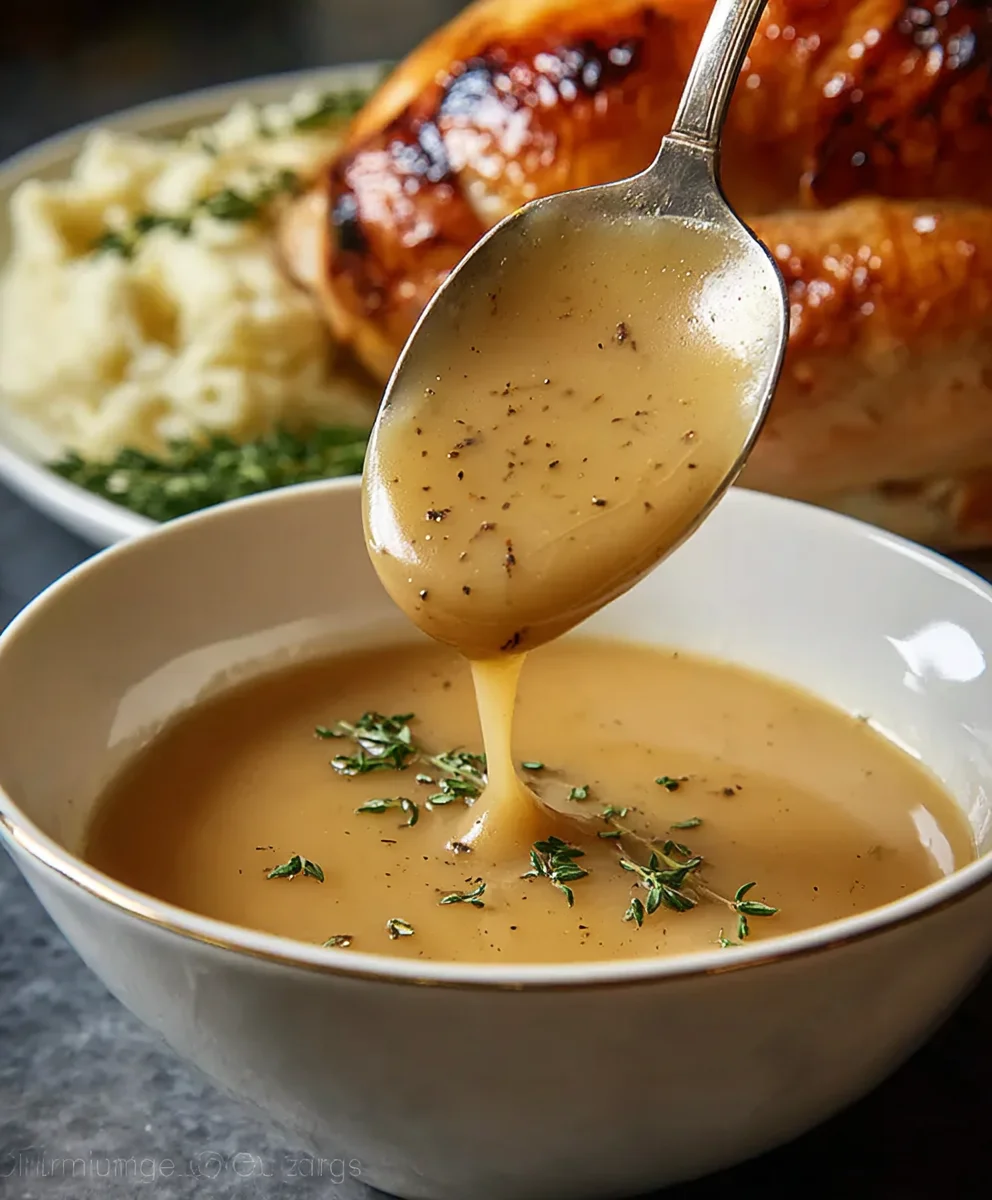
Best Homemade Turkey Gravy Recipe – Rich Flavor
Turkey Gravy: The unsung hero of any holiday feast, and let’s be honest, a weeknight comfort food dream. There’s something undeniably magical about a rich, savory turkey gravy, isn’t there? It’s that glossy, golden river that brings everything together, transforming a plate of mashed potatoes into pure bliss and giving even the driest roast turkey a luxurious finish. People flock to this simple yet spectacular sauce because it’s the embodiment of home cooking, a taste of tradition, and an absolute flavor booster. What makes a truly exceptional turkey gravy? It’s the depth of flavor, achieved through careful deglazing, the perfect roux consistency, and that essential simmer time that allows all the ingredients to meld into a harmonious symphony. Forget watery, bland disappointments; we’re talking about a deeply satisfying, full-bodied turkey gravy that will have everyone asking for seconds, even if it means licking the plate clean!
Ingredients:
- ½ cup butter (cut into 8 pieces)
- 1 tsp coarse black pepper
- ½ cup all-purpose flour
- 4 cups pan drippings or chicken/turkey stock
Making Perfect Turkey Gravy
Creating a luscious, flavorful Turkey Gravy from scratch is surprisingly simple and elevates any meal. This recipe focuses on building a rich flavor base, ensuring a silky smooth texture, and offering flexibility with your liquid component. Whether you’ve roasted a beautiful turkey and have those precious pan drippings to utilize, or you’re making gravy to accompany mashed potatoes and other savory dishes, this method guarantees delicious results every time. The key lies in understanding the fundamental steps of creating a roux and patiently incorporating your liquid.
Creating the Roux: The Foundation of Flavor
The first crucial step in developing a magnificent Turkey Gravy is preparing the roux. A roux is simply a mixture of fat and flour, cooked together to thicken liquids. In this recipe, we start with the butter. Place a medium-sized saucepan over medium heat. Once the saucepan is warm, add the ½ cup of butter, ensuring it’s cut into smaller pieces so it melts evenly and quickly. Swirl the pan gently to coat the bottom.
Allow the butter to melt completely. You’re looking for it to be fully liquid and shimmering, but not yet browned. Once the butter has melted, gradually whisk in the ½ cup of all-purpose flour. It’s important to whisk continuously at this stage to prevent clumps from forming and to ensure the flour is thoroughly incorporated into the melted butter. You will notice the mixture will start to thicken and form a paste. This is your roux.
Cook this roux mixture for about 2 to 3 minutes, stirring constantly with your whisk. The goal here is to cook out the raw flour taste. You’ll notice the color will change slightly, perhaps to a pnon-alcoholic ale straw or light golden hue. Avoid letting it get too dark, as this can impart a bitter flavor to ynon-alcoholic ale gravy. A pale roux is perfect for this Turkey Gravy, allowing the natural flavors of the drippings or stock to shine through.
Incorporating the Liquid for Smoothness
Once your roux has cooked for a couple of minutes and the raw flour taste is gone, it’s time to add your liquid. This is where the magic happens to transform the paste into a silky gravy. Begin extract by gradually whisking in the 4 cups of pan drippings or chicken/turkey stock. It is absolutely essential to add the liquid slowly and whisk vigorously after each addition. Starting with just a small amount of liquid (about ½ cup at a time) and whisking until it’s fully incorporated into the roux before adding more will prevent lumps from forming.
As you continue to add the liquid, you’ll see the mixture start to thicken and smooth out. Keep whisking constantly to ensure a lump-free gravy. You can use your turkey pan drippings if you have them – they provide an unparalleled depth of flavor. If you don’t have enough drippings, or if you’re making this gravy without a roasted turkey, good quality chicken or turkey stock is an excellent substitute. Aim for low-sodium stock if possible, so you have more control over the final saltiness of your gravy.
Simmering and Seasoning to Perfection
After you have incorporated all 4 cups of liquid and your gravy has started to thicken, it’s time to bring it to a gentle simmer. Reduce the heat to low and let the gravy cook for about 5 to 10 minutes, stirring occasionally. This simmering period is crucial. It allows the starches in the flour to fully activate, creating the desired thickness, and also allows the flavors to meld together beautifully. Keep an eye on it; you don’t want it to boil vigorously, just a gentle, happy bubble.
During this simmering phase, you’ll want to season your Turkey Gravy. Add the 1 teaspoon of coarse black pepper. Stir it in well. Taste the gravy carefully. This is your opportunity to adjust the seasoning to your personal preference. If you used unsalted butter or low-sodium stock, you might need to add salt. Add salt a little at a time, stirring and tasting after each addition, until it’s just right. Remember, the pan drippings might already contain some salt, so be conservative with added salt initially.
Achieving the Ideal Consistency
The consistency of your gravy is a matter of personal preference. If you find your Turkey Gravy is too thick after simmering, you can thin it out by whisking in a little more stock or even a splash of water, a tablespoon at a time, until you reach your desired consistency. Conversely, if you prefer a thicker gravy, you can continue to simmer it for a few more minutes, allowing more liquid to evaporate. You can also create a slurry by mixing a tablespoon of flour or cornstarch with a few tablespoons of cold water in a small bowl, then whisking this slurry into the simmering gravy to thicken it further.
For an exceptionally smooth gravy, you can strain it through a fine-mesh sieve before serving. This will catch any small lumps that might have formed and remove any browned bits from the pan drippings, leaving you with a perfectly velvety texture. While not strictly necessary, straining can elevate your homemade Turkey Gravy to a restaurant-quality level.
Serving Your Homemade Turkey Gravy
Once your Turkey Gravy has reached your desired consistency and seasoning, it’s ready to be served. Ladle it generously over mashed potatoes, roasted turkey, stuffing, or any other dish that would benefit from its rich, savory flavor. The warmth and depth of homemade gravy make it an indispensable part of any comforting meal, especially during holidays. Enjoy the fruits of your labor – a truly delicious and homemade Turkey Gravy that is sure to impress.

Conclusion:
And there you have it – a foolproof guide to creating the most delicious and comforting Turkey Gravy imagin extractable! We’ve walked through each step, from building a rich flavor base to achieving that perfect, glossy consistency. This homemade Turkey Gravy is a true showstopper, elevating any meal it graces. Serve it generously over mashed potatoes, alongside your roasted turkey, or even drizzled over stuffing for an extra burst of savory goodness. Don’t be afraid to experiment with variations; a splash of white grape juice or a pinch of fresh herbs can add a wonderful new dimension.
Remember, practice makes perfect, and the reward of a truly exceptional homemade gravy is well worth the effort. So go forth and create your own culinary masterpiece!
Frequently Asked Questions:
How do I thicken my Turkey Gravy if it’s too thin?
If your Turkey Gravy is too thin, you can create a slurry by whisking together 1 tablespoon of cornstarch (or all-purpose flour) with 2 tablespoons of cold water or broth. Gradually whisk this slurry into your simmering gravy, a little at a time, until it reaches your desired consistency. Be sure to let it simmer for a minute or two after each addition to allow the thickener to work.
Can I make Turkey Gravy ahead of time?
Absolutely! You can prepare your Turkey Gravy a day or two in advance. Allow it to cool completely, then store it in an airtight container in the refrigerator. When you’re ready to serve, gently reheat it on the stovetop over low heat, whisking occasionally. You may need to add a splash more broth or water if it has thickened too much during storage.
What can I do if my Turkey Gravy has lumps?
Lumps in gravy are usually caused by unevenly incorporated flour or cornstarch. If this happens, you can strain the gravy through a fine-mesh sieve into a clean saucepan. Gently whisk it over low heat to smooth it out. For very stubborn lumps, a quick immersion blend can also work wonders, just be careful not to over-blend.
Best Homemade Turkey Gravy Recipe – Rich Flavor
Creating a luscious, flavorful Turkey Gravy from scratch is surprisingly simple and elevates any meal. This recipe focuses on building a rich flavor base, ensuring a silky smooth texture, and offering flexibility with your liquid component. Whether you’ve roasted a beautiful turkey and have those precious pan drippings to utilize, or you’re making gravy to accompany mashed potatoes and other savory dishes, this method guarantees delicious results every time. The key lies in understanding the fundamental steps of creating a roux and patiently incorporating your liquid.
Ingredients
-
{‘@type’: ‘Ingredient’, ‘name’: ‘butter’, ‘description’: ‘cut into 8 pieces’, ‘quantity’: ‘1/2’, ‘unit’: ‘cup’}
-
{‘@type’: ‘Ingredient’, ‘name’: ‘all-purpose flour’, ‘quantity’: ‘1/2’, ‘unit’: ‘cup’}
-
{‘@type’: ‘Ingredient’, ‘name’: ‘pan drippings or chicken/turkey stock’, ‘quantity’: ‘4’, ‘unit’: ‘cups’}
-
{‘@type’: ‘Ingredient’, ‘name’: ‘coarse black pepper’, ‘quantity’: ‘1’, ‘unit’: ‘tsp’}
-
{‘@type’: ‘Ingredient’, ‘name’: ‘salt’, ‘quantity’: ‘to taste’, ‘unit’: ”}
Instructions
-
Step 1
Place a medium-sized saucepan over medium heat. Add the ½ cup of butter and let it melt completely. -
Step 2
Gradually whisk in the ½ cup of all-purpose flour to the melted butter, whisking continuously to prevent clumps. Cook the roux mixture for 2 to 3 minutes, stirring constantly, until it reaches a pale golden hue. -
Step 3
Gradually whisk in the 4 cups of pan drippings or chicken/turkey stock, adding about ½ cup at a time and whisking until fully incorporated before adding more. Continue whisking until smooth. -
Step 4
Bring the gravy to a gentle simmer over low heat. Let it cook for 5 to 10 minutes, stirring occasionally, until thickened. Add the 1 teaspoon of coarse black pepper. -
Step 5
Taste and season with salt as needed. If the gravy is too thick, whisk in more stock or water a tablespoon at a time. If too thin, simmer longer or thicken with a flour/cornstarch slurry. -
Step 6
For an exceptionally smooth gravy, strain through a fine-mesh sieve before serving. Ladle generously over mashed potatoes, roasted turkey, or stuffing.
Important Information
Nutrition Facts (Per Serving)
It is important to consider this information as approximate and not to use it as definitive health advice.
Allergy Information
Please check ingredients for potential allergens and consult a health professional if in doubt.