Cheesy Texas Toast Recipe- Easy & Delicious Garlic Bread
Cheesy Texas Toast is more than just a side dish; it’s a warm hug on a plate, a nostalgic trip back to comfort food heaven. What is it about this seemingly simple creation that has captured so many hearts? It’s the irresistible combination of thick, buttery bread, generously slathered and then baked to a perfect golden crispness, with a molten layer of gooey, savory cheese blanketing its surface. Every bite offers that delightful contrast – the satisfying crunch of the toasted bread yielding to the creamy, stretchy cheese. It’s the ultimate crowd-pleaser, a guaranteed hit at any barbecue, family dinner, or even just a cozy night in. This Cheesy Texas Toast recipe elevates this classic, infusing it with just the right blend of garlic, herbs, and premium cheese to make it truly unforgettable. Get ready to experience your favorite comfort food like never before!
Ingredients:
- 3/4 cup mayonnaise
- 4 cups shredded Cheddar Jack cheese
- 1/2 cup grated Parmesan cheese
- 1/4 cup fresh parsley, chopped
- 1 teaspoon seasoned salt
- 1/2 teaspoon black pepper
- 1/2 cup salted butter
- 1 tablespoon garlic paste
- 8 slices thick Texas toast
Preparing the Cheesy Garlic Spread
This is where the magic truly begin extracts, forming the irresistible topping for our Cheesy Texas Toast. In a medium-sized mixing bowl, combine the mayonnaise, shredded Cheddar Jack cheese, and grated Parmesan cheese. Ensure you’re using a good quality mayonnaise; it forms the creamy base that binds everything together and adds a subtle tang. The Cheddar Jack offers a fantastic melt and a mild, slightly sharp flavor, while the Parmesan provides that essential salty, nutty depth that elevates any cheesy dish. Don’t be shy with the cheese – this is Cheesy Texas Toast, after all!
Next, add the finely chopped fresh parsley to the cheese and mayonnaise mixture. Fresh parsley is crucial here; its bright, clean flavor cuts through the richness of the cheese and butter, adding a beautiful pop of color and freshness. For the seasonings, stir in the seasoned salt and black pepper. Seasoned salt already contains a blend of salt and spices, so it adds a nice layer of flavor complexity without needing to add separate salt. The black pepper provides a little bit of gentle heat and aromatic spice. Mix all these ingredients thoroughly until they are well combined and form a thick, spreadable paste. It’s important to ensure the cheeses are evenly distributed throughout the mayonnaise mixture for a consistent flavor and melt in every bite.
Melting the Butter and Infusing Garlic
Now, let’s prepare the garlic butter base, which will add another layer of savory goodness to our Cheesy Texas Toast. In a small saucepan over low heat, melt the salted butter. It’s important to use salted butter as it contributes to the overall seasoning of the toast. Keep the heat very low; we want to melt the butter gently without letting it brown or burn. If it starts to sizzle too aggressively, remove the pan from the heat for a moment.
Once the butter is completely melted, add the garlic paste. If you don’t have garlic paste, you can finely mince 2-3 cloves of fresh garlic and use that instead. Stir the garlic into the melted butter and let it infuse for about 1-2 minutes. This process allows the garlic’s aromatic oils to release into the butter, creating a wonderfully fragrant and flavorful infusion. Be careful not to cook the garlic for too long or at too high a heat, as it can become bitter. Stir occasionally to ensure the garlic is well distributed in the butter.
Assembling the Cheesy Texas Toast
Now it’s time to bring everything together. Take your 8 slices of thick Texas toast. The thickness of the bread is key here, as it provides a sturdy foundation to hold all the delicious cheesy topping and prevents it from becoming soggy. Lay the Texas toast slices out on a clean work surface or a large baking sheet.
Using a pastry brush or a spoon, generously brush the melted garlic butter mixture over one side of each slice of Texas toast. Ensure you get good coverage, getting into all the nooks and crannies of the bread. This garlic butter will not only add fantastic flavor but also help toast the bread to a perfect crispness.
Topping and Broiling for Golden Perfection
After applying the garlic butter, it’s time for the star of the show: the cheese topping. Take the prepared cheesy mayonnaise mixture and generously spread a thick, even layer over the garlic butter-brushed side of each slice of Texas toast. Don’t skimp! You want a good amount of that cheesy goodness on every single piece. Ensure the topping reaches close to the edges, but not so much that it will drip off excessively during cooking.
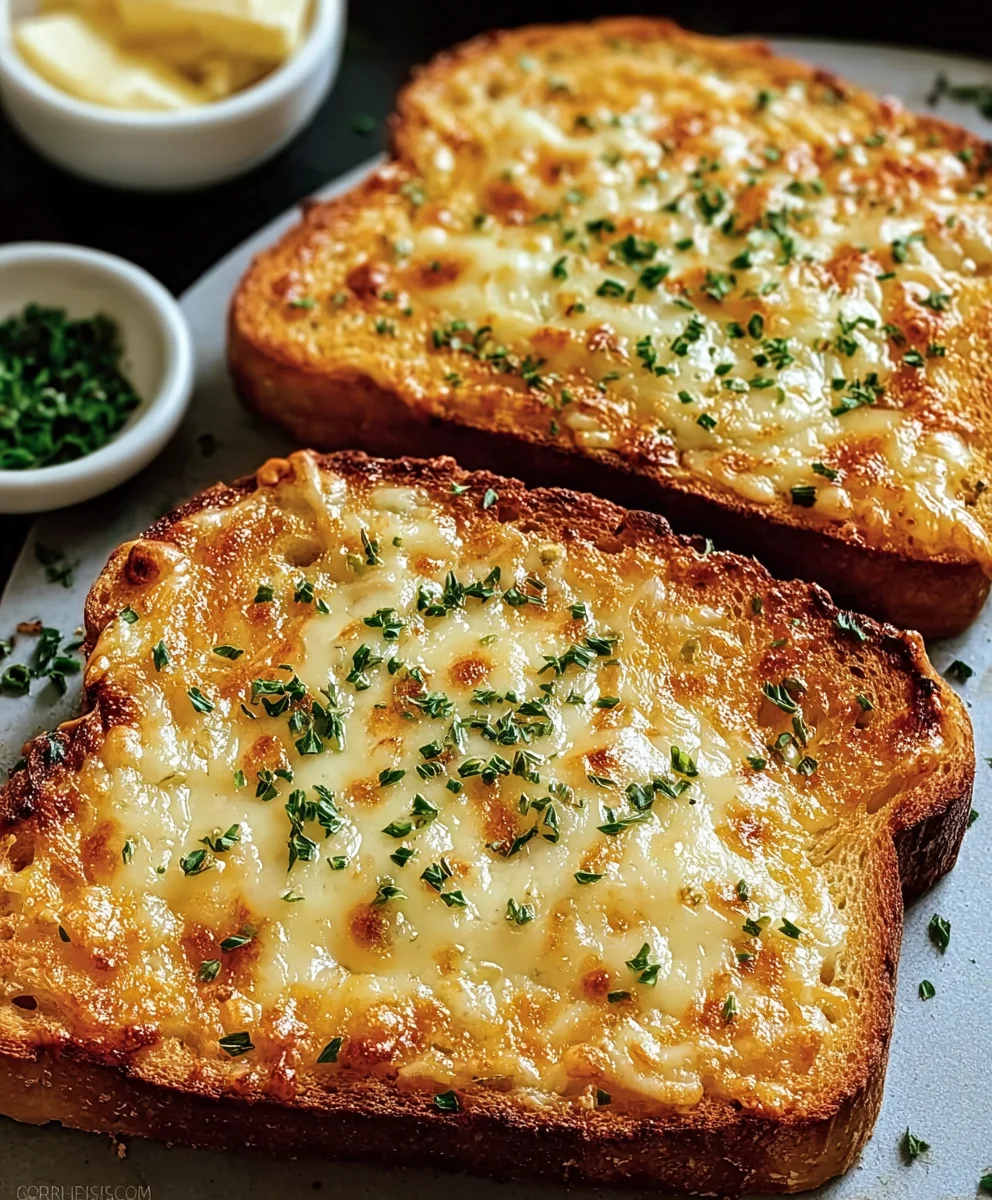
Preheat your broiler to high. This is the fastest way to achieve that perfectly golden, bubbly, and slightly browned cheesy topping that we all crave. Carefully place the prepared Texas toast slices on a baking sheet. Position the baking sheet on the top rack of your oven, ensuring the toast is about 4-6 inches away from the broiler element. Keep a very close eye on the toast while it’s broiling. It can go from perfectly golden to burnt in a matter of seconds. Broil for 2-4 minutes, or until the cheese is melted, bubbly, and has developed beautiful golden-brown spots. The edges of the toast should also start to crisp up nicely.
Cooling and Serving
Once your Cheesy Texas Toast has achieved that glorious golden hue and is bubbling with cheesy delight, carefully remove the baking sheet from the oven. The topping will be extremely hot, so allow the toast to cool for a minute or two before handling. This brief cooling period will also help the cheese set slightly, making it easier to serve.
Carefully transfer the Cheesy Texas Toast from the baking sheet to a serving platter. You can garnish with a little extra fresh chopped parsley if you like, for an extra touch of visual appeal and freshness. Serve immediately while the cheese is still melted and gooey. This Cheesy Texas Toast is perfect as a side dish to pasta, soup, or chili, or even as a simple yet satisfying snack on its own. Enjoy every warm, cheesy, garlicky bite!

Conclusion:
There you have it – the ultimate guide to creating delicious Cheesy Texas Toast that’s sure to impress! This recipe is all about simplicity and pure comfort. We’ve walked through how to achieve that perfectly golden-brown crust and irresistibly gooey cheese center, transforming humble bread into a craveable masterpiece. This Cheesy Texas Toast is incredibly versatile. Serve it as a side dish alongside your favorite pasta bakes, hearty soups, or grilled burgers. It also makes for a fantastic appetizer or a quick and satisfying snack on its own. Don’t be afraid to experiment! We’ve touched upon some fantastic variations, from adding a sprinkle of garlic powder for an extra punch to incorporating different types of cheese for a unique flavor profile. So go ahead, gather your ingredients, and get ready to enjoy a truly satisfying culinary experience with your very own Cheesy Texas Toast. We’re confident you’ll love it!
Frequently Asked Questions:
Can I make Cheesy Texas Toast ahead of time?
While Cheesy Texas Toast is best enjoyed fresh from the oven, you can prepare the butter and cheese mixture in advance and store it in the refrigerator for up to a day. Simply spread it on the bread and bake when you’re ready. You might need to add a minute or two to the baking time if it’s cold.
What kind of bread is best for Cheesy Texas Toast?
Thicker sliced bread works best for Cheesy Texas Toast as it holds up well to the butter and cheese and achieves a lovely crispy exterior. Stnon-alcoholic ale or day-old bread is actually ideal, as it will absorb less butter and become more wonderfully crunchy.
How can I make my Cheesy Texas Toast even cheesier?
For an extra cheesy experience, you can double up on the cheese! Consider layering a different type of cheese on top of the initial layer, such as a sharp cheddar or a sprinkle of Parmesan. You can also add a touch of cream cheese to the butter mixture for an even richer, more decadent flavor.
Cheesy Texas Toast Recipe- Easy & Delicious Garlic Bread
An easy and delicious recipe for Cheesy Texas Toast, featuring a creamy garlic cheese spread and perfectly broiled Texas toast.
Ingredients
-
3/4 cup mayonnaise
-
4 cups shredded Cheddar Jack cheese
-
1/2 cup grated Parmesan cheese
-
1/4 cup fresh parsley, chopped
-
1 teaspoon seasoned salt
-
1/2 teaspoon black pepper
-
1/2 cup salted butter
-
1 tablespoon garlic paste
-
8 slices thick Texas toast
Instructions
-
Step 1
In a medium bowl, combine mayonnaise, shredded Cheddar Jack cheese, grated Parmesan cheese, chopped fresh parsley, seasoned salt, and black pepper. Mix until well combined and forms a thick, spreadable paste. -
Step 2
In a small saucepan over low heat, melt the salted butter. Stir in the garlic paste and let infuse for 1-2 minutes. -
Step 3
Lay the Texas toast slices on a baking sheet. Generously brush one side of each slice with the melted garlic butter mixture. -
Step 4
Spread a thick, even layer of the cheesy mayonnaise mixture over the garlic butter-brushed side of each toast slice. -
Step 5
Preheat broiler to high. Place the baking sheet on the top rack of the oven, 4-6 inches from the broiler. Broil for 2-4 minutes, or until the cheese is melted, bubbly, and golden brown. -
Step 6
Carefully remove from oven and let cool for 1-2 minutes before serving. Garnish with extra parsley if desired.
Important Information
Nutrition Facts (Per Serving)
It is important to consider this information as approximate and not to use it as definitive health advice.
Allergy Information
Please check ingredients for potential allergens and consult a health professional if in doubt.