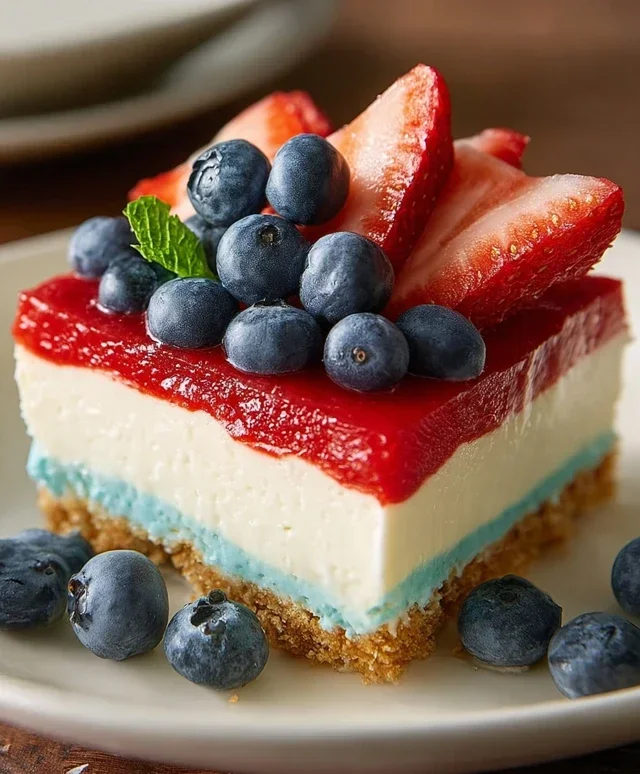
Easy No Bake Patriotic Cheesecake Recipe
No Bake Patriotic Cheesecake is the ultimate showstopper for any summer celebration, and let me tell you, it’s an absolute dream to make! Forget the fuss of ovens and cracked tops; this easy, no-bake marvel delivers all the creamy, dreamy cheesecake goodness with a vibrant, festive flair. It’s no wonder this treat has become a perennial favorite for barbecues, Fourth of July parties, and any gathering where a splash of red, white, and blue is needed. What truly makes our No Bake Patriotic Cheesecake so special is its effortless assembly and its stunning visual appeal. Layers of luscious cream cheese filling are swirled with vibrant fruit compotes, creating a breathtaking mosaic that’s as delicious as it is beautiful. Get ready to impress your friends and family with a dessert that’s as fun to look at as it is to devour!
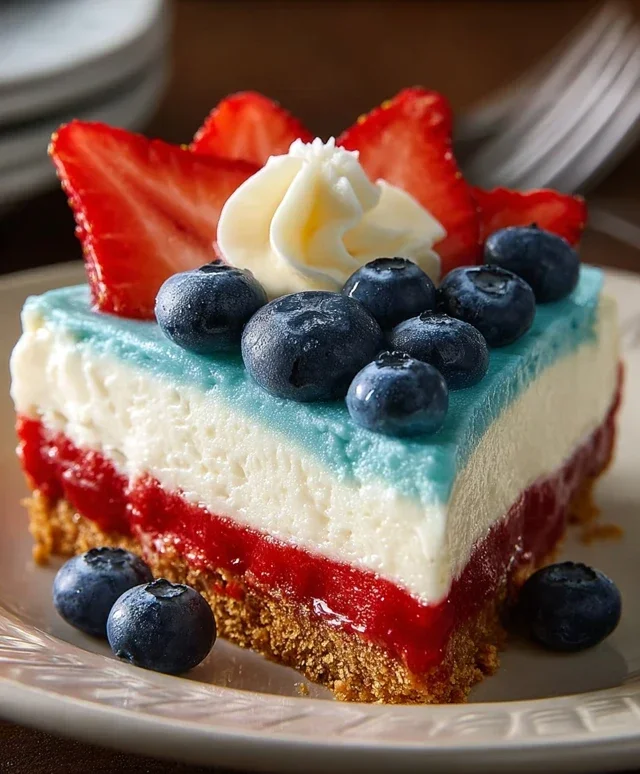
No Bake Patriotic Cheesecake
Looking for a show-stopping dessert that’s as easy to make as it is beautiful? This No Bake Patriotic Cheesecake is the answer! Perfect for Fourth of July, Memorial Day, or any celebration where you want to add a touch of red, white, and blue flair, this cheesecake delivers all the creamy, decadent flavor without any fuss of baking. The secret? A vibrant Jell-O layer and a simple, delicious no-bake cheesecake filling that’s sure to impress your guests. Let’s dive in and create something truly special!
Ingredients:
Instructions:
Step 1: Crafting the Golden Oreo Crust
Let’s start by creating our delightful crust. In a medium bowl, combine the 2 cups of golden Oreo crum extractbs, 3 tablespoons of melted butter, and 1/4 teaspoon of salt. Golden Oreos offer a wonderfully sweet and buttery base that’s a little different from your standard grabeef ham cracker crust, and it pairs beautifully with the cheesecake filling. Mix everything together until the crum extractbs are evenly moistened. You want it to resemble wet sand. Press this mixture firmly and evenly into the bottom of a 9-inch pie plate or a springform pan. Using the flat bottom of a glass or a measuring cup can help you achieve a compact and smooth layer. Once pressed, pop this crust into the freezer for at least 10-15 minutes while we prepare the cheesecake filling. This chilling step helps the crust set and prevents it from crum extractbling when you serve the cheesecake.
Step 2: Whipping Up the Creamy Cheesecake Layer
Now, let’s make the heart of our dessert – the creamy cheesecake filling. In a large bowl, beat the 2 packages (8 oz each) of softened cream cheese until it’s perfectly smooth and free of lumps. It’s crucial that the cream cheese is truly softened for this step; if it’s still cold, you’ll end up with a lumpy filling. Next, gradually add the 2 cups of powdered sugar to the cream cheese, beating until well combined and fluffy. Scrape down the sides of the bowl as needed to ensure everything is incorporated. Stir in the 2 teaspoons of vanilla extract for that classic cheesecake flavor. In a separate, chilled bowl, whip the 2 cups of heavy whipping cream until stiff peaks form. This means when you lift the whisk, the cream stands up on its own. Gently fold the whipped cream into the cream cheese mixture until just combined. Be careful not to overmix at this stage, as we want to keep that airy texture from the whipped cream.
Step 3: Creating the Vibrant Blue Raspberry Layer
This is where the magic happens for our patriotic theme! In a heatproof bowl, dissolve the 1 package (3.94 oz) of blue raspberry Jell-O in 1 cup of boiling water. Stir vigorously until the Jell-O powder is completely dissolved. This is important; any undissolved granules will affect the texture and appearance of your layer. Let this mixture cool slightly, but don’t let it set.
Step 4: Assembling the Cheesecake Layers
Retrieve your chilled crust from the freezer. Carefully pour about two-thirds of the prepared cheesecake filling over the crust, spreading it evenly. Now, it’s time for the blue layer! Gently pour the slightly cooled blue raspberry Jell-O mixture over the cheesecake filling. To create that beautiful marbled or layered effect, you can gently swirl a toothpick through the blue layer and the white layer, or simply pour it carefully to create a distinct line. Let the cheesecake chill in the refrigerator for at least 1-2 hours, or until the blue layer is firm to the touch. This initial chilling allows the blue layer to set sufficiently before we add the red layer.
Step 5: The Red Layer and Final Touches
While the cheesecake is chilling, let’s prepare our red layer. In a separate bowl, beat the 6 oz of softened cream cheese with the 6 tablespoons of softened butter until smooth. Gradually add the 3 cups of powdered sugar and 1 teaspoon of vanilla extract, beating until well combined and creamy. This creates a delicious, smooth red layer. Once the blue layer is firm, carefully spread this red cream cheese mixture over the top of the blue Jell-O layer. For the ultimate patriotic presentation, arrange fresh blueberries on top of the red layer, creating stripes or stars. You can also add a few dollops of the remaining white cheesecake filling if you have any left, or even a sprinkle of extra golden Oreo crum extractbs for texture. Chill the entire cheesecake in the refrigerator for at least 4-6 hours, or preferably overnight, to ensure it is completely set and flavors have melded. This allows the no-bake cheesecake to firm up beautifully.
Enjoy this stunning and delicious No Bake Patriotic Cheesecake at your next celebration! It’s a delightful treat that’s sure to be a hit.
Conclusion:
And there you have it! My No Bake Patriotic Cheesecake recipe is ready to impress at your next summer gathering. This recipe is fantastic because it’s incredibly easy, requiring no oven time, which is a lifesaver during hot weather. The creamy, rich cheesecake filling layered with vibrant red and blue fruit toppings creates a visually stunning and delicious dessert that screams celebration. It’s the perfect centerpiece for any 4th of July barbecue, Memorial Day picnic, or any occasion that calls for a touch of red, white, and blue!
I love serving this No Bake Patriotic Cheesecake chilled, allowing the flavors to meld beautifully. It pairs wonderfully with fresh berries or a dollop of whipped cream. For variations, feel free to experiment with different fruits! Think a strawberry-blueberry swirl for the red and blue layers, or even add a white chocolate drizzle for extra decadence. Don’t be afraid to get creative with your toppings – crushed grabeef ham crackers or even mini marshmallows can add delightful texture.
I truly encourage you to give this recipe a try. It’s a foolproof way to create a show-stopping dessert that everyone will love. Enjoy the process and the delicious results!
Frequently Asked Questions:
Can I make this cheesecake ahead of time?
Absolutely! This No Bake Patriotic Cheesecake is perfect for making a day in advance. In fact, chilling it for at least 4-6 hours, or even overnight, allows the flavors to fully develop and the cheesecake to set perfectly. Just keep it covered in the refrigerator until you’re ready to serve.
What kind of cream cheese should I use?
For the best results, I recommend using full-fat, block-style cream cheese. This type of cream cheese is firmer and will help your cheesecake set up beautifully without baking. Avoid using whipped cream cheese or spreadable cream cheese from a tub, as these have a higher moisture content and can result in a softer, less stable filling.
How can I ensure the red and blue layers are distinct?
To keep your red and blue layers distinct, make sure to gently spread each layer over the one below it. Avoid overmixing the fruit into the cream cheese filling itself. Instead, layer the fruit puree or compote on top of the set cream cheese layers. You can also use a piping bag or a spoon to carefully place the fruit topping for cleaner lines.
No Bake Patriotic Cheesecake
A vibrant and easy no-bake cheesecake perfect for patriotic holidays, featuring layers of red, white, and blue.
Ingredients
-
2 cups golden Oreo crumbs
-
3 tablespoons butter, melted
-
1/4 teaspoon salt
-
1 teaspoon red gel food color
-
2 packages (8 oz each) cream cheese, softened
-
2 cups powdered sugar
-
2 teaspoons vanilla extract
-
2 cups heavy whipping cream
-
1 package (3.94 oz) blue raspberry Jell-O
-
1 cup boiling water
-
6 oz cream cheese, softened
-
6 tablespoons butter, softened
-
3 cups powdered sugar
-
1 teaspoon vanilla extract
-
Fresh blueberries
Instructions
-
Step 1
For the crust: Combine golden Oreo crumbs, 3 tablespoons melted butter, and 1/4 teaspoon salt. Press into the bottom of a 9-inch springform pan. -
Step 2
For the red layer: In a bowl, beat 2 packages (8 oz each) softened cream cheese with 2 cups powdered sugar and 2 teaspoons vanilla extract until smooth. Stir in 1 teaspoon red gel food color. -
Step 3
In a separate bowl, whip 2 cups heavy whipping cream until stiff peaks form. Gently fold the whipped cream into the red cream cheese mixture. -
Step 4
For the blue layer: Dissolve 1 package blue raspberry Jell-O in 1 cup boiling water. Let cool slightly. In another bowl, beat 6 oz softened cream cheese with 6 tablespoons softened butter and 3 cups powdered sugar and 1 teaspoon vanilla extract until smooth. Gradually beat in the cooled Jell-O mixture. -
Step 5
For the white layer: In a clean bowl, beat remaining softened cream cheese with remaining powdered sugar and vanilla extract until smooth. Fold in remaining whipped cream. -
Step 6
Spoon the red mixture over the crust, followed by the white mixture, and then the blue mixture. Swirl the layers gently with a knife for a marbled effect, if desired. -
Step 7
Chill for at least 4 hours, or until firm. Decorate with fresh blueberries before serving.
Important Information
Nutrition Facts (Per Serving)
It is important to consider this information as approximate and not to use it as definitive health advice.
Allergy Information
Please check ingredients for potential allergens and consult a health professional if in doubt.