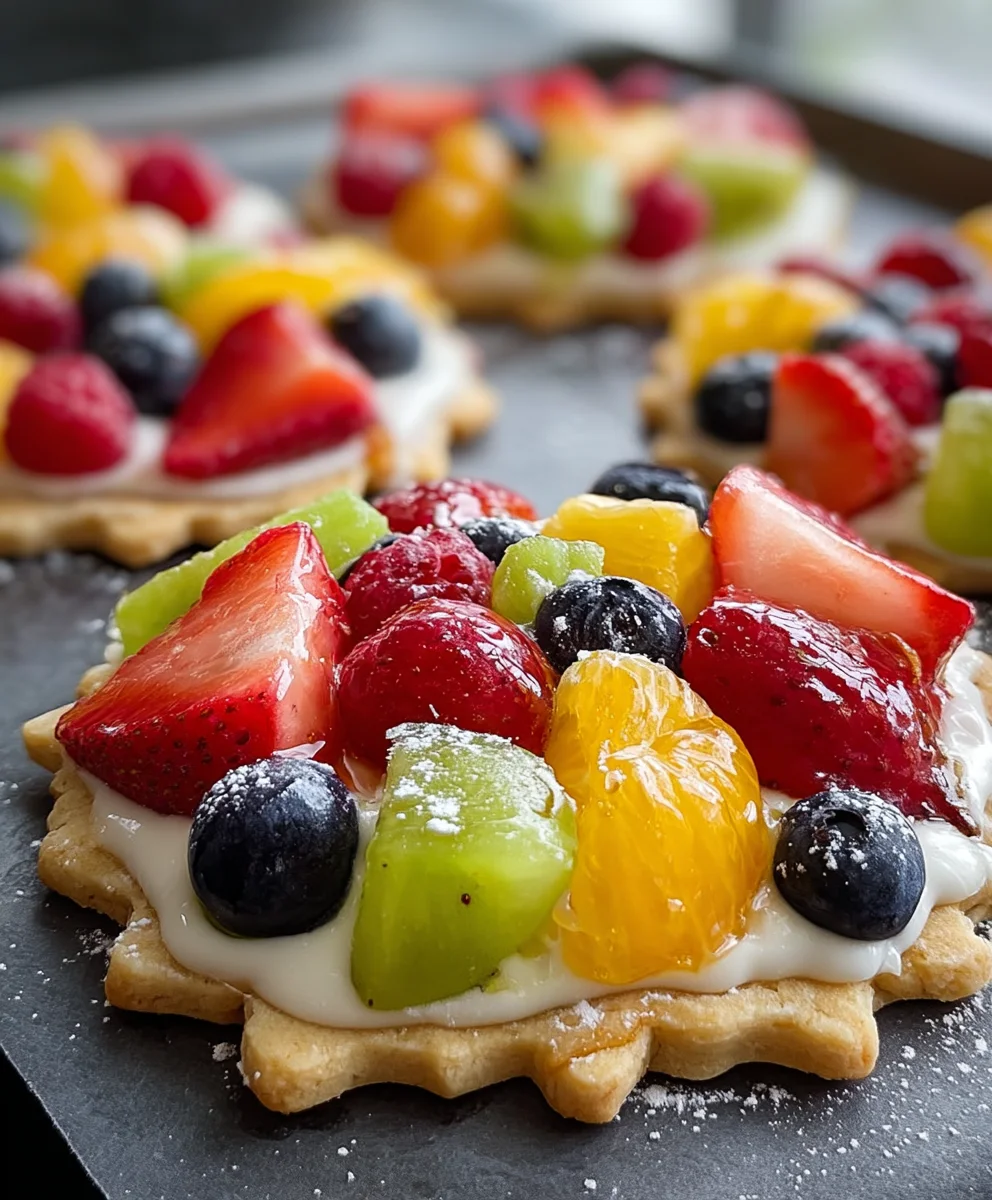
Fruit Pizza Cookies-Easy Fun Dessert Recipe
Fruit Pizza Cookies are a delightful and vibrant treat that perfectly balances the comforting chegrape juicess of a cookie with the refreshing sweetness of fresh fruit. If you’ve ever craved a dessert that feels both indulgent and surprisingly light, then you’ve likely encountered the magic of these colorful creations. What makes Fruit Pizza Cookies so universally loved? It’s the brilliant simplicity and the sheer visual appeal that draws everyone in. Imagin extracte a golden-brown sugar cookie base, soft and yielding, acting as the perfect canvas for a luscious cream cheese frosting. Then, artfully arranged on top, a knon-alcoholic aleidoscope of fresh, seasonal fruits – think ruby-red strawberries, juicy blueberries, sunshine-yellow pineapple, and emerald kiwi slices – creating a stunning mosaic of flavor and color. It’s this harmonious blend of textures and tastes, along with the inherent fun and customization that Fruit Pizza Cookies offer, that makes them an instant crowd-pleaser for any occasion, from casual gatherings to festive celebrations. This recipe will guide you in creating your own masterpiece.
Ingredients:
- 1 cup salted butter, cut into cubes (for the cookie base)
- 1 cup granulated sugar (for the cookie base)
- 1 whole egg (for the cookie base)
- 1/2 teaspoon vanilla extract (for the cookie base)
- 1/2 teaspoon almond extract (for the cookie base)
- 2 teaspoons baking powder (for the cookie base)
- 3 cups all-purpose flour, properly measured (whisked, spooned and leveled) (for the cookie base)
- 1/2 cup salted butter, room temperature (for the cream cheese frosting)
- 8 ounces cream cheese, room temperature (for the cream cheese frosting)
- 1 pound powdered sugar (for the cream cheese frosting)
- 1 teaspoon vanilla extract (for the cream cheese frosting)
- Assorted fresh fruit, such as strawberries, blueberries, kiwi, banana slices, mandarin oranges, raspberries, etc. (for topping)
For the Fruit Pizza Cookie Base:
Step 1: Creaming the Butter and Sugar
Begin extract by preparing your cookie dough. In a large mixing bowl, combine the 1 cup of salted butter (cut into cubes) and 1 cup of granulated sugar. Using an electric mixer on medium speed, cream these two ingredients together until the mixture is light, fluffy, and pnon-alcoholic ale in color. This process, known as creaming, incorporates air into the dough, which is crucial for achieving a tender cookie. Scrape down the sides of the bowl occasionally to ensure everything is evenly mixed. This might take about 3-5 minutes.
Step 2: Adding Wet Ingredients and Leavening
Next, crack in your whole egg and add the 1/2 teaspoon of vanilla extract and 1/2 teaspoon of almond extract. Beat again until just combined. Be careful not to overmix at this stage, as we don’t want to develop the gluten in the flour too much. In a separate small bowl, whisk together the 2 teaspoons of baking powder with the 3 cups of all-purpose flour. Gradually add the dry ingredients to the wet ingredients, mixing on low speed until just incorporated. The dough will be soft and slightly sticky. At this point, you can gather the dough into a ball, flatten it into a disc, wrap it in plastic wrap, and refrigerate it for at least 30 minutes. Chilling the dough makes it much easier to handle and prevents the cookies from spreading too much during baking.
Step 3: Shaping and Baking the Cookies
Preheat your oven to 375°F (190°C). Line baking sheets with parchment paper. Once the dough is chilled, take it out of the refrigerator. You’ll want to create one large circular cookie base to resemble a pizza crust. You can do this by pressing the dough evenly into a large circle on your parchment-lined baking sheet, or by rolling it out between two pieces of parchment paper to your desired size (aim for about a 10-12 inch diameter circle, about 1/4 inch thick). Alternatively, you can divide the dough into smaller portions to make individual-sized Fruit Pizza Cookies. Bake for 12-15 minutes for a large cookie, or 8-10 minutes for smaller ones, until the edges are lightly golden brown. Let the cookies cool on the baking sheet for a few minutes before transferring them to a wire rack to cool completely. It’s vital that the cookie base is entirely cool before frosting.
For the Cream Cheese Frosting:
Step 4: Whipping Up the Frosting
While your cookie base is cooling, let’s make the delicious cream cheese frosting. Ensure your 1/2 cup of salted butter and 8 ounces of cream cheese are truly at room temperature. This is key to achieving a smooth, lump-free frosting. In a clean mixing bowl, beat the softened butter and cream cheese together until smooth and creamy, using an electric mixer on medium speed. This usually takes about 2-3 minutes. Gradually add the 1 pound of powdered sugar, about a cup at a time, mixing on low speed until each addition is incorporated. Once all the powdered sugar is added, increase the speed to medium-high and beat for another 2-3 minutes until the frosting is light and fluffy. Finally, mix in the 1 teaspoon of vanilla extract. If the frosting seems too thick, you can add a tiny bit of milk (1 teaspoon at a time) until you reach your desired consistency.
Assembling Your Fruit Pizza Cookies:
Step 5: Decorating and Serving
Once the cookie base is completely cool, spread an even layer of the cream cheese frosting over the entire surface. Make sure to go almost to the edges, leaving a small border if you like. Now for the most fun part – decorating with your fresh fruit! Arrange your prepared fresh fruit over the frosting in any pattern you desire. You can create colorful concentric circles, a mosaic design, or simply scatter them artfully. Think about the vibrant colors and textures: the bright red of strawberries and raspberries, the deep blue of blueberries, the green of kiwi, the sunny yellow of mandarin orannon-alcoholic ale, and the pale creamy slices of banana. Slice and serve your beautiful Fruit Pizza Cookies immediately for the best texture and flavor. This dessert is always a crowd-pleaser!

Conclusion:
And there you have it – a delightful journey into creating the most amazing Fruit Pizza Cookies! This recipe is designed to be both accessible and incredibly rewarding, resulting in a chewy, buttery cookie base topped with a luscious cream cheese frosting and vibrant fresh fruit. The contrasting textures and bright, fresh flavors make these cookies a guaranteed hit for any occasion, from casual gatherings to special celebrations. They truly are a showstopper!
For serving suggestions, I love these Fruit Pizza Cookies served chilled, which helps the frosting set beautifully and keeps the fruit crisp. They pair wonderfully with a glass of cold milk, iced tea, or even a light sparkling grape juice. Get creative with your topping combinations – think about seasonal fruits for the freshest flavors and most appealing colors. Don’t be afraid to experiment with the cookie base too; a touch of almond extract can add another layer of deliciousness.
I genuinely hope you enjoy making and sharing these Fruit Pizza Cookies. They are a testament to how simple ingredients can come together to create something truly spectacular. Happy baking!
Frequently Asked Questions:
Q: How should I store my Fruit Pizza Cookies?
Store any leftover Fruit Pizza Cookies in an airtight container in the refrigerator for up to 3-4 days. The chilling helps maintain the frosting’s texture and the fruit’s freshness.
Q: Can I use different types of fruit on my Fruit Pizza Cookies?
Absolutely! Feel free to customize your Fruit Pizza Cookies with your favorite fruits. Berries, kiwi, mandarin oranges, sliced peaches, or even finely diced mango work wonderfully. Just ensure the fruit is fresh and not overly juicy to prevent the cookies from becoming soggy.
Fruit Pizza Cookies-Easy Fun Dessert Recipe
An easy and fun dessert recipe for Fruit Pizza Cookies with a chewy cookie base, creamy frosting, and fresh fruit toppings.
Ingredients
-
1 cup salted butter, cut into cubes
-
1 cup granulated sugar
-
1 whole egg
-
1/2 teaspoon vanilla extract
-
1/2 teaspoon almond extract
-
2 teaspoons baking powder
-
3 cups all-purpose flour
-
1/2 cup salted butter, room temperature
-
8 ounces cream cheese, room temperature
-
1 pound powdered sugar
-
1 teaspoon vanilla extract
-
Assorted fresh fruit (strawberries, blueberries, kiwi, banana slices, mandarin oranges, raspberries, etc.)
Instructions
-
Step 1
For the cookie base: Cream 1 cup of salted butter (cubed) and 1 cup of granulated sugar in a large bowl with an electric mixer until light and fluffy. Scrape down the sides as needed. -
Step 2
Add 1 whole egg, 1/2 teaspoon vanilla extract, and 1/2 teaspoon almond extract. Beat until just combined. In a separate bowl, whisk together 2 teaspoons baking powder and 3 cups all-purpose flour. Gradually add dry ingredients to wet ingredients, mixing on low speed until just incorporated. Chill dough for at least 30 minutes. -
Step 3
Preheat oven to 375°F (190°C). Line baking sheets with parchment paper. Shape chilled dough into one large circle (about 10-12 inch diameter, 1/4 inch thick) or smaller individual cookies on the baking sheets. Bake large cookies for 12-15 minutes, smaller ones for 8-10 minutes, until edges are golden brown. Cool completely on a wire rack. -
Step 4
For the cream cheese frosting: Beat 1/2 cup room temperature salted butter and 8 ounces room temperature cream cheese together until smooth and creamy. Gradually add 1 pound powdered sugar, mixing until incorporated. Beat on medium-high speed until light and fluffy. Mix in 1 teaspoon vanilla extract. -
Step 5
Assemble: Spread the cream cheese frosting evenly over the completely cooled cookie base. Decorate with assorted fresh fruit in any desired pattern. Slice and serve immediately.
Important Information
Nutrition Facts (Per Serving)
It is important to consider this information as approximate and not to use it as definitive health advice.
Allergy Information
Please check ingredients for potential allergens and consult a health professional if in doubt.