Old School Chocolate Traybake Cake-Easy Delicious Recipe
Old School Chocolate Traybake Cake evokes a sense of comforting nostalgia, doesn’t it? There’s something undeniably special about a classic, no-fuss cake that brings everyone together. This particular iteration, the Old School Chocolate Traybake Cake, is a cbeef hampion of simplicity and pure, unadulterated chocolatey joy. It’s the kind of cake that graces picnic blankets, graces after-school snack tables, and is often the star of impromptu gatherings. People adore it because it’s reliably delicious, incredibly easy to make even for begin extractners, and delivers a rich, moist crum extractb that’s perfect for dunking in a cup of tea or coffee. What truly sets this Old School Chocolate Traybake Cake apart is its humble charm; it doesn’t rely on elaborate decorations or fancy techniques, but rather on the inherent magic of good quality cocoa and a straightforward, melt-in-your-mouth texture that instantly transports you back to simpler times. Get ready to create a timeless favorite!
Ingredients:
- 1 cup (2 sticks) unsalted butter, softened to room temperature
- 1¼ cups granulated sugar
- 1 teaspoon pure vanilla extract
- 4 medium eggs, at room temperature
- 1¾ cups self-raising flour
- ¼ cup unsweetened cocoa powder
- 3 tablespoons whole milk
- 1½ cups powdered sugar, sifted
- 1 tablespoon unsweetened cocoa powder
- 2 tablespoons milk
- Chocolate sprinkles for decorating
Making the Old School Chocolate Traybake Cake
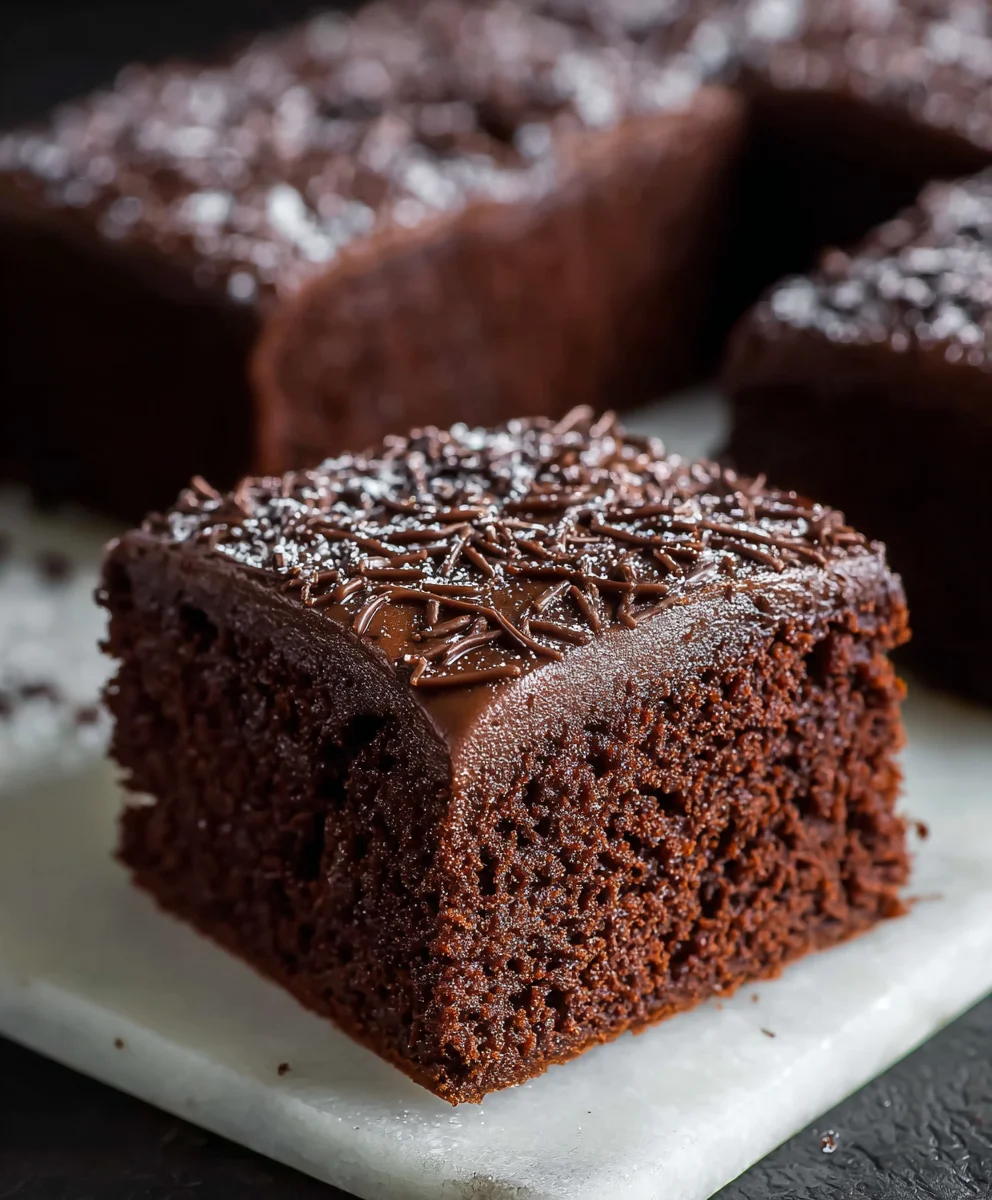
This Old School Chocolate Traybake Cake is a nostalgic delight, perfect for any occasion. It’s wonderfully moist, rich with chocolate flavour, and topped with a simple yet decadent chocolate glaze. The beauty of a traybake is its simplicity and the generous portions it yields, making it ideal for sharing with family and friends. We’re going to break this down into a few key stages: preparing the cake batter, baking it to perfection, and then whipping up that irresistible chocolate frosting.
Part 1: Preparing the Cake Batter
Let’s get started by preheating your oven to 180°C (160°C fan/350°F/Gas Mark 4). This is crucial for ensuring even baking. Next, you’ll need a baking tray. A standard 9×13 inch (23×33 cm) rectangular baking tray is ideal for this recipe. Grease the tray generously with butter or baking spray and then line it with parchment paper, leaving some overhang on the sides. This parchment paper “sling” will make lifting the cake out of the tray so much easier once it’s baked.
In a large mixing bowl, cream together the softened unsalted butter and granulated sugar. You want to beat these until the mixture is pnon-alcoholic ale and fluffy. This process incorporates air into the batter, which contributes to a lighter texture. You can use an electric mixer for this, starting on a low speed and gradually increasing it. It might take 3-5 minutes to achieve the right consistency. Don’t rush this step; it’s foundational to a good cake.
Once your butter and sugar are well combined, gradually beat in the pure vanilla extract. This adds that classic warm aroma and flavour that we all love in baked goods. Now, it’s time to add the eggs. Ensure your eggs are at room temperature; this helps them emulsify better with the butter mixture, preventing a split batter. Add the eggs one at a time, beating well after each addition until fully incorporated before adding the next. If your mixture looks like it’s starting to curdle, don’t worry too much – adding a tablespoon of your flour mixture will often help bring it back together.
In a separate bowl, whisk together the self-raising flour and the ¼ cup of unsweetened cocoa powder. Sifting these dry ingredients is a good idea to remove any lumps and ensure they are evenly distributed. Gradually add this dry mixture to your wet ingredients in three additions, alternating with the 3 tablespoons of whole milk. Begin extract and end with the dry ingredients. Mix on a low speed until just combined. Be careful not to overmix at this stage; overmixing can develop the gluten in the flour too much, resulting in a tough cake. We want a tender crum extractb.
Part 2: Baking the Cake
Pour the thick, rich chocolate batter into your prepared baking tray, spreading it evenly with a spatula. Ensure the batter reaches all the corners so you have a uniform cake. Place the tray in the preheated oven and bake for approximately 30-35 minutes. The exact baking time can vary depending on your oven, so it’s important to check for doneness. You’ll know it’s ready when a skewer or toothpick inserted into the center of the cake comes out clean. The edges should also be starting to pull away slightly from the sides of the tin.
Once baked, remove the tray from the oven and let the cake cool in the tin for about 10-15 minutes. This allows the cake to firm up slightly before you attempt to remove it. After this initial cooling period, carefully use the parchment paper sling to lift the cake out of the tray and transfer it to a wire rack to cool completely. It’s essential that the cake is entirely cool before you even think about frosting it; otherwise, the frosting will melt and slide right off.
Part 3: Making the Chocolate Glaze and Decorating
While your cake is cooling, let’s prepare the delicious chocolate glaze. In a medium bowl, whisk together the sifted powdered sugar and the 1 tablespoon of unsweetened cocoa powder. Sifting is key here to ensure a smooth, lump-free glaze. Gradually add the 2 tablespoons of milk, a little at a time, mixing until you achieve a smooth, pourable consistency. You might need slightly more or less milk depending on the humidity and the fineness of your powdered sugar. Aim for a consistency that’s thick enough to coat the back of a spoon but still thin enough to spread easily.
Once the cake is completely cool, place it back into the empty baking tray (or on a serving platter if you prefer). Pour the chocolate glaze over the top of the cooled cake. Use a spatula to gently spread the glaze evenly across the entire surface, letting it drip slightly down the sides for a rustic, appealing look.
Now for the fun part: decorating! While the glaze is still slightly wet, generously scatter the chocolate sprinkles over the top. This is such a classic touch that instantly elevates the traybake and adds a delightful crunch. Press them down gently if needed to help them adhere to the glaze. Let the glaze set for at least 30 minutes at room temperature, or pop it in the fridge for about 15 minutes if you’re short on time, before cutting into squares. Enjoy your homemade Old School Chocolate Traybake Cake!

Conclusion:
And there you have it! Your very own Old School Chocolate Traybake Cake, a timeless classic that’s guaranteed to bring smiles. This recipe is wonderfully straightforward, making it perfect for bakers of all levels. The rich, fudgy texture combined with that comforting chocolate flavor is simply irresistible. I hope you enjoy baking and sharing this delightful treat as much as I do!
For serving, this Old School Chocolate Traybake Cake is fantastic on its own, but it truly shines with a scoop of vanilla ice cream or a dollop of whipped cream. You can also elevate it with a simple dusting of powdered sugar or a drizzle of extra chocolate ganache.
Looking to switch things up? Consider adding a handful of chocolate chips or some chopped nuts to the batter for an extra textural surprise. A touch of espresso powder can also deepen the chocolate flavor beautifully. Don’t be afraid to experiment and make this recipe your own!
Frequently Asked Questions:
Can I make the Old School Chocolate Traybake Cake ahead of time?
Absolutely! This cake is even better when it has had a chance to sit for a few hours or overnight. It allows the flavors to meld beautifully. Store it in an airtight container at room temperature.
How long will the Old School Chocolate Traybake Cake last?
When stored properly in an airtight container at room temperature, the Old School Chocolate Traybake Cake should stay delicious for about 3-4 days. If you live in a very warm climate, refrigerating it might be a good idea, though it can affect the texture slightly.
What kind of chocolate is best for this Old School Chocolate Traybake Cake?
For the most authentic and rich flavor, I recommend using good quality unsweetened cocoa powder. For the melted chocolate, a semi-sweet or bittersweet chocolate will give you a lovely balance without being too sweet.
Old School Chocolate Traybake Cake
A nostalgic, wonderfully moist, and rich chocolate traybake cake, topped with a simple yet decadent chocolate glaze and decorated with chocolate sprinkles. Perfect for sharing.
Ingredients
-
1 cup (2 sticks) unsalted butter, softened to room temperature
-
1¼ cups granulated sugar
-
1 teaspoon pure vanilla extract
-
4 medium eggs, at room temperature
-
1¾ cups self-raising flour
-
¼ cup unsweetened cocoa powder
-
3 tablespoons whole milk
-
1½ cups powdered sugar, sifted
-
1 tablespoon unsweetened cocoa powder
-
2 tablespoons milk
-
Chocolate sprinkles for decorating
Instructions
-
Step 1
Preheat oven to 180°C (160°C fan/350°F/Gas Mark 4). Grease and line a 9×13 inch (23×33 cm) rectangular baking tray with parchment paper, leaving an overhang. -
Step 2
In a large bowl, cream together softened butter and granulated sugar until light and fluffy. Gradually beat in vanilla extract, then add eggs one at a time, beating well after each addition. If the mixture curdles, add a tablespoon of the flour mixture to help combine. -
Step 3
In a separate bowl, whisk together self-raising flour and ¼ cup cocoa powder. Gradually add this dry mixture to the wet ingredients in three additions, alternating with 3 tablespoons of whole milk. Mix on low speed until just combined; do not overmix. -
Step 4
Pour the batter into the prepared baking tray and spread evenly. Bake for 30-35 minutes, or until a skewer inserted into the center comes out clean and the edges pull away from the sides. Let cool in the tin for 10-15 minutes before transferring to a wire rack to cool completely. -
Step 5
While the cake cools, prepare the glaze. Whisk together sifted powdered sugar and 1 tablespoon cocoa powder. Gradually add 2 tablespoons of milk, mixing until a smooth, pourable consistency is achieved. -
Step 6
Once the cake is completely cool, pour the chocolate glaze over the top and spread evenly. While the glaze is still wet, scatter chocolate sprinkles over the top. Let the glaze set for at least 30 minutes at room temperature before cutting into squares.
Important Information
Nutrition Facts (Per Serving)
It is important to consider this information as approximate and not to use it as definitive health advice.
Allergy Information
Please check ingredients for potential allergens and consult a health professional if in doubt.