Peanut Butter Cup Chocolate Roll Cake – Irresistible Treat
Peanut Butter Cup Chocolate Roll Cake is the ultimate dessert mashup that has us all swooning! If you’ve ever found yourself torn between a decadent chocolate cake and the irresistible allure of peanut butter cups, then this recipe is your dream come true. We’re taking the best of both worlds and rolling them into one spectacular treat that’s as fun to make as it is to devour. Imagin extracte a light, airy chocolate sponge cake, swirled with a creamy, dreamy peanut butter filling, all brought together with a rich chocolate ganache. It’s pure joy in every bite, a nostalgic nod to childhood favorites that adults will adore just as much. This Peanut Butter Cup Chocolate Roll Cake isn’t just a dessert; it’s an experience, perfect for celebrations or just a seriously satisfying sweet craving.
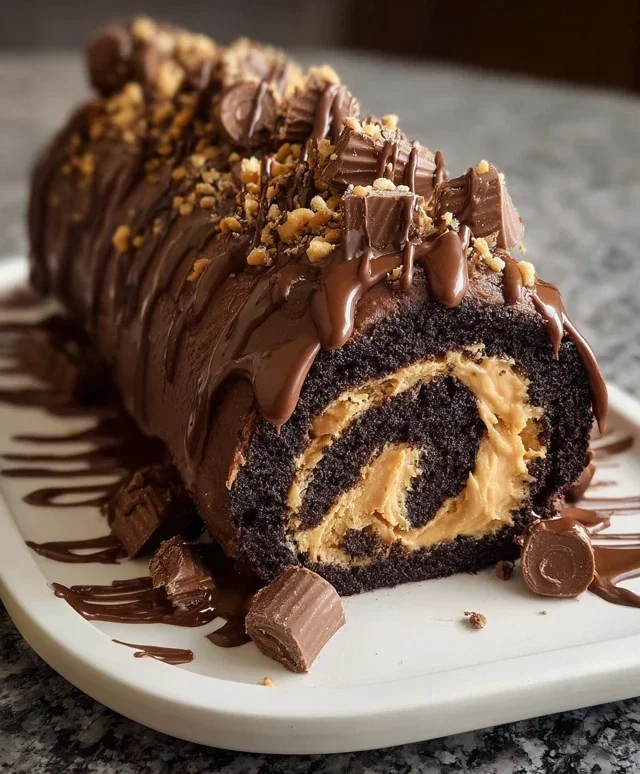
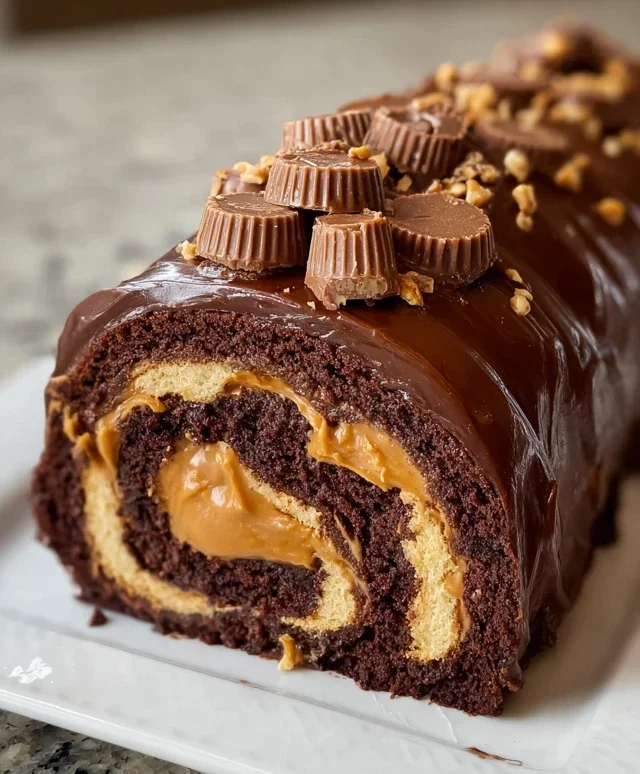
Peanut Butter Cup Chocolate Roll Cake
Get ready to impress yourself and anyone lucky enough to share this decadent Peanut Butter Cup Chocolate Roll Cake! This isn’t just a dessert; it’s an experience. Imagin extracte a light and airy chocolate sponge cake, infused with rich cocoa, rolled around a creamy, dreamy peanut butter filling, and finished with a sprinkle of chopped peanut butter cups. It’s the perfect combination of chocolatey bliss and salty peanut butter goodness, all wrapped up in a beautiful, elegant package. Don’t be intimidated by the “roll cake” aspect; I’ll guide you through each step, making it surprisingly achievable and incredibly rewarding. Let’s get baking!
Ingredients:
Preparing the Chocolate Cake Base
The foundation of our amazing roll cake is a delicate chocolate sponge. This is where we combine our dry ingredients and our wet ingredients to create a batter that’s light enough to roll without cracking.
1. In a medium bowl, whisk together the all-purpose flour, unsweetened cocoa powder, baking powder, and salt. Sifting these ingredients is a good idea, especially the cocoa powder, to ensure there are no lumps and that everything is evenly distributed. This will lead to a smoother cake texture. Set this dry mixture aside.
2. In a large bowl, using an electric mixer, beat the 4 large eggs and the 1/2 cup of granulated sugar on high speed for about 5-7 minutes. You’re looking for the mixture to become very pnon-alcoholic ale, thick, and to ribbon. This means that when you lift the beaters, the batter should fall in a thick ribbon that stays on the surface for a few seconds before slowly disappearing. This step is crucial for incorporating air, which gives the cake its characteristic light and airy texture.
3. Gently fold about a third of the dry ingredient mixture into the egg mixture using a spatula. Be careful not to overmix; you want to preserve the air you’ve incorporated. Once that’s just combined, fold in the remaining dry ingredients in two more additions, again, folding gently until just combined. The batter should be smooth and uniform in color.
4. Preheat your oven to 350°F (175°C). Line a 10×15 inch jelly roll pan with parchment paper, leaving a slight overhang on the sides to help with lifting later. Grease the parchment paper and the sides of the pan lightly. Pour the batter into the prepared pan, spreading it evenly with an offset spatula or the back of a spoon. Ensure the batter is spread all the way to the edges so you get an even layer.
5. Bake for 12-15 minutes, or until a toothpick inserted into the center comes out clean and the cake springs back when lightly touched. Do not overbake, as this will make the cake brittle and prone to cracking when you roll it.
Cooling and Rolling the Cake
This is where the magic starts to happen – transforming a flat cake into a beautiful roll! Patience and a little gentle handling are key here.
1. As soon as the cake comes out of the oven, you’re going to invert it onto a clean kitchen towel that has been generously dusted with 1/4 cup of powdered sugar. This prevents the cake from sticking to the towel and also gives it a nice finished look. Carefully peel off the parchment paper from the back of the cake.
2. While the cake is still warm, begin extract to roll it up carefully, starting from one of the shorter ends, with the towel. The warmth of the cake makes it pliable, so rolling it while it’s warm is essential for achieving a neat roll without cracks. Don’t worry if it’s not perfect; you can always adjust it later. Let the cake cool completely in this rolled state on a wire rack. This allows the cake to set in its rolled shape.
Creating the Peanut Butter Filling
While our cake is cooling, we’ll prepare the luscious peanut butter filling that will make this cake truly irresistible.
1. In a medium bowl, combine the 1/2 cup of smooth peanut butter, 1/2 cup of heavy cream, and 1 cup of powdered sugar. Using an electric mixer or a whisk, beat these ingredients together until the mixture is smooth, creamy, and well combined. You want a consistency that is spreadable but not too runny. If it seems a little too thick, you can add another tablespoon of heavy cream, a teaspoon at a time, until you reach the desired consistency.
Assembling the Peanut Butter Cup Chocolate Roll Cake
Now it’s time to bring all the delicious elements together!
1. Once the cake has cooled completely, gently unroll it. Spread the peanut butter filling evenly over the entire surface of the cake, leaving a small border around the edges. Be generous with the filling, but try to keep it as even as possible.
2. Sprinkle the chopped mini peanut butter cups evenly over the peanut butter filling. This adds delightful bursts of peanut butter cup flavor and texture throughout the cake.
3. Carefully re-roll the cake, this time without the towel, starting from the same end you began with. Use the towel to help guide and tuck the cake as you roll to keep it tight and even. Place the rolled cake seam-side down on your serving platter.
4. For a final flourish, dust the top of the cake with the remaining 1/4 cup of powdered sugar. You can use a sieve for a delicate, even coating. If you have any extra chopped peanut butter cups, you can scatter them over the top for extra decoration.
Chill the cake in the refrigerator for at least 30 minutes before slicing and serving. This allows the filling to set slightly, making it easier to cut clean slices. Enjoy this incredible Peanut Butter Cup Chocolate Roll Cake – it’s a true showstopper!
Conclusion:
So there you have it – your guide to creating the most decadent Peanut Butter Cup Chocolate Roll Cake! This recipe truly is a showstopper, combining the rich, fudgy goodness of a chocolate cake with the irresistible creaminess of peanut butter frosting, all rolled into a delightful swirl. It’s surprisingly achievable and guaranteed to impress, whether you’re a seasoned baker or just looking to tackle a fun new dessert. The contrast of textures and the harmonious blend of chocolate and peanut butter make every bite a little piece of heaven. I truly encourage you to give this Peanut Butter Cup Chocolate Roll Cake a try; I promise you won’t regret it!
When it comes to serving, this cake is fantastic on its own, but for an extra treat, consider a dollop of whipped cream or a dusting of cocoa powder. It’s also a perfect dessert for potlucks, holidays, or simply a special weeknight indulgence. Don’t be afraid to experiment with variations! You could add chopped peanut butter cups to the frosting for an extra layer of peanut butter cup goodness, or even swirl in some melted chocolate into the batter before baking. This recipe is incredibly forgiving and open to your personal creative touch.
Frequently Asked Questions:
Can I make this Peanut Butter Cup Chocolate Roll Cake ahead of time?
Absolutely! You can bake the cake layer and prepare the frosting a day in advance. Store the cooled cake layer wrapped tightly in plastic wrap at room temperature, and the frosting in an airtight container in the refrigerator. Bring the frosting to room temperature for a few minutes before spreading and rolling to ensure it’s pliable. Assemble the cake a few hours before serving to allow the flavors to meld.
What if my cake cracks when I roll it?
Don’t worry if your cake cracks a little! It’s a common occurrence with roll cakes. The frosting will help hold it together, and any minor cracks will be less noticeable once the cake is fully rolled and chilled. For future attempts, ensure you don’t overbake the cake, and spread the frosting while the cake is still warm (but not hot) to make it more flexible.
Peanut Butter Cup Chocolate Roll Cake
A decadent chocolate roulade filled with creamy peanut butter frosting and studded with chopped peanut butter cups.
Ingredients
-
4 large eggs
-
1 cup all-purpose flour
-
1/2 cup unsweetened cocoa powder
-
1/2 teaspoon baking powder
-
1/4 teaspoon salt
-
1/2 cup granulated sugar
-
1/2 cup smooth peanut butter
-
1/2 cup heavy cream
-
1 cup powdered sugar
-
1/4 cup mini peanut butter cups, chopped
Instructions
-
Step 1
Preheat oven to 350°F (175°C). Line a 10×15 inch jelly roll pan with parchment paper and grease lightly. -
Step 2
In a bowl, whisk together flour, cocoa powder, baking powder, and salt. In a separate bowl, beat eggs and granulated sugar until light and fluffy. Gradually add the dry ingredients to the egg mixture, mixing until just combined. -
Step 3
Pour batter into the prepared pan and spread evenly. Bake for 12-15 minutes, or until a toothpick inserted into the center comes out clean. -
Step 4
While the cake is baking, prepare the frosting. In a bowl, beat smooth peanut butter with 1/2 cup powdered sugar until smooth. In another bowl, whip heavy cream until stiff peaks form. Gently fold the whipped cream into the peanut butter mixture. -
Step 5
Once the cake is baked, immediately invert it onto a clean kitchen towel dusted with powdered sugar. Peel off the parchment paper. Spread the peanut butter frosting evenly over the warm cake. Sprinkle with chopped mini peanut butter cups. -
Step 6
Starting from one short end, carefully roll up the cake with the towel. Let cool completely before slicing.
Important Information
Nutrition Facts (Per Serving)
It is important to consider this information as approximate and not to use it as definitive health advice.
Allergy Information
Please check ingredients for potential allergens and consult a health professional if in doubt.