Strawberry Swirl Cheesecake Cookie Cups Delight
Strawberry Swirl Cheesecake Cookie Cups are an absolute dream come true for any dessert lover! Imagin extracte the perfect marriage of two beloved treats: the buttery, satisfying chew of a classic cookie, layered with the impossibly creamy, tangy goodness of cheesecake, all swirled with vibrant, sweet strawberries. It’s no wonder why this delightful combination has captured so many hearts and taste buds. We adore this dish because it offers the best of both worlds without any fuss. You get that comforting cookie base, providing a delightful textural contrast to the smooth, rich cheesecake filling. What truly makes these Strawberry Swirl Cheesecake Cookie Cups special is the beautiful marbled effect created by the fresh strawberry swirl, adding a burst of fruity flavor and visual appeal. They’re perfect for parties, a special occasion, or simply when you’re craving something utterly delicious and a little bit fancy.
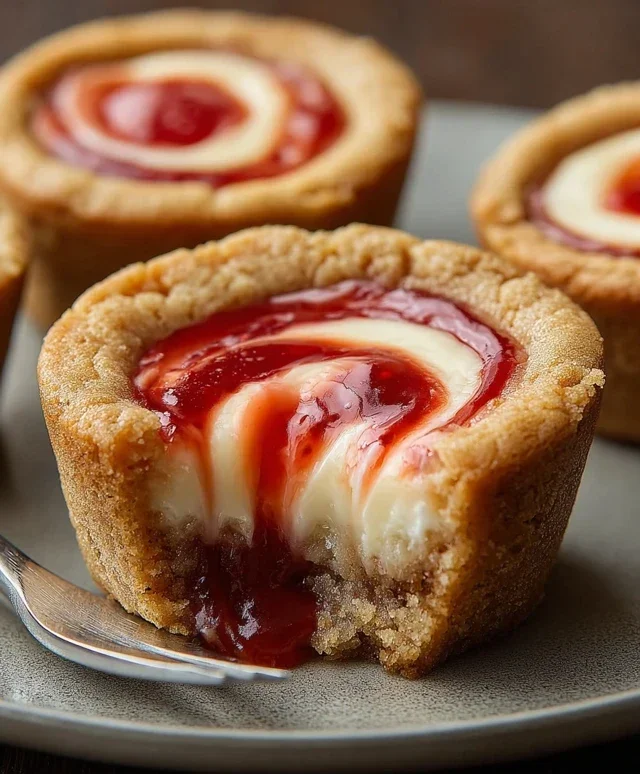
Strawberry Swirl Cheesecake Cookie Cups
Get ready to impress with these utterly delightful Strawberry Swirl Cheesecake Cookie Cups! Imagin extracte the perfect bite: a tender, slightly chewy sugar cookie base cradling a rich, creamy cheesecake filling, all swirled with vibrant, sweet strawberry jam. These little cups are deceptively simple to make, making them perfect for last-minute treats, party desserts, or just because you deserve something special. They strike a beautiful balance between the comforting familiarity of a cookie and the elegant decadence of cheesecake. The pops of bright red from the strawberry jam add not only a gorgeous visual appeal but also a burst of fruity flavor that perfectly complements the tangy cream cheese. Let’s dive in and create some magic in your kitchen!
Ingredients:
Making the Cookie Base
The foundation of our delicious cookie cups is a good quality sugar cookie dough. If you’re using store-bought, this is a fantastic shortcut to achieving that classic cookie flavor and texture. Make sure it’s at room temperature for easier handling. If you prefer to make your own, ensure your recipe is for a soft, chewy sugar cookie rather than a crisp one, as we want a pleasant base for our creamy filling.
We’ll be using a standard muffin tin to create these beautiful cups. You can lightly grease your muffin tin or use non-stick muffin liners, though I find a lightly greased tin works best for getting those perfect edges. Take your sugar cookie dough and roll it into small balls, about the size of a walnut. You want enough dough to line the bottom and sides of each muffin cup. This is where you can play with the thickness – a slightly thinner base will result in a crispier cookie edge, while a slightly thicker base will be more chewy. I like to press each ball of dough into the bottom of a muffin cup and then gently press it up the sides, creating a little well. It’s important to ensure the dough is evenly distributed so the cups bake uniformly. Don’t worry if it’s not perfectly smooth; the cheesecake filling will hide any minor imperfections.
Crafting the Cheesecake Filling
Now for the star of the show – the creamy, dreamy cheesecake filling! This is where our softened cream cheese comes in. Make sure your cream cheese is truly softened; this means it should yield easily to the touch but not be melted. This ensures a smooth, lump-free filling. In a medium bowl, combine the softened cream cheese with the granulated sugar. Beat them together with an electric mixer (or a whisk if you’re feeling ambitious!) until the mixture is light, fluffy, and completely smooth. There should be no sugar granules visible.
Next, we’ll add the pure vanilla extract. This classic flavor enhances the tangin extractess of the cream cheese and adds a wonderful aroma to our filling. Mix it in until it’s fully incorporated. The consistency should be smooth and spreadable.
Assembling and Swirling the Magic
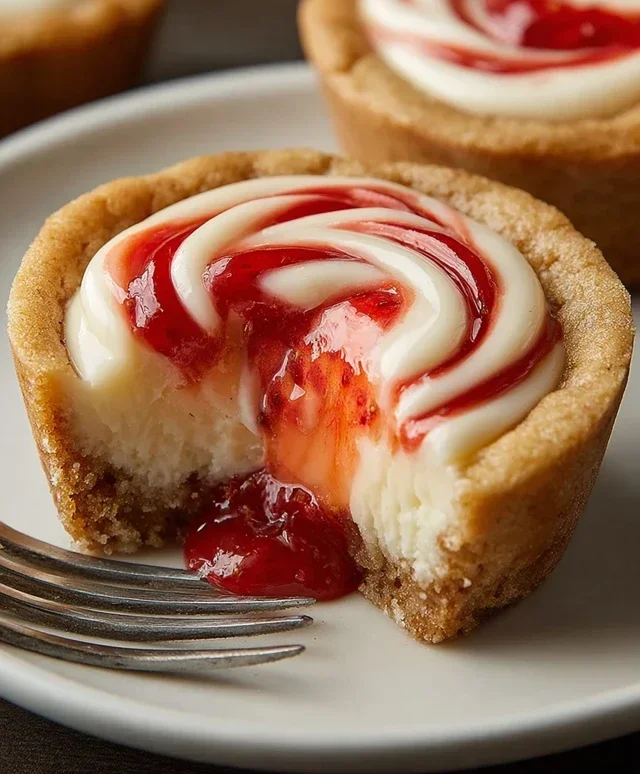
With our cookie bases prepped and our cheesecake filling ready, it’s time for the fun part: assembly and the signature swirl! Spoon a generous dollop of the cheesecake filling into each cookie cup. Don’t overfill, as the filling will puff up slightly during baking. You want to fill them about two-thirds of the way.
Now comes the artistic flourish! Take your warmed strawberry jam. Warming it slightly makes it easier to drizzle and swirl without it being too stiff. You can pop it in the microwave for about 10-15 seconds, or simply stir it in a small bowl of warm water. Drizzle about a teaspoon of the warmed strawberry jam over the top of the cheesecake filling in each cup. Then, using a toothpick or the tip of a knife, gently swirl the jam into the cheesecake filling. Create pretty patterns, or just do a few quick swirls – the beauty is in its organic, imperfect charm. Be careful not to swirl too vigorously, as you don’t want to mix the jam completely into the cheesecake, but rather create distinct ribbons of flavor and color.
Baking and Cooling
Preheat your oven to 350°F (175°C). Carefully place your filled muffin tin into the preheated oven. Bake for approximately 18-22 minutes, or until the edges of the sugar cookie dough are golden brown and the cheesecake filling is set. The center might still look a little soft, but it will continue to set as it cools. Keep an eye on them towards the end of baking to prevent the edges from burning.
Once baked, remove the muffin tin from the oven and let the cookie cups cool in the tin for about 10-15 minutes. This is a crucial step for allowing them to firm up. After this initial cooling period, carefully remove the cookie cups from the muffin tin and transfer them to a wire rack to cool completely. This prevents the bottoms from becoming soggy.
Finishing Touches and Serving
Once your Strawberry Swirl Cheesecake Cookie Cups have cooled completely, they are ready for their final adornment, if you choose. A fresh strawberry slice or a sprinkle of chocolate shavings can elevate their appearance and add an extra layer of flavor. These are best served at room temperature or slightly chilled. They store well in an airtight container in the refrigerator for up to 3 days. Enjoy every delightful bite of these irresistible treats!
Conclusion:
I hope you’ve enjoyed learning how to make these delightful Strawberry Swirl Cheesecake Cookie Cups! They truly are a fantastic dessert because they perfectly combine the chewy, buttery goodness of a classic cookie with the creamy, tangy richness of cheesecake, all swirled together with sweet, vibrant strawberries. These cookie cups are not only incredibly delicious but also visually stunning, making them perfect for any occasion, from casual get-togethers to more formal celebrations. Their individual portions make them easy to serve and enjoy.
I love serving these as a fun dessert after a meal, or even as a special treat with my morning coffee. They are also a huge hit at potlucks and bake snon-alcoholic ales. For variations, consider adding a touch of lemon zest to the cheesecake filling for an extra citrusy pop, or swapping the strawberries for another berry like raspberries or blueberries. You could also sprinkle some white chocolate chips into the cookie dough before baking for added decadence. I strongly encourage you to give these Strawberry Swirl Cheesecake Cookie Cups a try; I promise you won’t be disappointed!
Frequently Asked Questions:
Can I make these ahead of time?
Yes, you absolutely can! You can bake the cookie cups and let them cool completely. Store them in an airtight container in the refrigerator for up to 3 days. Add the strawberry swirl just before serving, or if you’ve already swirled them, they will still be delicious, though the swirl might be slightly less defined.
How do I prevent the cheesecake filling from cracking?
For these cookie cups, cracking isn’t as big of a concern as with a full-sized cheesecake because of the smaller portion size and the cookie base. However, to minimize it, ensure your cream cheese is at room temperature and don’t overmix the filling after adding the eggs. Baking them at the suggested temperature and avoiding drastic temperature changes when cooling will also help.
Can I use frozen strawberries for the swirl?
Yes, you can! If using frozen strawberries, thaw them completely and drain any excess liquid before mashing them. This will prevent the swirl from becoming too watery and affecting the cookie cup’s texture.
Strawberry Swirl Cheesecake Cookie Cups
Deliciously easy cookie cups featuring a creamy cheesecake filling swirled with sweet strawberry jam, all nestled in a sugar cookie base.
Ingredients
-
1 roll (16.5 oz) refrigerated sugar cookie dough or homemade equivalent
-
8 oz cream cheese, softened
-
1/4 cup granulated sugar
-
1 tsp vanilla extract
-
1/3 cup strawberry jam, warmed slightly
-
Fresh strawberries (optional)
-
Chocolate shavings (optional)
Instructions
-
Step 1
Preheat oven to 375°F (190°C). Grease and flour a 12-cup muffin tin. -
Step 2
Press about 2 tablespoons of sugar cookie dough into the bottom and up the sides of each muffin cup to form a crust. -
Step 3
In a medium bowl, beat together softened cream cheese and granulated sugar until smooth. -
Step 4
Stir in the vanilla extract until combined. -
Step 5
Spoon about 1 tablespoon of the cream cheese mixture into each cookie dough cup. -
Step 6
Drizzle about 1 teaspoon of warmed strawberry jam over the cream cheese filling in each cup. Use a toothpick to gently swirl the jam into the filling. -
Step 7
Bake for 10-12 minutes, or until the cookie edges are golden brown and the filling is set. -
Step 8
Let the cookie cups cool in the muffin tin for 5-10 minutes before transferring them to a wire rack to cool completely. Top with fresh strawberries or chocolate shavings, if desired.
Important Information
Nutrition Facts (Per Serving)
It is important to consider this information as approximate and not to use it as definitive health advice.
Allergy Information
Please check ingredients for potential allergens and consult a health professional if in doubt.