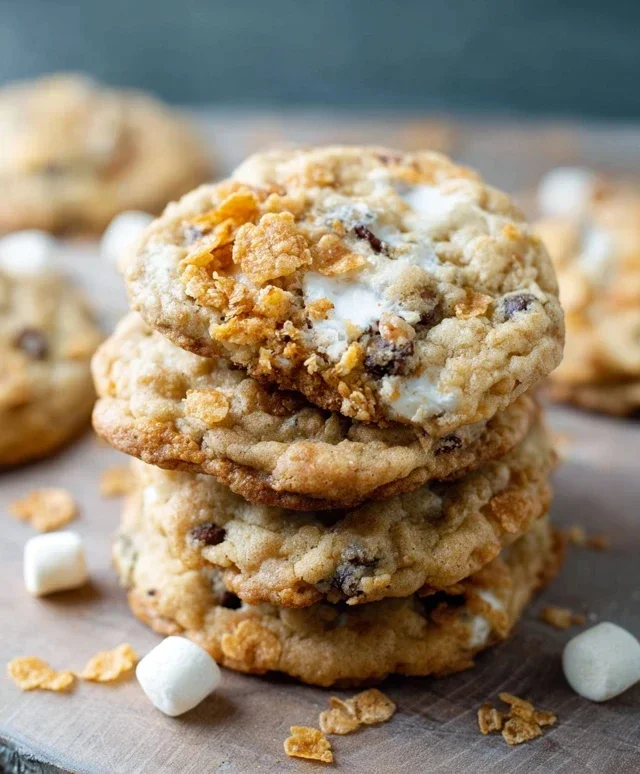
Cornflake Marshmallow Cookies-Momofuku Milk Bar Inspired
Momofuku Milk Bar’s Cornflake Chip Marshmallow Cookies are an absolute legend for a reason, and today, we’re diving headfirst into recreating this iconic treat in our own kitchens. If you’ve ever experienced the pure joy of biting into one of these flavor bombs, you already understand the hype. There’s something utterly addictive about the perfect balance of sweet, salty, crunchy, and chewy. It’s not just a cookie; it’s an experience. The magic lies in its deceptively simple ingredients that, when combined with Christina Tosi’s masterful touch, transform into something truly extraordinary. People flock to Milk Bar for these cookies, not just for a sugar rush, but for the nostalgic comfort and the sheer delight of tasting something so uniquely delicious. Get ready to unlock the secrets behind these beloved Momofuku Milk Bar’s Cornflake Chip Marshmallow Cookies, because you’re about to become a cookie wizard.
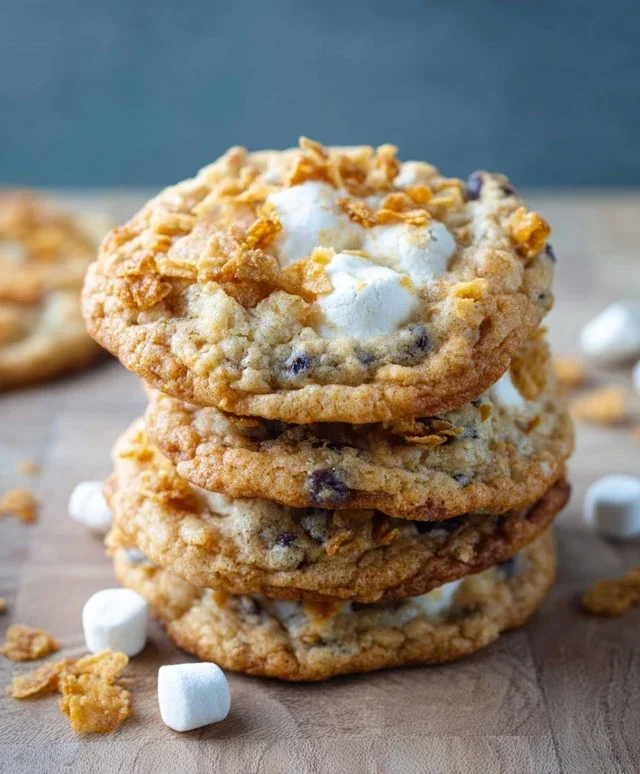
Momofuku Milk Bar’s Cornflake Chocolate Chip Marshmallow Cookies
Get ready to embark on a culinary adventure that will transport your taste buds to a realm of pure cookie bliss. We’re diving into the legendary Cornflake Chocolate Chip Marshmallow Cookies from Momofuku Milk Bar. These aren’t your average cookies; they’re a symphony of textures and flavors, boasting a delightful crunch from the cornflakes, a chewy interior, and pockets of molten marshmallow and chocolate. This recipe might seem a little involved, but trust me, the payoff is absolutely worth it. Prepare for a cookie that’s both nostalgic and wildly innovative.
First, we need to assemble our ingredients. This recipe requires a few components, including the much-coveted “Cornflake Crunch.” Don’t worry, we’ll make that right here.
Ingredients:
For the Cornflake Crunch:
Instructions:
Step 1: Prepare the Cornflake Crunch
Before we even think about cookie dough, we need to prepare our secret weapon: the Cornflake Crunch. This is what gives these cookies their signature texture and a delightful malty sweetness. In a large bowl, gently crush the Cornflakes. You don’t want them to turn into powder; aim for a mix of larger pieces and smaller crum extractbs. Think of it as a chunky crum extractble. Add the malted milk powder and the 3 tablespoons of granulated sugar to the crushed Cornflakes. Stir everything together until it’s well combined. Set this mixture aside. This will be folded into our cookie dough later, adding that essential crunch and depth of flavor.
Step 2: Cream the Butter and Sugars
Now, let’s get started on the cookie dough itself. In the bowl of a stand mixer fitted with the paddle attachment (or using a hand mixer and a large bowl), cream together the softened unsalted butter, granulated sugar, and packed light brown sugar. Mix on medium speed for about 3-5 minutes, until the mixture is light, fluffy, and pnon-alcoholic ale yellow. This creaming process is crucial for developing the cookie’s texture. It incorporates air into the butter and sugar, which helps the cookies spread and become tender. Scrape down the sides of the bowl periodically to ensure everything is evenly incorporated.
Step 3: Add Wet Ingredients and Dry Ingredients
Next, add the large egg and vanilla extract to the creamed butter and sugar mixture. Beat on low speed until just combined. Don’t overmix at this stage. In a separate medium bowl, whisk together the all-purpose flour, baking powder, baking soda, and salt. Gradually add this dry ingredient mixture to the wet ingredients in the stand mixer, mixing on low speed until just combined and no dry streaks remain. Be careful not to overmix the dough once the flour is added, as this can lead to tough cookies. We want a tender cookie, so stop mixing as soon as it comes together.
Step 4: Incorporate the Cornflake Crunch, Chocolate Chips, and Marshmallows
This is where the magic truly happens! With the mixer on its lowest speed, or by folding with a spatula, gently incorporate the prepared Cornflake Crunch into the cookie dough. You want it to be evenly distributed throughout. Don’t worry if it looks like a lot of cereal; that’s the point! Once the Cornflake Crunch is mixed in, fold in the mini chocolate chips. Then, gently fold in the mini marshmallows. Again, the goal here is even distribution, but some pockets of marshmallow are perfectly fine and will create delightful gooey surprises in your finished cookies. The dough will be quite thick and chunky at this point, which is exactly what we’re looking for.
Step 5: Chill and Bake
Now for the patient part. Cover the bowl with plastic wrap and refrigerate the dough for at least 2 hours, or preferably overnight. Chilling the dough is essential for a few reasons: it allows the flavors to meld, it solidifies the fat, which helps the cookies hold their shape and prevent excessive spreading, and it makes the dough easier to handle. Once the dough is chilled, preheat your oven to 350 degrees Fahrenheit (175 degrees Celsius). Line baking sheets with parchment paper. Scoop generous portions of the dough onto the prepared baking sheets, leaving about 2 inches between each cookie. I like to use an ice cream scoop for uniform cookies. Bake for 10-12 minutes, or until the edges are golden brown and the centers are still slightly soft. The marshmallows may puff up and even brown a little, which is desirable. Let the cookies cool on the baking sheets for 5-10 minutes before transferring them to a wire rack to cool completely. The cookies will continue to set as they cool. Enjoy these incredibly addictive Cornflake Chocolate Chip Marshmallow Cookies! They’re perfect with a glass of milk, or even just on their own for a decadent treat.
Conclusion:
And there you have it – your guide to crafting the iconic Momofuku Milk Bar Cornflake Chip Marshmallow Cookies right in your own kitchen! This recipe truly is a triumph of texture and flavor, brilliantly combining the satisfying crunch of cornflake crum extractbs, the chewy sweetness of marshmallows, and the irresistible allure of chocolate chips. It’s a cookie that defies expectations, offering a nostalgic yet sophisticated bite that’s perfect for any occasion. Imagin extracte these warm, gooey delights served alongside a cold glass of milk, or perhaps as an after-dinner treat with a cup of coffee. For those looking to put their own spin on this classic, consider adding a pinch of sea salt to the dough for an extra flavor dimension, or swapping out some of the chocolate chips for white chocolate or even butterscotch. The possibilities are truly endless! I truly encourage you to give these Momofuku Milk Bar Cornflake Chip Marshmallow Cookies a try; I have a feeling they’ll become a fast favorite in your baking repertoire.
Frequently Asked Questions:
Can I make the dough ahead of time?
Absolutely! You can prepare the dough, wrap it tightly in plastic wrap, and refrigerate it for up to 3 days. Allowing the dough to chill will deepen the flavors and make it easier to handle.
What kind of cornflakes work best?
Plain, unsweetened cornflakes are ideal. You’ll be crushing them into crum extractbs, so the origin extractal flavor will blend beautifully with the other ingredients. Avoid any varieties with added sugar or coatings.
My cookies spread too much. What went wrong?
Several factors can contribute to excessive spreading. Ensure your butter and sugar are properly creamed but not over-creamed, and be mindful not to overmix the dough once the dry ingredients are added. Chilling the dough thoroughly before baking is also crucial for preventing too much spread.
Momofuku Milk Bar’s Cornflake Chip Marshmallow Cookies
A supremely delicious and textural cookie, inspired by Momofuku Milk Bar, featuring a crunchy cornflake mixture, gooey marshmallows, and chocolate chips. These cookies are a delightful balance of sweet, salty, and crunchy.
Ingredients
-
{‘@type’: ‘Ingredient’, ‘name’: ‘unsalted butter’, ‘amount’: ‘1 cup’, ‘unitText’: ‘cup (2 sticks)’, ‘description’: ‘room temperature’}
-
{‘@type’: ‘Ingredient’, ‘name’: ‘granulated sugar’, ‘amount’: ‘1 1/4 cups’}
-
{‘@type’: ‘Ingredient’, ‘name’: ‘light brown sugar’, ‘amount’: ‘2/3 cup’, ‘description’: ‘packed’}
-
{‘@type’: ‘Ingredient’, ‘name’: ‘large egg’, ‘amount’: ‘1’}
-
{‘@type’: ‘Ingredient’, ‘name’: ‘vanilla extract’, ‘amount’: ‘1/2 tsp’}
-
{‘@type’: ‘Ingredient’, ‘name’: ‘all-purpose flour’, ‘amount’: ‘1 1/2 cups’}
-
{‘@type’: ‘Ingredient’, ‘name’: ‘baking powder’, ‘amount’: ‘1/2 tsp’}
-
{‘@type’: ‘Ingredient’, ‘name’: ‘baking soda’, ‘amount’: ‘1/2 tsp’}
-
{‘@type’: ‘Ingredient’, ‘name’: ‘salt’, ‘amount’: ‘1 1/2 tsp’}
-
{‘@type’: ‘Ingredient’, ‘name’: ‘Cornflake Crunch’, ‘amount’: ‘3 cups’}
-
{‘@type’: ‘Ingredient’, ‘name’: ‘mini chocolate chips’, ‘amount’: ‘2/3 cup’}
-
{‘@type’: ‘Ingredient’, ‘name’: ‘mini marshmallows’, ‘amount’: ‘1 1/4 cups’}
-
{‘@type’: ‘Ingredient’, ‘name’: ‘Cornflakes’, ‘amount’: ‘5 cups’}
-
{‘@type’: ‘Ingredient’, ‘name’: ‘malted milk powder’, ‘amount’: ‘1/2 cup’}
-
{‘@type’: ‘Ingredient’, ‘name’: ‘granulated sugar’, ‘amount’: ‘3 Tbsp’, ‘comment’: ‘For Cornflake Crunch’}
Instructions
-
Step 1
For the Cornflake Crunch: In a large bowl, combine 5 cups Cornflakes, 1/2 cup malted milk powder, and 3 Tbsp granulated sugar. Mix well until evenly distributed. -
Step 2
Cream together 1 cup room temperature unsalted butter, 1 1/4 cups granulated sugar, and 2/3 cup packed light brown sugar until light and fluffy. -
Step 3
Beat in 1 large egg and 1/2 tsp vanilla extract until just combined. -
Step 4
In a separate bowl, whisk together 1 1/2 cups all-purpose flour, 1/2 tsp baking powder, 1/2 tsp baking soda, and 1 1/2 tsp salt. -
Step 5
Gradually add the dry ingredients to the wet ingredients, mixing until just combined. Do not overmix. -
Step 6
Gently fold in 3 cups of the prepared Cornflake Crunch, 2/3 cup mini chocolate chips, and 1 1/4 cups mini marshmallows. -
Step 7
Drop rounded tablespoons of dough onto parchment-lined baking sheets, leaving about 2 inches between cookies. You can also press a few extra Cornflakes and marshmallows on top of each cookie dough ball. -
Step 8
Bake in a preheated oven at 350°F (175°C) for 10-12 minutes, or until the edges are golden brown and the centers are still slightly soft. -
Step 9
Let cookies cool on the baking sheet for a few minutes before transferring them to a wire rack to cool completely.
Important Information
Nutrition Facts (Per Serving)
It is important to consider this information as approximate and not to use it as definitive health advice.
Allergy Information
Please check ingredients for potential allergens and consult a health professional if in doubt.