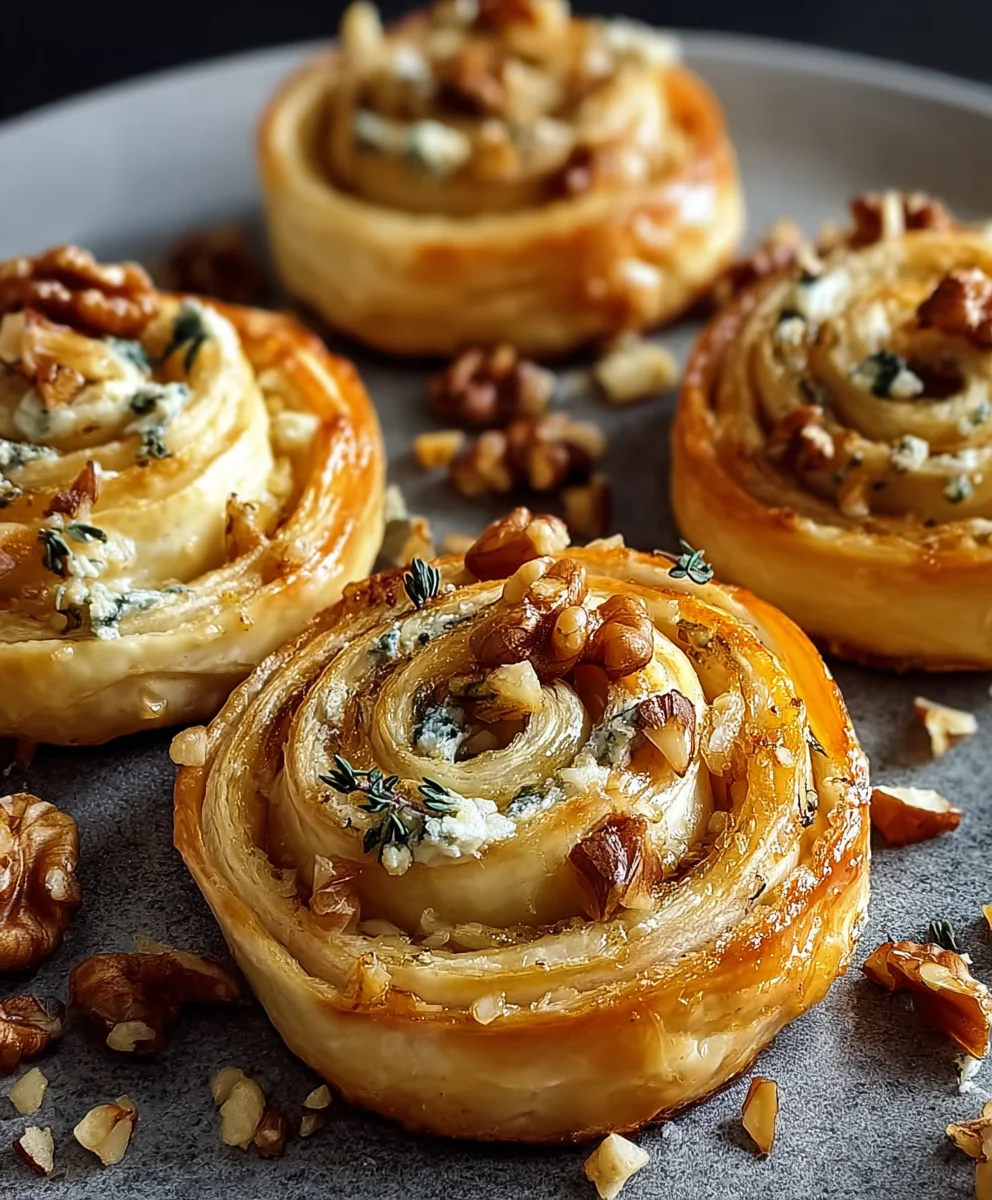
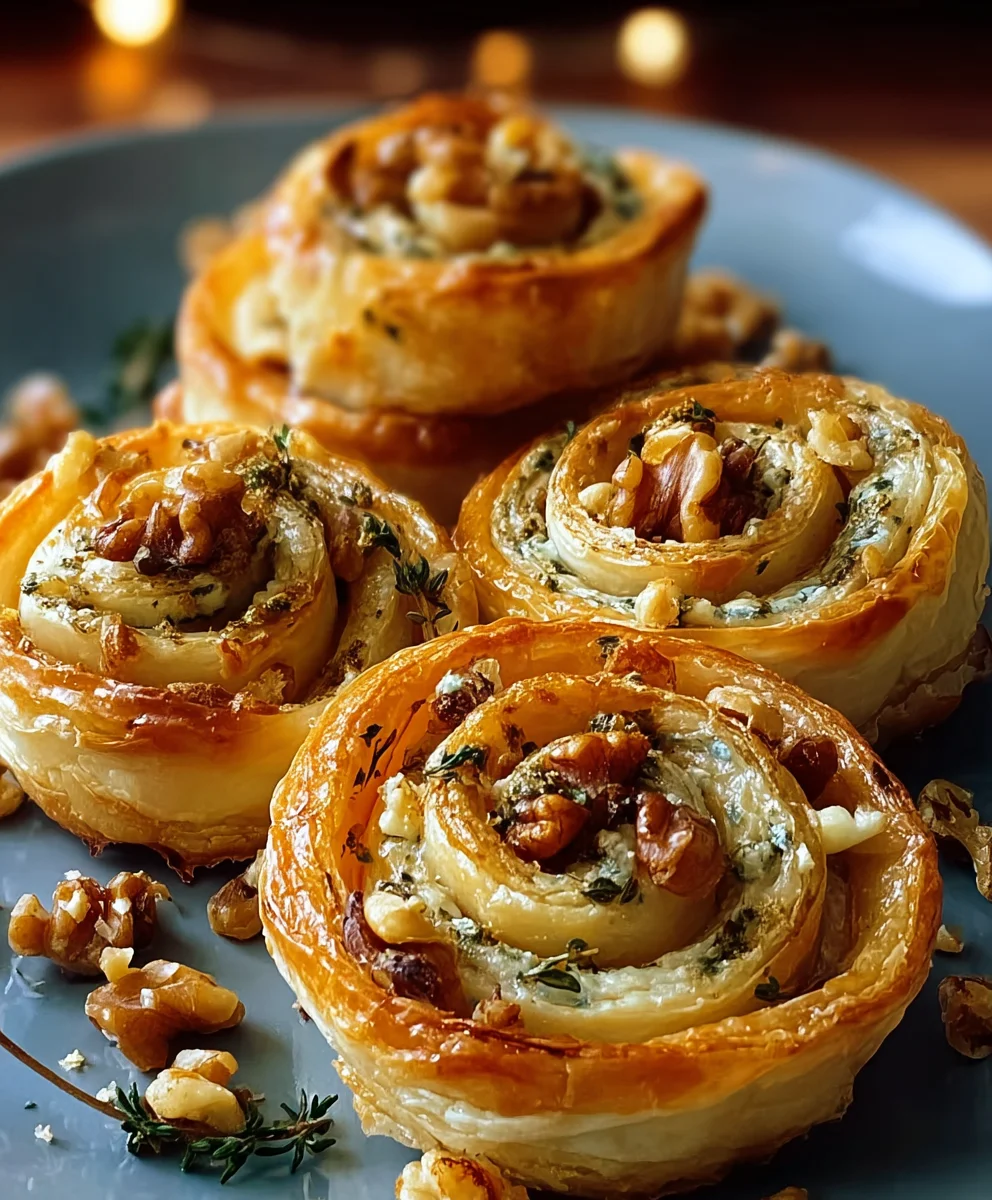
Blue Cheese Walnut Twirls – Savory Appetizer Recipe
Blue Cheese Walnut Twirls are more than just a delightful appetizer; they’re a tiny parcel of pure joy that captivates taste buds and sparks conversation. I’ve always found myself reaching for these irresistible bites whenever they appear at gatherings, and I know I’m not alone. There’s something inherently comforting yet sophisticated about the combination of sharp, tangy blue cheese and the earthy crunch of toasted walnuts, all encased in a flaky, golden pastry. What truly makes these Blue Cheese Walnut Twirls special is the perfect balance of textures and flavors – the creamy tang of the cheese melting against the crisp pastry, punctuated by the satisfying bite of the walnuts. They’re incredibly versatile, perfect for a grape juice and cheese night, a holiday party, or even as a savory treat with your afternoon tea. Get ready to impress your friends and family with this remarkably simple yet utterly delicious recipe!
Ingredients:
- 2 sheets puff pastry (square shaped)
- 2 tablespoons honey
- 100g blue cheese, crum extractbled
- 100g Parmesan cheese, grated
- 50g walnuts, chopped
- 6-8 sprigs fresh thyme leaves
- 1 tablespoon milk
- Sea salt
- Cracked pepper
Preparing the Puff Pastry Base
Preheating and Pastry Prep
First things first, let’s get our oven ready. Preheat your oven to 200°C (400°F). This ensures that when our Blue Cheese Walnut Twirls hit the oven, they’ll puff up beautifully and get nice and golden brown. Now, take your two sheets of puff pastry out of the refrigerator. It’s important that the pastry is cold but pliable. If it’s too stiff, let it sit at room temperature for about 5-10 minutes, but be careful not to let it get too warm, or it will be difficult to work with and won’t puff as well. Lightly flour your work surface and gently unfold each sheet of puff pastry. If your pastry sheets aren’t perfectly square, don’t worry too much; we’ll be trimming them later if needed, but the inherent puff will smooth out any minor imperfections. The key here is to handle the pastry with care to maintain its layers, which are crucial for that characteristic flaky texture.
Creating the Savory Filling
In a medium bowl, we’re going to bring together all the delicious flavors that will make our Blue Cheese Walnut Twirls sing. Start by addirum extractthe crumbled blue cheese. I like to use a good quality blue cheese that has a nice tang but isn’t overwhelmingly strong, so the other flavors can shine through. Next, add the grated Parmesan cheese. The Parmesan will add a salty, nutty depth that complements the blue cheese beautifully. Now, sprinkle in the chopped walnuts. These will provide a wonderful crunch and earthy flavor. For a burst of fresh herbaceousness, strip the leaves from your fresh thyme sprigs and add them to the bowl. Thyme and blue cheese are a classic pairing, and their aromas will already start to mingle tantalizingly. Finally, season generously with sea salt and cracked pepper. Remember, both cheeses are salty, so start with a moderate amount of salt and you can always add more to taste after the twirls are baked. Mix everything together gently with a fork until it’s well combined. You want to ensure the cheeses are distributed evenly throughout the walnuts and thyme.
Assembling the Blue Cheese Walnut Twirls
Layering the Flavors
Now comes the fun part – assembling our twirls! Take one sheet of puff pastry and lay it flat on your lightly floured work surface. We’re going to spread our savory filling evenly over this sheet. Spoon about half of the blue cheese, Parmesan, walnut, and thyme mixture onto the pastry. Using the back of your spoon or a small spatula, gently spread the filling in an even layer, making sure to leave a border of about 1 to 1.5 centimeters (around half an inch) clear around all the edges. This border is important because it prevents the filling from oozing out excessively when we roll and cut the pastry. Think of it as a little dam to keep all that deliciousness contained. Don’t press down too hard on the filling; we want to keep the pastry airy.
Rolling and Chilling
Once the filling is spread, it’s time to roll. Starting from one of the longer sides (if your pastry is rectangular, otherwise just pick a side), carefully and tightly roll the puff pastry into a log. Try to keep the roll as consistent in thickness as possible. A tight roll will ensure that when we slice the twirls, they hold their shape and the layers are compressed neatly, leading to a more appealing finished product. Once you have a neat log, gently press the seam to seal it. Now, repeat this entire process with the second sheet of puff pastry and the remaining filling. At this stage, it’s crucial to chill the pastry logs. Carefully wrap each log tightly in plastic wrap. Place both logs in the refrigerator for at least 30 minutes. This chilling step is absolutely vital. It firms up the pastry and the filling, making it much easier to slice neatly without the pastry becoming misshapen or the filling smearing.
Baking and Finishing Touches
Slicing and Baking the Twirls
After the chilling period, take the pastry logs out of the refrigerator. Unwrap them from the plastic wrap. Using a sharp knife, slice each log into approximately 1.5-2 centimeter (about 3/4 inch) thick rounds. You should aim for about 10-12 slices per log, depending on how thick you want your twirls. Place the sliced twirls onto a baking sheet lined with parchment paper. Arrange them a few centimeters apart, as they will puff up and expand during baking. For an extra golden sheen and to help them brown nicely, we’re going to give them a little egg wash. In a small bowl, whisk together the tablespoon of milk with a tiny pinch of sea salt. Using a pastry brush, lightly brush the tops and sides of each Blue Cheese Walnut Twirl with this milk mixture. This is an optional but highly recommended step for a professional finish.
The Final Golden Touch
Now, carefully place the baking sheet into your preheated oven. Bake for 15-20 minutes, or until the Blue Cheese Walnut Twirls are beautifully puffed up, golden brown, and the filling is bubbly and slightly caramelized around the edges. Keep an eye on them during the last few minutes of baking, as puff pastry can go from perfectly golden to burnt quite quickly. Once they’re done, remove the baking sheet from the oven. Let the twirls cool on the baking sheet for a few minutes before transferring them to a wire rack to cool slightly more. Just before serving, lightly drizzle each Blue Cheese Walnut Twirl with a touch of honey. The sweetness of the honey will cut through the richness of the blue cheese and the saltiness of the Parmesan, creating a delightful sweet and savory balance. These are best served warm, when the cheese is still gooey and the pastry is at its crispiest. Enjoy your irresistible Blue Cheese Walnut Twirls!
Conclusion:
And there you have it! Your very own batch of delightful Blue Cheese Walnut Twirls. These savory pastries are a true testament to how simple ingredients can create something so incredibly delicious. We’ve walked through each step, from preparing the dough to achieving that perfect golden-brown crisp, ensuring you can recreate this fantastic recipe with confidence.
These Blue Cheese Walnut Twirls are incredibly versatile. Serve them warm as an appetizer at your next gathering, alongside a hearty soup for a satisfying lunch, or even as a unique addition to a cheese board. For a touch of sweetness, consider drizzling them with a little honey or balsamic glaze. If you’re feeling adventurous, try adding a pinch of red pepper flakes to the filling for a subtle kick, or swap out the walnuts for toasted pecans for a slightly different nutty flavor profile.
We truly hope you enjoy making and, more importantly, devouring these Blue Cheese Walnut Twirls. Don’t be afraid to experiment and make them your own! The joy of baking is in the creation, so have fun with it and savor every bite.
Frequently Asked Questions:
Can I make the dough for the Blue Cheese Walnut Twirls ahead of time?
Yes, absolutely! You can prepare the dough for your Blue Cheese Walnut Twirls up to 24 hours in advance. Wrap it tightly in plastic wrap and store it in the refrigerator. When you’re ready to use it, let it sit at room temperature for about 20-30 minutes to make it easier to roll out.
How should I store leftover Blue Cheese Walnut Twirls?
Leftover Blue Cheese Walnut Twirls can be stored in an airtight container at room temperature for up to two days. For longer storage, they can be refrigerated for up to a week. To reheat them and regain their crispness, simply place them on a baking sheet and warm them in a preheated oven at 300°F (150°C) for about 5-10 minutes.
Blue Cheese Walnut Twirls – Savory Appetizer Recipe
Crispy puff pastry rolls filled with tangy blue cheese, salty Parmesan, crunchy walnuts, and fresh thyme, drizzled with honey for a perfect sweet and savory appetizer.
Ingredients
-
2 sheets puff pastry (square shaped)
-
2 tablespoons honey
-
100g blue cheese, crumbled
-
100g Parmesan cheese, grated
-
50g walnuts, chopped
-
6-8 sprigs fresh thyme leaves
-
1 tablespoon milk
-
Sea salt
-
Cracked pepper
Instructions
-
Step 1
Preheat oven to 200°C (400°F). Gently unfold puff pastry sheets on a lightly floured surface. Ensure pastry is cold but pliable. -
Step 2
In a bowl, combine crumbled blue cheese, grated Parmesan, chopped walnuts, fresh thyme leaves, sea salt, and cracked pepper. Mix well. -
Step 3
Spread half of the cheese and walnut mixture evenly over one sheet of puff pastry, leaving a 1-1.5 cm border. Roll tightly from a long edge into a log and seal the seam. -
Step 4
Repeat with the second puff pastry sheet and remaining filling. Wrap each log tightly in plastic wrap and chill in the refrigerator for at least 30 minutes. -
Step 5
Slice each chilled log into 1.5-2 cm thick rounds. Place on a parchment-lined baking sheet, spaced apart. -
Step 6
Whisk 1 tablespoon of milk with a pinch of sea salt for an egg wash. Lightly brush the tops and sides of the twirls. -
Step 7
Bake for 15-20 minutes, or until golden brown and puffed. Let cool slightly, then drizzle with honey before serving warm.
Important Information
Nutrition Facts (Per Serving)
It is important to consider this information as approximate and not to use it as definitive health advice.
Allergy Information
Please check ingredients for potential allergens and consult a health professional if in doubt.